Extend your legacy date fields to support a richer set of date values and improve the performance of your reports.
In my previous TechTip, "Converting Legacy Date Fields to DB2 Web Query Dates, Part I," I described how to use the powerful DB2 Web Query for IBM i built-in functions (BIFs) to convert your legacy date fields to "smart dates." These smart dates are virtual columns stored in the metadata and, as such, can be used in DB2 Web Query reports and graphs just like any other field in the data source. In Part II of this TechTip, I'll show you an alternate way of extending your legacy date fields to support a richer set of date values and improve the performance of your reports. This technique involves the introduction of a new table (physical file) to your database: the date conversion table.
Date Conversion Table
The idea behind a date conversion table is relatively simple. Create a table that contains one row for each individual day within a specified date range. Each row is made up of columns that represent the same date value in various ways (e.g., day of week). Your reporting and business intelligence requirements will dictate how many date value representations you add to your conversion table. For example, a date conversion table could include the following columns:
- Julian date
- Date (a "true" DB2 date field)
- Fiscal year
- Fiscal quarter
- Day of the week (Monday, Tuesday, etc.)
- Month of the year (January, February, etc.)
- Season (spring, summer, autumn, winter)
- Super Bowl Sunday flag (Y or N)
- Day before a holiday flag (Y or N)
- Day after a holiday flag (Y or N)
- Full moon flag (Y or N)
- And so on
In order for this technique to work, the date conversion table must have a column that represents the date in the same format as the legacy file. When the report is run, the join operation is applied to rows in the date conversation table that match those in the legacy file. This matching column in the conversion table will be the unique key. Defining a referential constraint relationship between the two tables will enable DB2 Web Query to recognize this join relationship between the tables and generate the SQL join syntax necessary to join the legacy file and the date conversion table. The result is a very efficient date conversion implementation and a faster-running report.
With this technique, each date format in the date conversion table is available to the DB2 Web Query development tools and therefore can be easily be included in any report. This gives the report developer the ability to effortlessly do some interesting customized analysis. For example:
- What are the profit margins on days before and after holidays?
- What is the rate of product returns on the day after Christmas as compared to any other day of the year?
- Are more galoshes sold in the spring or the fall?
- How many cases of motor oil are sold on days when there is a full moon?
To be thorough, you will want your conversion table to contain a broad range of dates (for example, every day between January 1, 1900, and December 31, 2030). This way, any possible dates in your legacy files would have a matching row in the conversion table. Don't be too concerned about the size of the date conversion table; to represent every day in this 130-year range, the table would contain 47,847 rows. This is a relatively small table in most IBM i shops.
The beauty of this technique is that the conversion has been performed before any report has been run. Each possible day is represented by a row in the table that has already been converted in all the different formats that you have specified. Consequently, instead of the DB2 Web Query tool (or any other application that uses this method) performing the CPU-intensive date conversions, the work is pushed down into DB2. However, the work done by DB2 for i is not date conversion work at all, but rather joining the rows from the legacy file to the date conversion table. Since the database engine is very good at join processing (especially if the right indexes are in place), the result is faster delivery of reports that rely on intensive date conversions.
Steps to Implement the Date Conversion Table
Implementing the date conversion method is relatively simple and can be performed in the following five steps:
- Create the date conversion table.
- Populate the date conversion table.
- Create constraints.
- Create a synonym against the legacy file.
- Create reports.
Step 1: Create the Date Conversion Table
The first step for this solution should be obvious: You need to create the table that stores the converted dates for each day in your date range. An example with various ways that dates can be represented is provided below. Execute these SQL statements from any SQL interface.
CREATE TABLE DATE_CONV (
DC_DATE DATE ,
DC_MDYY_PD DECIMAL(8, 0),
DC_MDYY_CHAR CHAR(8),
DC_YEAR INTEGER ,
DC_DOW INTEGER ,
DC_DOY INTEGER,
DC_QOY INTEGER,
DC_CC NUMERIC(2, 0),
DC_YY NUMERIC(2, 0),
DC_MM NUMERIC(2, 0),
DC_DD NUMERIC(2, 0),
DC_DAY_NAME CHAR(9),
DC_QUARTER_NAME FOR COLUMN DC_QTR_NAM CHAR(6) ,
DC_WEEKEND CHAR(1),
DC_HOLIDAY CHAR(1),
DC_BEFORE_HOLIDAY FOR COLUMN DC_BFR_HOL CHAR(1),
DC_AFTER_HOLIDAY FOR COLUMN DC_AFT_HOL CHAR(1),
DC_SEASON CHAR(6) DEFAULT NULL,
DC_FISCAL_YEAR FOR COLUMN DC_FIS_YR INTEGER,
DC_FISCAL_QUARTER FOR COLUMN DC_FIS_QTR INTEGER,
DC_MONTH_NAME FOR COLUMN DC_MO_NM CHAR(9),
DC_MONTH_ABRV FOR COLUMN DC_MO_ABV CHAR(3),
DC_JULIAN NUMERIC(7, 0),
DC_FULL_MOON FOR COLUMN DC_FLLMOON CHAR(1));
LABEL ON COLUMN DATE_CONV
(
DC_DATE TEXT IS 'Date (date format)',
DC_YEAR TEXT IS 'Year (4 digits)' ,
DC_MDYY_PD TEXT IS 'Date (MMDDYYY decimal)',
DC_MDYY_CHAR TEXT IS 'Date (MMDDYYY character)',
DC_DOW TEXT IS 'Day of week (1-7)',
DC_DOY TEXT IS 'Day of year (1-366)',
DC_QOY TEXT IS 'Quarter of year (1-4)',
DC_CC TEXT IS 'Century (2 digits)',
DC_YY TEXT IS 'Year (2 digits)',
DC_MM TEXT IS 'Month (2 digits)',
DC_DD TEXT IS 'Day (2 digits)',
DC_DAY_NAME TEXT IS 'Day of Week Name (Monday,etc.)',
DC_QUARTER_NAME TEXT IS 'Quarter name (2008Q1)',
DC_WEEKEND TEXT IS 'Weekend Flag (Y or N)',
DC_HOLIDAY TEXT IS 'Holiday Flag (Y or N)',
DC_BEFORE_HOLIDAY TEXT IS 'Day Before Holiday Flag (Y or N)',
DC_AFTER_HOLIDAY TEXT IS 'Day After Holiday Flag (Y or N)',
DC_SEASON TEXT IS 'Season (Spring, Summer, Autumn, Winter)',
DC_FISCAL_YEAR TEXT IS 'Fiscal year (4 digits)',
DC_FISCAL_QUARTER TEXT IS 'Fiscal quarter (1-4)',
DC_MONTH_NAME TEXT IS 'Month name (January, etc)',
DC_MONTH_ABRV TEXT IS 'Month abbreviation (Jan, Feb, etc)',
DC_JULIAN TEXT IS 'Date in Julian format',
DC_FULL_MOON TEXT IS 'Full Moon Flag (Y or N)');
|
|
To be honest, I actually do not know of any application that needs to know whether a particular day falls on a full moon. The point here is that you have the ability and freedom to provide creative types of dates in your reports and deliver this information to your report consumers.
Step 2: Populate the Date Conversion Table
Now that you have a date conversion table, the next step is to load it with data. There are various ways you can do this, but the recommended approach is to leverage the power of SQL and all its built-in date functions. An example SQL stored procedure has been provided below. Simply create and run this stored procedure from any SQL interface.
Note: In order for this stored procedure to work as written, you will first need to make sure that the date format for your SQL session is *ISO. This can be done by checking JDBC settings from Run SQL Script window, or if you are using interactive SQL (STRSQL command), press F13=Services and then select option 1 (Change Session Attributes). Make sure this is done before you create the stored procedure below.
CREATE PROCEDURE LOAD_DATE_CONVERSION_FILE ( )
LANGUAGE SQL
BEGIN
DECLARE var_date DATE DEFAULT NULL;
DECLARE var_date_mdyy_dec DECIMAL(8,0);
DECLARE var_date_mdyy_char CHAR(8);
DECLARE var_year INTEGER;
DECLARE var_DOW INTEGER;
DECLARE var_DOY INTEGER;
DECLARE var_QOY INTEGER;
DECLARE var_CC NUMERIC(2, 0);
DECLARE var_YY NUMERIC(2, 0);
DECLARE var_MM NUMERIC(2, 0);
DECLARE var_DD NUMERIC(2, 0);
DECLARE var_DAY_NAME CHAR(9);
DECLARE var_QUARTER_NAME CHAR(6);
DECLARE var_WEEKEND CHAR(1);
DECLARE var_HOLIDAY CHAR(1);
DECLARE var_BEFORE_HOLIDAY CHAR(1);
DECLARE var_AFTER_HOLIDAY CHAR(1);
DECLARE var_SEASON CHAR(6);
DECLARE var_FISCAL_YEAR INTEGER;
DECLARE var_FISCAL_QUARTER INTEGER;
DECLARE var_MONTH_NAME CHAR(9);
DECLARE var_MONTH_ABRV CHAR(3);
DECLARE var_JULIAN NUMERIC(7, 0);
DECLARE var_FULL_MOON CHAR(1);
SET var_date = '1900-01-01';
SET var_holiday = 'N';
SET var_before_holiday = 'N';
SET var_after_holiday = 'N';
SET var_full_moon = 'N';
REPEAT
SET var_date_mdyy_char = substring(char(var_date),6,2) || substring(char(var_date),9,2) || substring(char(var_date),1,4);
SET var_date_mdyy_dec =DECIMAL(var_date_mdyy_char);
SET var_year = YEAR (var_date);
SET var_DOW = DAYOFWEEK_ISO (var_date);
SET var_DOY = DAYOFYEAR(var_date);
SET var_QOY = QUARTER(var_date);
SET var_CC = decimal(substring(char(year(var_date)),1,2));
SET var_YY = decimal(substring(char(year(var_date)),3,2));
SET var_MM = MONTH(var_date);
SET var_DD = DAY(var_date);
SET var_DAY_NAME =
(CASE var_dow
WHEN 1
THEN 'Monday'
WHEN 2
THEN 'Tuesday'
WHEN 3
THEN 'Wednesday'
WHEN 4
THEN 'Thursday'
WHEN 5
THEN 'Friday'
WHEN 6
THEN 'Saturday'
WHEN 7
THEN 'Sunday'
ELSE ''
END);
SET var_quarter_name= TRIM(CHAR(YEAR(var_date))) CONCAT 'Q' CONCAT TRIM(CHAR(QUARTER(var_date)));
SET var_weekend =
(CASE var_dow
WHEN 1
THEN 'Y'
WHEN 7
THEN 'Y'
ELSE 'N'
END);
SET var_season =
(CASE
WHEN var_mm < 3 OR (var_mm = 3 and var_dd <21)
THEN 'Winter'
WHEN var_mm < 6 OR (var_mm = 6 and var_dd <21)
THEN 'Spring'
WHEN var_mm < 9 OR (var_mm = 9 and var_dd <21)
THEN 'Summer'
WHEN var_mm < 12 OR (var_mm = 12 and var_dd <21)
THEN 'Autumn'
ELSE 'Winter'
END);
SET var_fiscal_quarter =
(CASE
WHEN var_mm < 4
THEN 2
WHEN var_mm < 7
THEN 3
WHEN var_mm < 10
THEN 4
ELSE 1
END);
SET var_fiscal_year =
(CASE
WHEN var_mm < 10
THEN YEAR(var_date)
ELSE YEAR(var_date) + 1
END);
SET var_month_name = MONTHNAME(var_date);
SET var_month_abrv =
(CASE var_mm
WHEN 1
THEN 'JAN'
WHEN 2
THEN 'FEB'
WHEN 3
THEN 'MAR'
WHEN 4
THEN 'APR'
WHEN 5
THEN 'MAY'
WHEN 6
THEN 'JUN'
WHEN 7
THEN 'JUL'
WHEN 8
THEN 'AUG'
WHEN 9
THEN 'SEP'
WHEN 10
THEN 'OCT'
WHEN 11
THEN 'NOV'
WHEN 12
THEN 'DEC'
ELSE ''
END);
SET var_JULIAN = decimal(substring(char((year(var_date)*1000 + dayofyear(var_date))), 1,7));
INSERT INTO date_conv VALUES(
var_date,
var_date_mdyy_dec,
var_date_mdyy_char,
var_year,
var_DOW,
var_DOY,
var_QOY,
var_CC,
var_YY,
var_MM,
var_DD,
var_DAY_NAME ,
var_QUARTER_NAME,
var_WEEKEND,
var_HOLIDAY,
var_BEFORE_HOLIDAY,
var_AFTER_HOLIDAY,
var_SEASON,
var_FISCAL_YEAR,
var_FISCAL_QUARTER,
var_MONTH_NAME,
var_MONTH_ABRV,
var_JULIAN,
var_FULL_MOON );
SET var_date = var_date + 1 day;
UNTIL var_date> '12/31/2030'
END REPEAT;
END;
|
|
Note: The above stored procedure example uses the SQL function DAYOFWEEK_ISO to populate the integer value (1-7) of the column DC_DOW (day of week). The DAYOFWEEK_ISO function returns an integer between 1 and 7 that represents the day of the week, where 1 is Monday and 7 is Sunday. An alternative to this is the DAYOFWEEK function, which returns 1 for Sunday and 7 for Saturday. Use whichever function matches your company's definition of the first day of the week.
While SQL does provide most of the BIFs to convert the date and populate the table in this stored procedure example, some columns cannot be populated with SQL functions. For example, there is no SQL function to return a holiday (and consequently the day before or after a holiday), the season, or even (believe it nor not) the day of a full moon. These values vary depending on factors such as your country, geographic location, and culture. Therefore, for these columns, the table will have to be either updated manually or perhaps populated from an existing file in your database that already contains this information. In this stored procedure example, the flag column values are all set to N, and the season column is populated based on the commonly applied United States date boundaries for the seasons.
Step 3: Create Constraints
The next step is to create the referential integrity (RI) constraints to link the files together and force the conformance of the constraint. This involves creating unique key constraints in the date conversion table and foreign key constraints in the legacy file.
Note: Implementing RI is an optional step in this process. There are advantages provided when RI constraints are in place at the database level, and they are described later in this article; but from a pure DB2 Web Query perspective, the primary advantage is that they greatly simplify the process of joining tables together. If you are uncomfortable with implementing RI and would like to bypass this step, refer to section 12.1.4 Joining Tables in the IBM Redbook Getting Started with DB2 Web Query for System i for examples on manually creating joins using the DB2 Web Query development tools.
Create Unique Keys in the Date Conversion Table
To create a unique key constraint against the date conversion table, first determine what the date format is in the legacy file. The column in the date conversion table that matches this date format is the one that you will want to make the unique key. In the following example, this is the field DC_MDYY_PD. This is a packed decimal field in MMDDYYYY format. To create this unique key constraint, run the following SQL statement:
ALTER TABLE DATE_CONV
ADD CONSTRAINT DATE_CONV_UNIQUE_KEY_BY_DC_MDYY_PD
UNIQUE( DC_MDYY_PD ) ;
As an alternative, constraints can be created using the CL command ADDPFCST. If you are more comfortable using CL, issue the following command from a 5250 command line:
ADDPFCST FILE(DATE_DIM/DATE_CONV)
TYPE(*UNQCST)
KEY(DC_MDYY_PD)
CST(DATE_CONV_UNIQUE_KEY_BY_DC_MDYY_PD)
Create Foreign Key Constraints on Legacy Files
Once the unique key constraint is in place, foreign keys can be created on the legacy file. If you are unfamiliar with foreign keys, the concept is pretty simple: A foreign key is a column (or set of columns) in a table that matches a unique or primary key field (also called a parent key) in another (parent) table. Its purpose is to enforce data integrity by preventing users or processes from entering column values that do not exist in the parent table. Any database insert or update request that violates this rule is rejected by the database, thus preserving the data integrity. A database insert request will always be validated by the constraint; an update request will go through constraint enforcement only if the value of the foreign key is updated. In either case, the insert or update request will fail if a matching row is not found in the parent table. This underlying checking process is referred to as "constraint enforcement."
For example, when the appropriate foreign key constraint is in place, a user entering a new order is not allowed to insert a new row if the part number specified does not exist in the parts master table.
In this tip, an example legacy file named ORDHDR is used. Here is the format for this order header file:
|
ORDHDR Format |
|||
|
Field |
Data Type |
Field Length |
Column Heading |
|
ORDER |
PACKED |
7 0 |
Order Number |
|
CUST |
CHAR |
5 |
Customer Number |
|
ORDDAT |
PACKED |
8 0 |
Order Date |
|
SHPVIA |
CHAR |
15 |
Ship Mode |
|
ORDSTS |
CHAR |
1 |
Order Status |
|
ORDAMT |
PACKED |
11 2 |
Order Amount |
|
TOTLIN |
PACKED |
3 0 |
Order Total |
|
INVNUM |
CHAR |
7 |
Invoice Number |
Similar to unique key constraints, a foreign key constraint can be created against an existing file using the ALTER TABLE SQL statement. In this step, the foreign key is defined as the packed decimal date column, ORDDAT, that references DC_MDYY_PD, the unique key column in the date conversion table with the same format. Run the following SQL statement to do this:
ALTER TABLE ORDHDR
ADD CONSTRAINT FK_ORDHDR_ORDDAT
FOREIGN KEY( ORDDAT )
REFERENCES DATE_CONV ( DC_MDYY_PD )
ON DELETE NO ACTION
ON UPDATE NO ACTION ;
Or issue the following equivalent CL command:
ADDPFCST FILE(COBBG/ORDHDR) TYPE(*REFCST) KEY(ORDDAT)
CST(FK_ORDHDR_ORDDAT)
PRNFILE(DATE_DIM/DATE_CONV) PRNKEY(DC_MD00001)
DLTRULE(*NOACTION) UPDRULE(*NOACTION)
Once the foreign key constraint has been created, referential integrity enforcement is in effect at the database level.
Constraint Considerations
Once you have populated the date conversion table with a broad range of dates, you should have a matching row for every date field in your legacy files. But if the date fields in your legacy files contain blanks, nulls, or invalid date values, you will have problems when attempting to create the foreign key constraint because of the RI enforcement process described above. The attempt will fail, and the SQL0667 message (FOREIGN key value does not match a value in the parent key of constraint) will be issued. Consequently, in order to implement this solution, you must either create rows in the date conversion table with null or blank key values (so that matching rows can be found) or clean up the "dirty data" from your legacy files. The latter option is recommended because your reports will be more accurate and useful if the rows contain valid and correct date field values.
Once your data is cleaned up and the constraint is successfully created, you will be able to take advantage of the true objective of RI constraints: Users (regardless of the interface) will no longer be able to enter invalid dates into this date field. Consequently, any applications that insert or update rows with invalid dates would fail with the SQL0530 message (Operation not allowed by referential constraint) and would need to be updated to handle this error appropriately.
Step 4: Create Synonym
Now that the conversion table and the necessary constraints are in place, you are ready to create the metadata (synonym) against the legacy file. To do this, take the following steps:
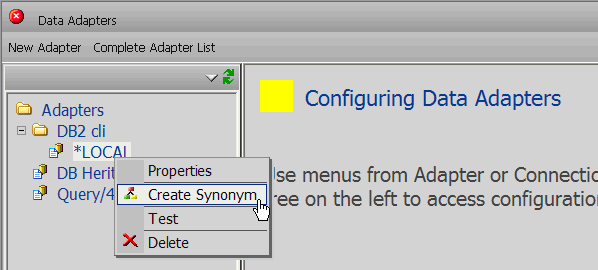
- Open a DB2 Web Query metadata session, and from the right-mouse-click menu, specify Create Synonym against the DB2 CLI local adapter as shown in Figure 1.
Figure 1: Create a synonym. (Click images to enlarge.)
- Specify the library that contains the legacy file and click the Next button.
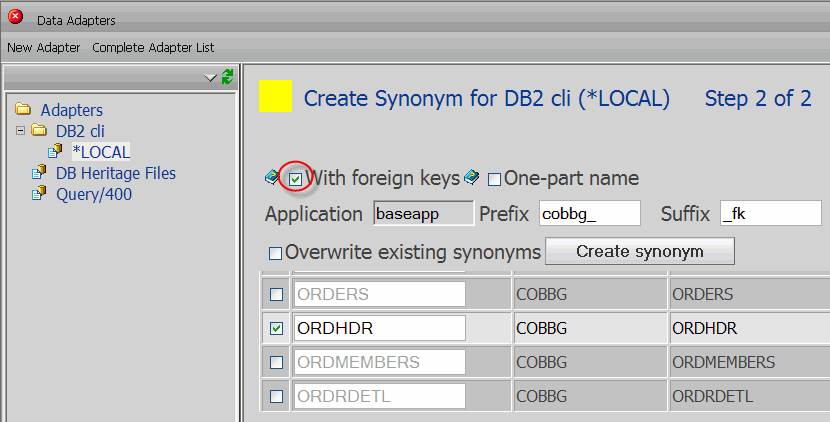
- On the screen called "Create Synonym for DB2 cli (*LOCAL) Step 2 of 2," select the "With foreign keys" setting, specify the Prefix and Suffix values, select the ORDHDR file from the list of files, and click the Create Synonym button. An example of this screen is shown in Figure 2.
Figure 2: Create a synonym with foreign keys.
Once a foreign key has been established, there is an implicit relationship between the files; they are essentially joined by the foreign key field of the legacy file and the unique key of the parent date conversion table. DB2 Web Query is well aware of this implied relationship, and by selecting the "With foreign keys" setting during the synonym creation process, you are instructing DB2 Web Query to look for these file relationships. If they exist, DB2 Web Query uses this information to build the necessary SQL join syntax whenever any report based on this synonym is ultimately executed.
Step 5: Create Reports
Finally, you are ready to create reports using this technique. Follow these steps to create a new report:
- Create a new report using Report Assistant.
- Select the synonym you just created.
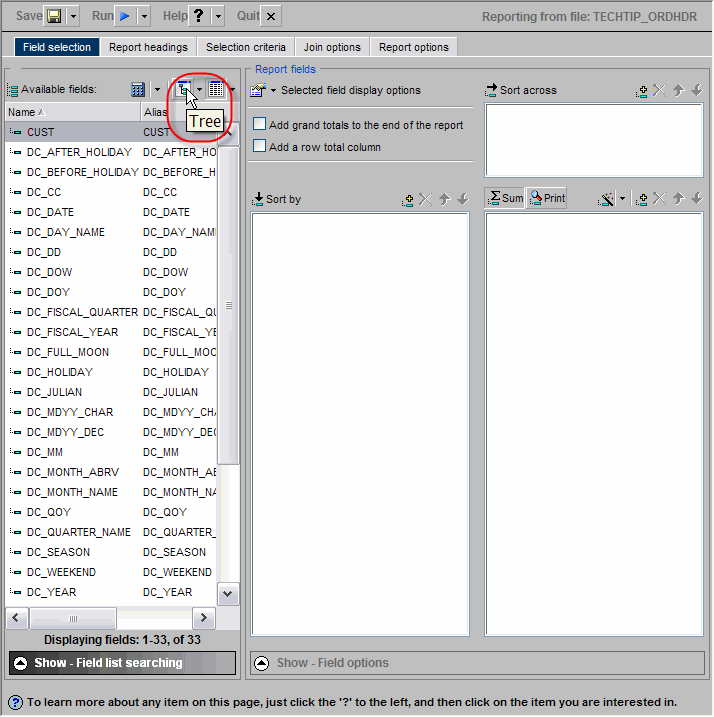
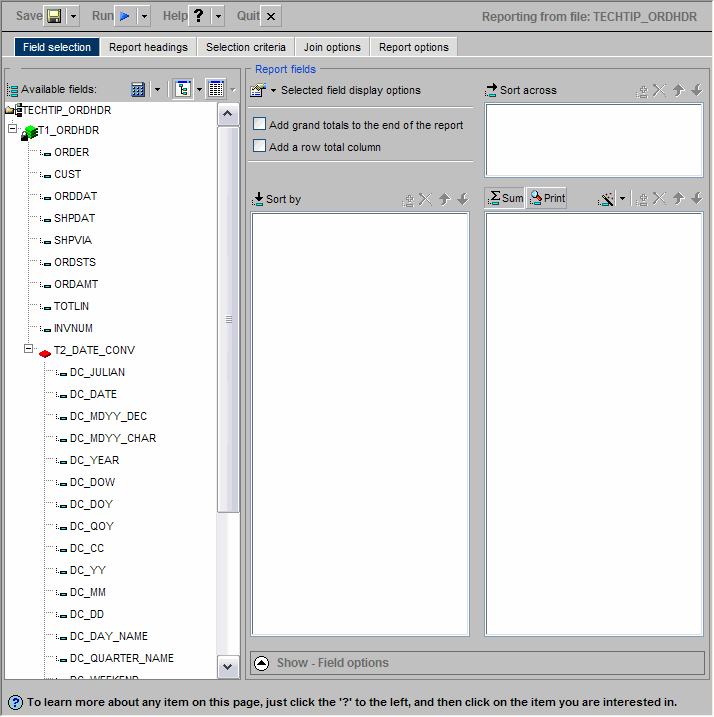
- The Report Assistant development is displayed. Notice that all the columns from the synonym are displayed in alphabetical order. For a more organized look, you might want to display the columns in their separate segments by selecting the Tree view icon as shown in Figure 3.
Figure 3: Select the Tree view.
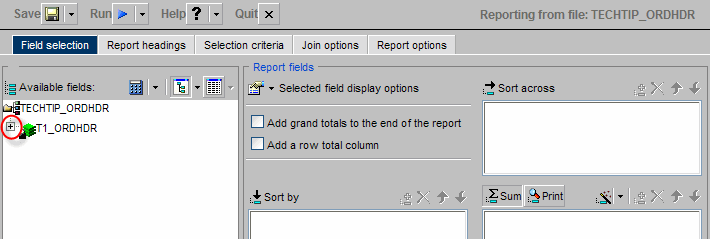
- Expand the segments by clicking on the plus sign (+) next to the segments as shown in Figure 4.
Figure 4: Expand the segments in the Tree view.
Once all your segments are expanded, the screen will look like the example shown in Figure 5.
Figure 5: The Tree view shows expanded segments.
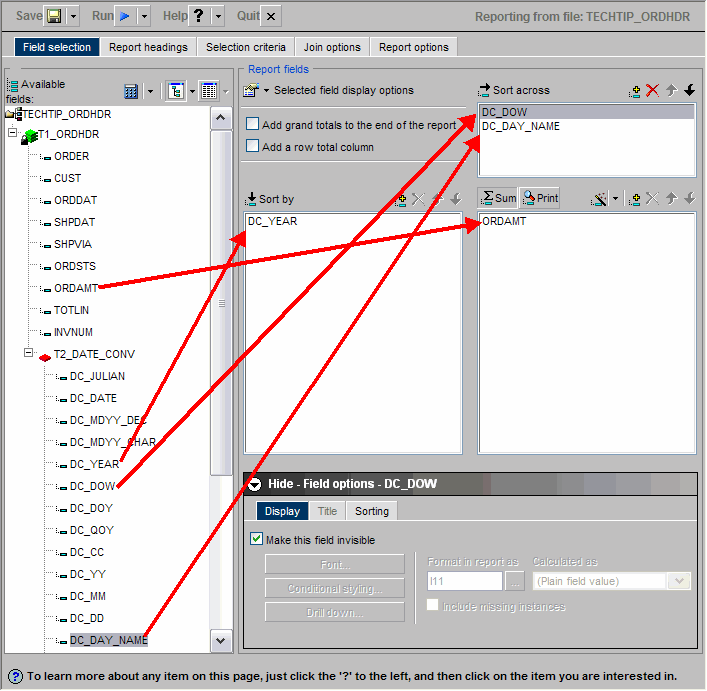
Notice that all the fields from both files are available to be used in the report. Because of the previous steps that were taken, DB2 Web Query has brought them all in as if they were a single virtual table. All of the various ways to represent the date can be easily included in your report. You simply select the columns from this list of available fields. An example of this is shown in Figure 6.
Figure 6: Select report columns.
When the report is executed, DB2 Web Query will generate all of the join syntax. The join will bring in all of the matching rows with the converted date values. At this point, you do not need to worry about any date conversion functions or joining files together; it's all been done. How easy is that?
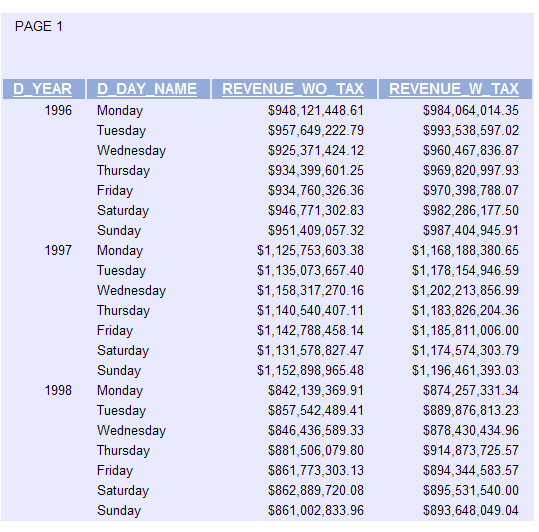
An example of what this report looks like is shown in Figure 7.
Figure 7: Here's an example report using the date conversion table.
Performance Differences: Does It Matter?
In Part I of this TechTip, I described how to use the DB2 Web Query BIFs to convert your date fields. This particular tip relies on database join logic to retrieve the dates from a file whose columns have already been converted. So you are probably wondering, does it matter which method I use? From a report performance perspective, the answer is "yes." The date conversion technique does provide significant report performance advantages, but exactly to what degree will always vary, depending on such factors as system resources, system activity, available indexes, the number of rows retrieved, and the number of columns converted. But to give you some idea of what gains can potentially be realized, I conducted a mini benchmark that compared the performance results of the two techniques. The following tables provide information about the files and reports used in this benchmark:
|
Legacy File Specifications |
|
|
Legacy File Attribute |
Value |
|
Name |
ORDDTL |
|
Number of rows |
600,000 |
|
Number of date fields to convert |
1 |
|
Date Conversation Table Specifications |
|
|
Date Conversion Table Attributes |
Value |
|
Name |
DATE_CONV |
|
Number of rows |
47,847 (one row for every day in the range January 1, 1900, to December 31, 2030) |
|
Report Specifications |
|
|
Report Attributes |
Value |
|
Name |
DATE_CONV |
|
Sort/Group by columns |
|
|
Display columns |
|
Two versions of the same report were created and run (and yielded identical output results). The first version used the DB2 Web Query BIFs to convert the date field. The second version used the date conversion table. An example of the report output is shown in Figure 8.
Figure 8: This is the example performance benchmark report.
Each version of the report was run 20 times and the run time (the time between when the user selected the report and when the report was displayed to the browser) was recorded and averaged. The results are displayed in the table below.
|
Benchmark Results |
|
|
Date Conversion Technique |
Average Runtime (20 Executions) |
|
DB2 Web Query functions |
41.6 seconds |
|
Date conversion table |
3.9 seconds |
As you can see, for this particular example report, the performance difference between the two techniques was quite significant. The report that used the date conversion method ran over 10 times faster than the same report that used the BIFs! While, as stated, your results may vary, this should be enough to convince you that the date conversion table method is at least worthy of a prototyping exercise in your environment.
Date Conversion Table: Worth Considering
Although DB2 Web Query does provides many built-in functions to help convert your legacy date fields to smart dates, there are advantages to implementing the date conversion table technique described in this tip. With referential integrity constraints in place, you ensure that no more invalid dates can be entered into your database files. And because the conversion work has already been performed, you may experience significant improvements in DB2 Web Query report performance. Finally, it is an extremely easy way to include some interesting ways to represent date values in your reports. Heck, you might even decide that a full moon flag might be useful after all!



LATEST COMMENTS
MC Press Online