Point-and-click your way to repeatable data updates to or from any database from your DB2 database.
One common theme I’ve experienced through several RPG developer jobs is to provide data to an external data warehouse from the all-knowing DB2 database. Other common needs may be to supply member information to a website or to some third-party software. Sometimes these would be DB2 databases, and sometimes they wouldn't. I'm going to show you how to quickly set up a SQL Server Integration Services (SSIS) package to take care of this process for you.
In this article, we will select the data from a simple database table to retrieve all active users in a DB2 database and insert the data into a target Microsoft SQL database server using SSIS. Of course, this process can be run daily as a scheduled task.
Simple Specifications for Our First DB2 File Export
Reusing the details from previous articles, we'll simply be exporting a user file that will export only active members and will run daily. The file will have a simple DDS as follows, where the active members have the JRSTATUS field set to either "A" or "Y."
* FILE: JR_USER - SIMPLE MEMBER USER FILE
A R JRUSER
A JRUSERKEY 6S 0
A JRFNAME 32A
A JRLNAME 32A
A JRMI 1A
A JRSTATUS 1A
We'll seed the initial data to look as follows. Note that I have attached the DDL and DML source code for download for easy setup of this example.

Figure 1: Here's the initial sample data in the source DB2 database created from DML.
Source and Destination Databases
To refresh the data warehouse, we simply run a SELECT query from the source DB2 database and insert that data into the destination data warehouse, which for this example will be a Microsoft SQL database.
Source database: DB2
Destination database: Microsoft SQL Server (Data Warehouse)
In my previous modular article, SSIS Data Sources for IBM i DB2 and Microsoft SQL Databases, I’ve shown how to create the SSIS package with both a Microsoft SQL server connection and an IBM DB2 server connection that can be reused here to start your development. The previous article also contains links back to the beginning of my Microsoft tutorials that will take you all the way back to square one. I’ll assume you have those bases covered, and we’ll move forward with our current objective to pull data from an IBM DB2 database and push into a Microsoft SQL server.
Destination Table
For our example, we'll create new DDL for the Microsoft database to represent the target for your DB2 data. We'll deliberately have different field names that will be a subset of our source data.
CREATE TABLE target_user(
target_guid uniqueidentifier NOT NULL default(newid()),
target_key int NOT NULL,
target_fname varchar(64) NOT NULL,
target_lname varchar(64) NOT NULL
)
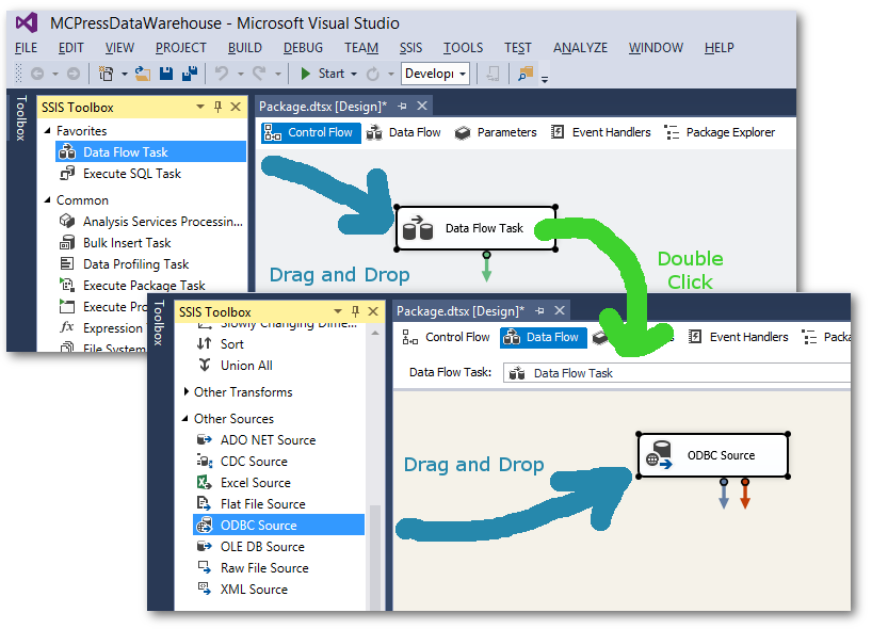
To get our source data from the DB2 database, we'll create a Data Flow Task by dragging and dropping it on the Control Flow tab.
Double-click the Data Flow Task. Under Other Sources, drag and drop the ODBC Source onto your Data Flow area.

Figure 2: Put your ODBC source onto a Data Flow Task to prepare for a SELECT query.
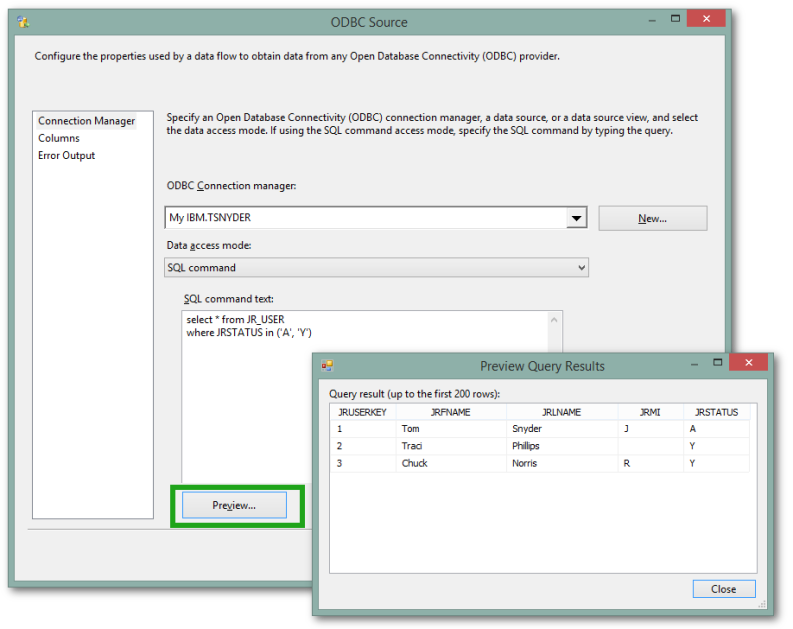
Double-click on the ODBC Source. Select the following:
- ODBC Connection manager: Your DB2 source connection
- Data access mode: SQL command
- SQL command text: select * from JR_USER where JRSTATUS in ('A', 'Y')

Figure 3: Create your SELECT query on the ODBC data source.
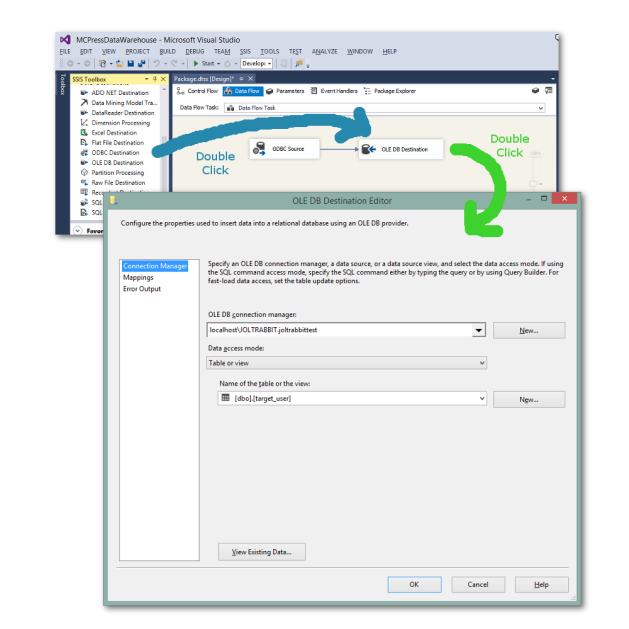
To get your source database connected to your destination database, simply drag and drop the OLE DB Connection onto the work area.
Double-click the OLE DB Connection to pick the Microsoft SQL destination connection that was set up earlier. You should have executed the DDL above to create the new target_user table in the Microsoft database; you'll be able to select it from the table drop-down.

Figure 4: Connect the source to the destination database.
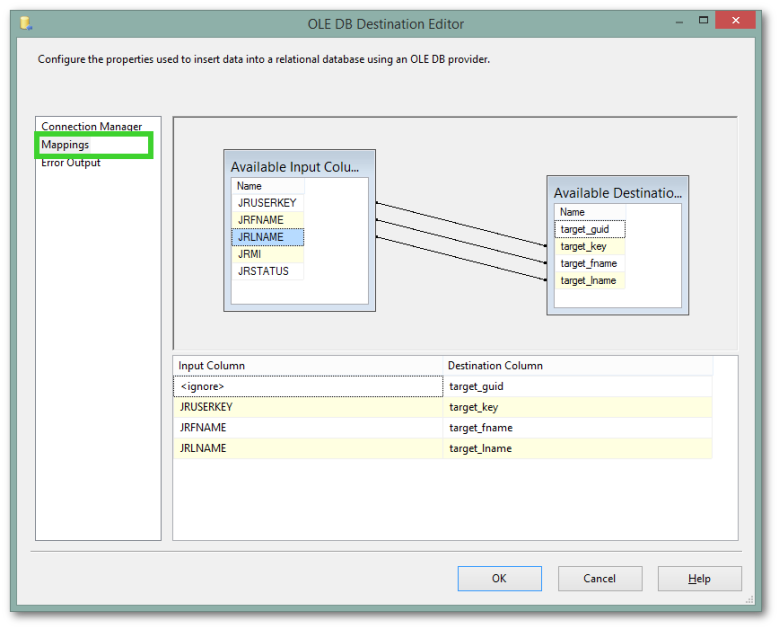
Now you need to map the input source fields to the output destination fields by clicking on the Mappings option on the left side.

Figure 5: Map the DB2 source fields to the Microsoft destination fields.
You may notice that the target_guid is not mapped, which is why I set the default value in the DDL when I created the table.
When you run the SSIS project, you can look in the Microsoft SQL database and verify that the data was mapped and copied to the destination database.
If you run the SSIS package a second time, you'll see that the data was duplicated with a new set of unique identifiers.
Truncating the Destination Table
As a side project, you could fix the duplication problem by truncating the destination table prior to the copy. If you're working through this, you can go back to the Control Flow tab and add an SQL Task. Select the Microsoft database as your connection using the OLE DB connection type. For the SQL statement, use the following:
truncate table target_user
Summary
This is just one of the many ways that you can update your data warehouse or copy data between servers with mappings for whatever reason. If you happen to have multiple databases, regardless of which type they are, you can use SSIS with a few clicks and have data copying with minimal work. Set up a scheduled job and you have the data mapped and synchronized regularly.


LATEST COMMENTS
MC Press Online