Dynamic Runtime Environments (RTEs) are an example of IBM listening to your feedback and implementing your suggestions.
Libraries have been a longstanding and fundamental way for IBM i customers to store separate copies of files that are identical in name and format but hold different data. And by simply manipulating the library list correctly, users access the right file located in the right library to get the information they need.
Typically, changing the library list is handled by an application: the user selects a menu option in the application and the library list is changed accordingly. During data access, as long as the application program did not explicitly qualify the library, the library list is searched and the data from the appropriate library is retrieved (provided that library is in the library list). Nothing new here, right? Just good ol' *LIBL!
Users of the DB2 Web Query for IBM i product need this same kind of fast, easy, and flexible capability to switch their library lists so that the appropriate information is displayed in a report, chart, compound document, or dashboard. DB2 Web Query generates dynamic SQL and uses the *SYSTEM naming convention, so it does have the ability to search the library list for the unqualified file references. However, the challenge has been to change the library list when the need arises. Previously, this was accomplished by signing off from DB2 Web Query and doing one of the following:
- Having a system administrator change the library list of the user's job description and signing back on again
- Signing on as a different user (which has a different library list defined in the job description)
While both techniques work, neither is exactly ideal: one requires more (seemingly unnecessary) Web Query licenses, both are difficult to maintain and require system administrator assistance, and the words "fast," "easy," or "flexible" don't really come to mind.
A third and completely different technique (and one that several customers have implemented) is using the QIBM_QSQ_CLI_CONNECT exit point. This technique basically allows you to call an exit program during each Call Level Interface (CLI) connect event, but it requires the development of an application and supporting database tables. In addition, it may require the application to distinguish DB2 Web Query requests from CLI requests that were issued by other applications. Further, there's no interface built into the DB2 Web Query product to directly communicate a desired change in the library list for this type of solution. So it can require a fair amount of work to set up and still not be an optimal solution.
In this article, I introduce to you DB2 Web Query Dynamic Runtime Environments (also known as RTEs), a new feature that was first made available in DB2 Web Query version 2.1 group PTF level 4. RTEs are really just a fancy name of a new product feature that allows DB2 Web Query users to easily, quickly, and dynamically change their library list. Once set up and assigned to a user, RTEs will "fire" before each query execution and change the job's user portion of the library list to the values configured in the RTE.
Setting Up RTEs (Administrative Tasks)
Setting up the appropriate environment for RTEs is quite simple and requires three basic steps:
- Create DB2 Web Query synonyms that do not have the explicit library qualification; this enables library list searching when the database engine looks for the data. This feature in DB2 Web Query is referred to as "one-part naming."
- Create one or more RTEs that contain the library list to search.
- Assign users to one more RTEs.
Setting Up One-Part Naming
If you're familiar with DB2 Web Query, you're already aware of its powerful metadata component—an abstraction layer between the database and the DB2 Web Query reporting engine. Before you can query a table or other database object, you must first create metadata over it; we refer to these metadata "objects" as synonyms. Each synonym contains information that describes the data to be queried at both the file and field level. Within it, you can simplify the data model by predefining table joins, creating virtual columns and filters, and centralizing specific business logic. The key to setting up library list searching for a DB2 Web Query data source is to define this desired behavior in the synonym, and that's what the feature referred to as "one-part naming" is all about.
Before we proceed, there are several requirements and limitations to be aware of:
- Queried database objects must have identical names across the various libraries.
- Queried database objects should be identical in format across the various libraries. If they are not, errors may occur during query execution.
- Synonyms must be created using DB2 CLI adapter.
- There's *LOCAL connection support only, no remote (DRDA) database support.
- RTEs change only the user portion of the job's library list. The system portion of the library list is not affected; neither is the job's current library.
Synonyms are created by using either the browser's metadata console or the DB2 Web Query Developer Workbench tool. In step 2 of this process, simply check the "One-part name" setting as shown in Figure 1.
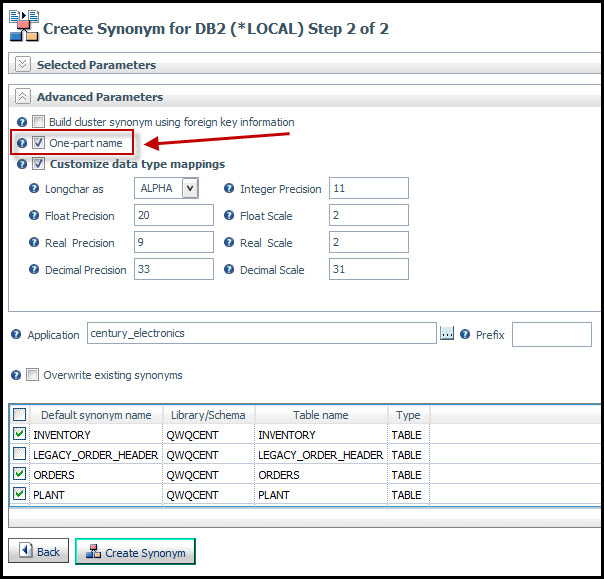
Figure 1: Perform one-part naming by using the graphical interfaces.
One-part name simply means that only the database object name is included in the synonym; the library (schema) portion is omitted. A synonym with the library explicitly included in it is referred to as a "two-part name" synonym and is the default behavior when synonyms are created. So you must take explicit action to override this.
Alternatively, you can use the CRTWQSYN command to create synonyms. If you prefer this method, simply specify *NO for the "Include library qualification" parameter as shown in Figure 2.
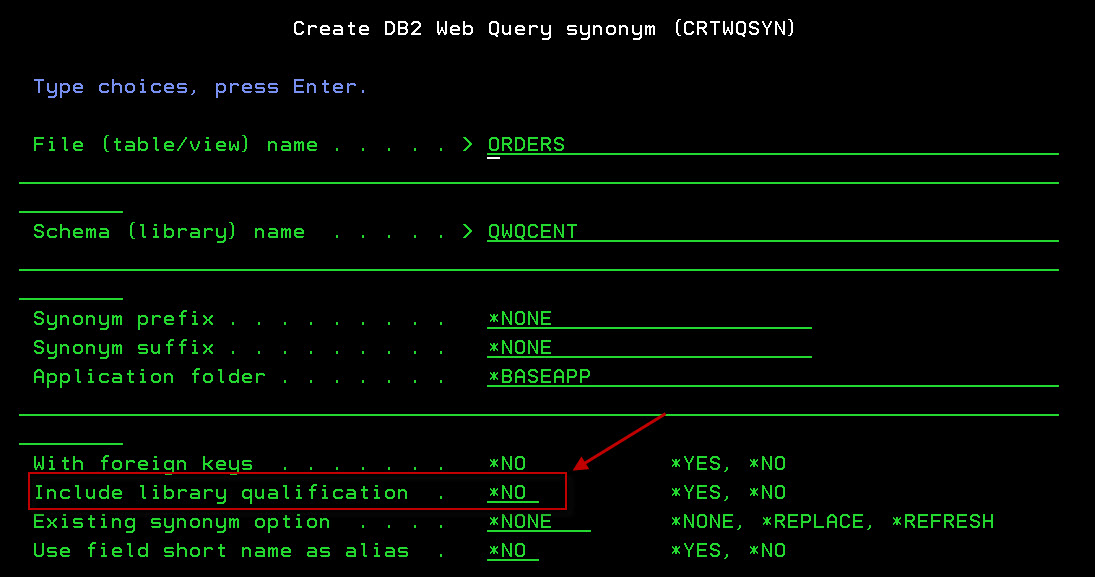
Figure 2: Perform one-part naming using the CRTWQSYN command.
If you already have synonyms created and want to change them to one-part naming, open them in the synonym editor (either the browser-based or Developer Workbench version) and simply remove the library qualification in the Properties panel. A before and after image of this is displayed in Figure 3.

Figure 3: Change existing synonyms to one-part naming.
Once the synonym has been saved (and a user runs a report based on that synonym), DB2 Web Query generates an SQL statement with an unqualified database object reference and submits the request to the DB2 for i engine. DB2 (running under the *SYSTEM naming convention) uses the job's library list to find the database object.
Creating RTEs
To set up a DB2 Web Query Runtime Environment, sign into a 5250 session as QWQADMIN or any DB2 Web Query administrator and issue the following command:
WRKWQRTE
You will see the Work with DB2 Web Query Runtime Environments screen as shown in Figure 4.

Figure 4: WRKWQRTE brings up this panel.
Initially, the only value in the list is a special value of *NONE, meaning that no RTE is to be used. To add a new RTE to this list, press the F6 key. The Add DB2 Web Query Runtime Environment screen is presented as shown in Figure 5.
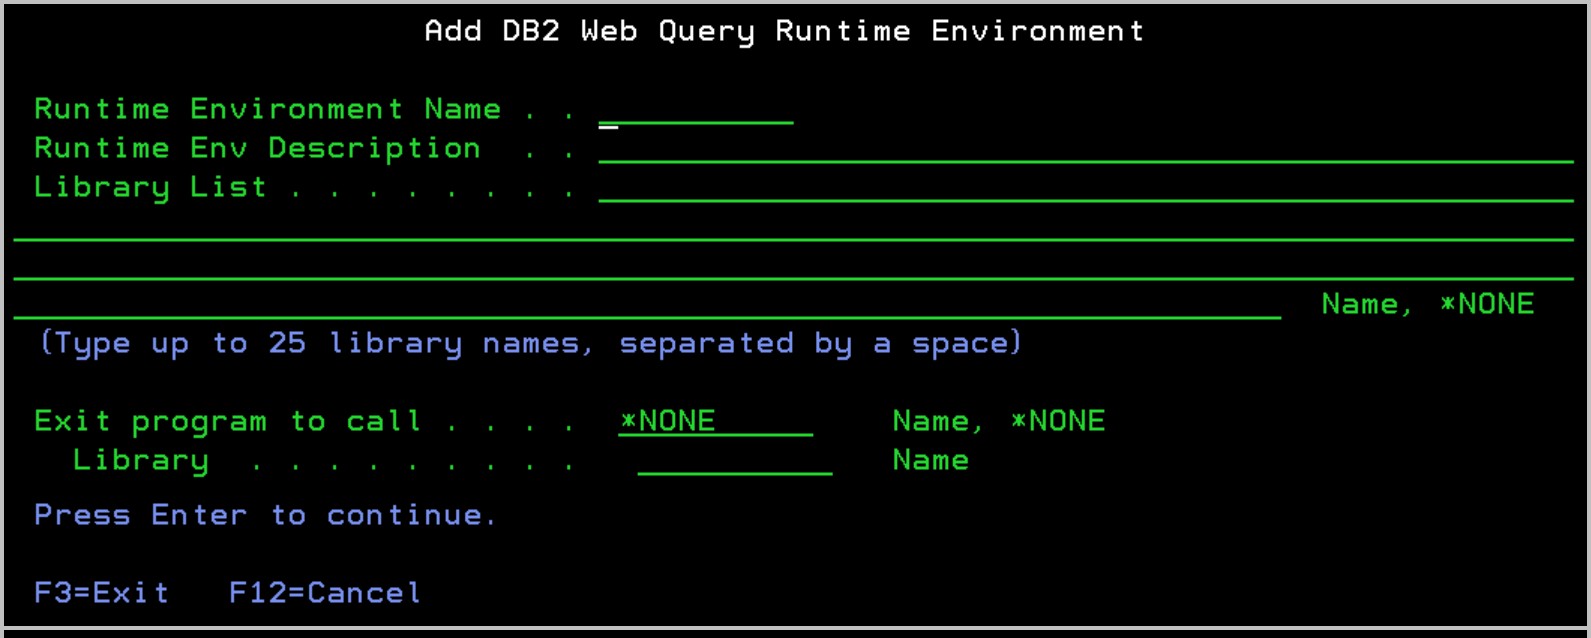
Figure 5: Add a new RTE from this panel.
Specify the following information and press Enter:
- Runtime Environment Name—Specify the name of the RTE. Names are 10 characters in length and must be unique.
- Runtime Environment Description—Specify a description for the RTE. This is an optional field but is displayed when DB2 Web Query users hover over the RTE from the BI Portal interface.
- Library List—Specify up to 25 library names (in the order you want them). Each library should be separated by a space. Specify *NONE if you do not want to change the library list; this might be appropriate if you want to call an exit program instead.
- Exit program and library—Specify the name and library of the exit program you want called. The exit program is one that you develop and is called prior to each DB2 Web Query request. Specify *NONE if you do not want to call an exit program.
A sample of a completed RTE is shown in Figure 6.
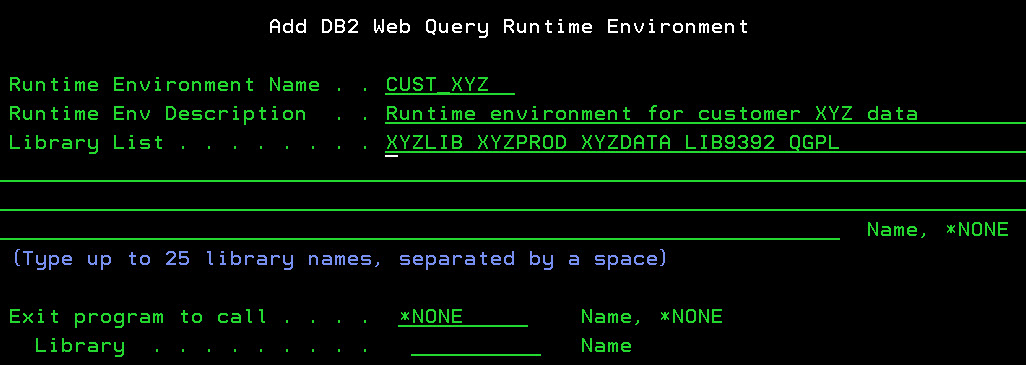
Figure 6: A completed RTE looks like this.
In this example, an RTE named CUST_XYZ was created. When this RTE is assigned to and activated for a DB2 Query user and a query is run, the following user portion of the library list will be used to search for unqualified (one-part name) database objects:
- XYZLIB
- XYZPROD
- XYZDATA
- LIB9392
- QGPL
If you need to change the RTE (add/remove a library from the library list or specify a different exit program), use option 2. If you want to delete the RTE, specify option 4. To create a new copy of an existing TE definition, specify option 3 and give the RTE a new name.
Optional Step: Setting Up an Exit Program
There may be cases where setting up a library list for each user or group of users is simply not enough. You might want to implement your own custom logic for manipulating the library list (or taking some other action before a query is run), based on certain conditions such as the current fiscal quarter, time of day, or inventory levels. Or you might want to call an existing program that you have that already performs your desired library list logic. Whatever the motivating requirement is, you might find the RTE's exit program feature to be quite useful because you write the program so you control the processing. Once created and configured, the RTE fires and the exit program is called just before the DB2 Web Query report is run. If a library list is specified in the RTE, the exit program is called before the library list is changed.
The exit program has three parameters:
- Current User CHAR(10)—Input parameter. Specifies the user who made the query request.
- Full Path CHAR(256)—Input parameter. Specifies the full path of the DB2 Web Query report to be run.
- Return Code INT(10)—Output parameter. If exit program executes successfully, return a value of zero. Otherwise, return a non-zero integer value.
An example RPG prototype for the exit program has been provided below:
|
d rteExitPgm PR ExtPgm(MYEXITPGM) D currentUser 10a Const D fullPath 256a Const D exitPgmRC 10u 0 |
Once the exit program has been compiled in a library, you can add it to the RTE definition as shown in Figure 7.

Figure 7: Configure the exit program.
In the above example, when the RTE named CUST_XYZ is activated for a user, the program named MYEXITPGM in library QGPL will be called prior to every DB2 Web Query report execution and before the library list is changed.
WARNING: The exit program feature is purely optional and should be developed with great care. If errors occur in your exit program and they are not monitored/received, an inquiry message is sent to QSYSOPR, and every DB2 Web Query report request for that user will hang, waiting for someone to reply to the QSYSOPR message. So please use with caution!
|
|
Assigning Users to Runtime Environments
The next step is to assign users to the RTEs. This is the way to control which RTEs are presented to each user or group of users. When a user is assigned to an RTE, that entry shows up on the user's Runtime Environment drop-down list on the DB2 Web Query BI Portal (more on the BI Portal later in this article). The user can then select that RTE to make it the active one.
Alternatively, you could assign RTEs to users (more on that later). But, because we are already at the Work with DB2 Web Query Runtime Environments screen, let's assign users to environments first. Type option 8 (Assign users) next to the RTE you want to assign users to and press Enter. An example is provided in Figure 8.
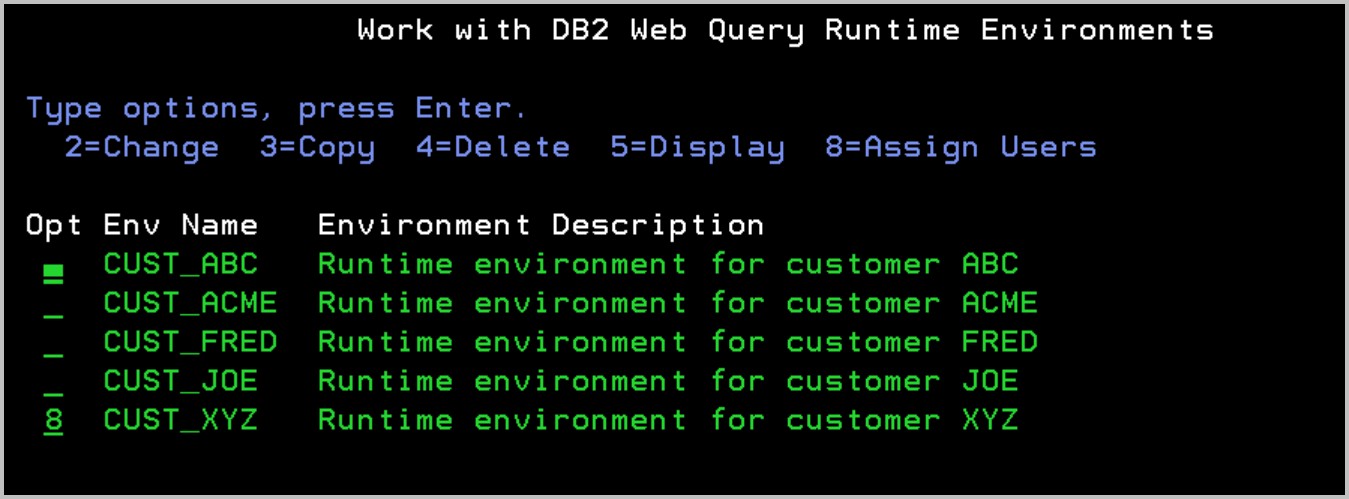
Figure 8: Assign users to RTEs.
As shown in Figure 9, a list of all registered DB2 Web Query users is presented. Registered runtime group profiles also appear in this list and are denoted by an asterisk (*) on the right side of the profile name.
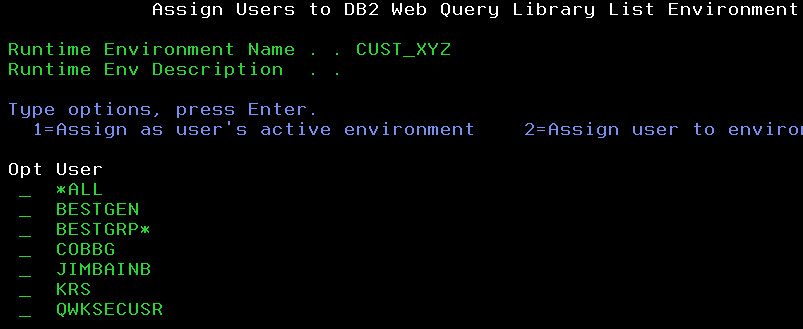
Figure 9: This list shows the DB2 Web Query users.
To assign a profile to an RTE, simply type a 2 next to the profile name and press Enter. If you want this environment to be the active (default) RTE and be automatically activated when that user logs into DB2 Web Query, then specify a 1 next to that profile. To "un-assign" (remove) a user from an RTE, simply blank out the 1 or the 2 option next to that profile name and press the Enter key.
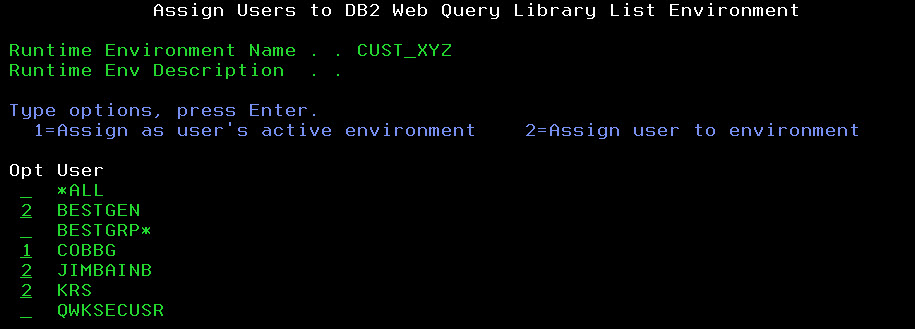
Figure 10: Choose which users are assigned to an RTE.
In the example shown in Figure 10 above, users BESTGEN, COBBG, JIMBAINB, and KRS have been assigned to the RTE named CUST_XYZ. For user COBBG, notice that we specified option 1 to make it the "Active" RTE for that user. This RTE becomes the default active one for COBBG and is "activated" automatically. This means that when user profile COBBG runs a DB2 Web Query report, that RTE will fire prior to running every DB2 Web Query report. When this happens, the library list is changed to the one defined in CUST_XYZ, and the exit program defined in CUST_XYZ will be called prior to the report's data retrieval process. Because option 1 is used and the environment is made the active one by default, COBBG does not have to activate CUST_XYZ manually by selecting it from the RTE drop-down list in the DB2 Web Query BI portal.
Note: A user can have only one Active RTE at a time.
Notice that the first user in the list is named *ALL. This special value is provided as a "convenience" feature and can be used to assign all DB2 Web Query users to an RTE. This way, you do not have to assign all of the individual users and groups to one or more RTEs. Also, as mentioned previously, runtime group profiles are also included in this list. So if assigned to an RTE, any users that are members of that group can select that RTE from the DB2 Web Query BI portal.
So what happens if multiple "sets" of RTEs are assigned to a user? This is the case if the administrator assigns different RTEs to *ALL, one or more group profiles that the user profile is a member of, and the user profile itself. In this situation, all unique RTEs in those sets will appear in the user's BI Portal drop-down list. In the case where different RTEs are defined as the active ones in these various sets, the following ordered list is used to resolve this:
- User profile—If an active RTE is specified for the user profile, this one always wins and becomes the active one for the user.
- Group profile—If no active RTE is specified at the user profile level and if the user is a member of multiple runtime group profiles, then the first group profile (sorted alphabetically) that has an active RTE defined becomes the active one for the user.
- *ALL—If no active RTE is specified at the user profile and group profile levels, and an active RTE is defined for the *ALL entry, this one becomes the active one for the user.
Assigning Runtime Environments to Users
If you prefer, you could also make these assignments from a user perspective. This is useful if you have one or two user profiles that have different library list requirements than other users. To do this, return to the Work with DB2 Web Query Runtime Environments panel. Notice at the bottom there is a function key labeled F11=Work users (Figure 11). Press this function key.
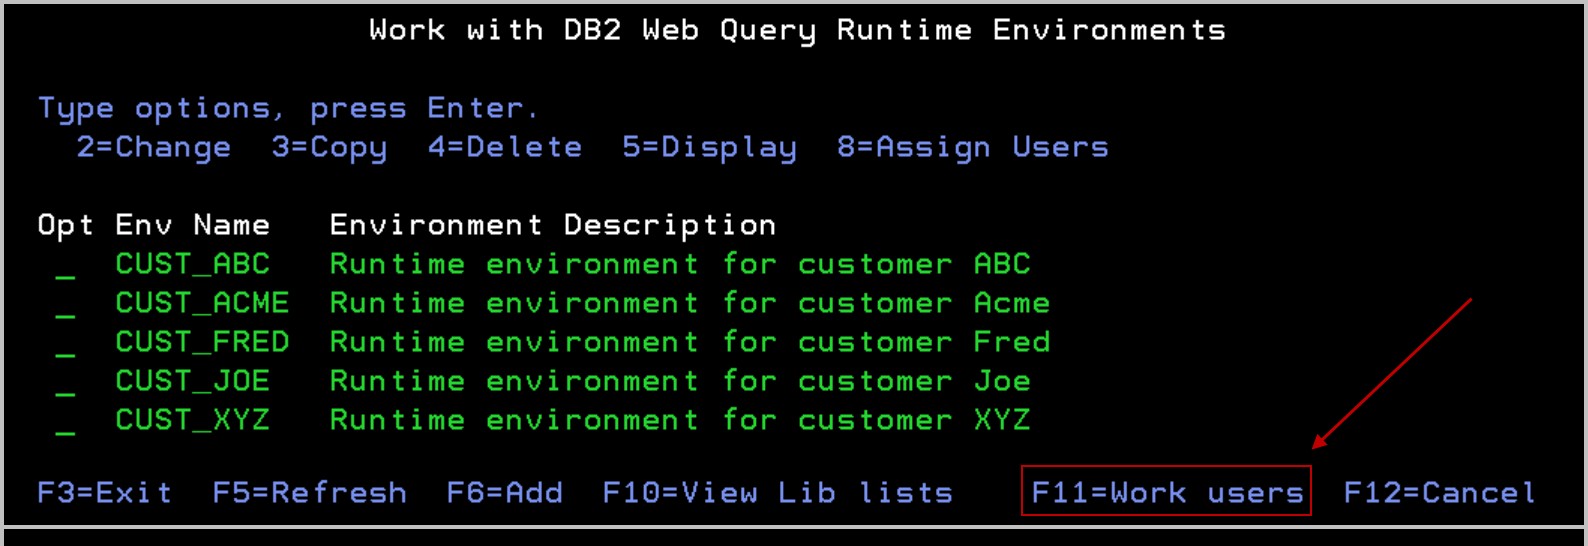
Figure 11: Press F11 to work with users.
As demonstrated in Figure 12, a list of all registered DB2 Web Query users is presented. Just as before, runtime groups are included and are denoted by an asterisk to the right of the profile name.
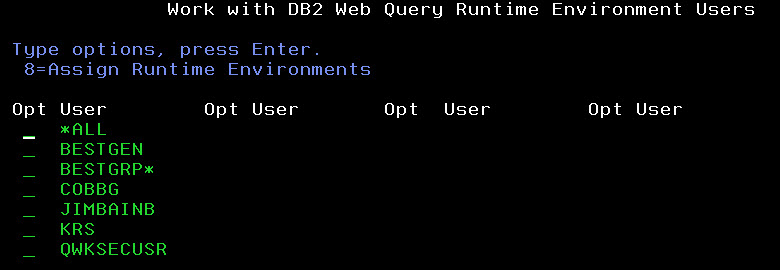
Figure 12: Assign RTEs to users.
To assign environments to a specific user, type option 8 next to that user and press Enter. As you can see in Figure 13, this presents a list of DB2 Web Query RTEs.
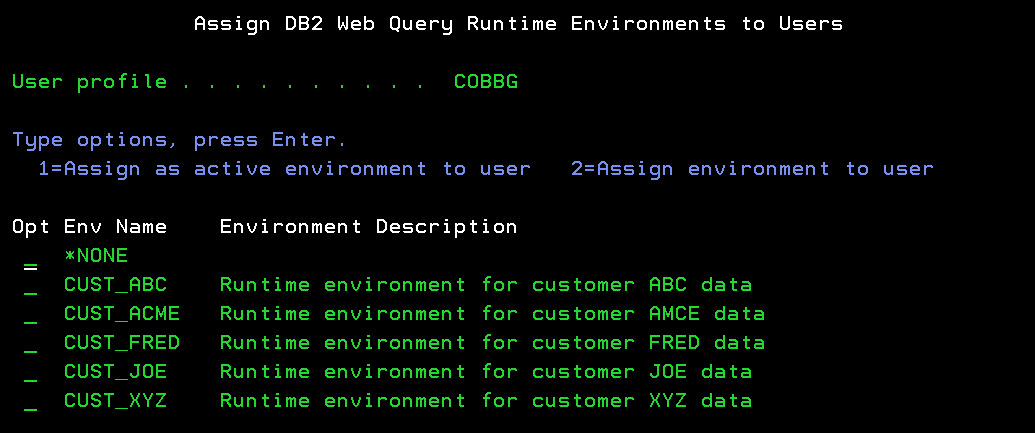
Figure 13: Assign RTE to a user panel.
Just as before, you can select option 2 to assign the RTE to the user or you can select option 1 to make it the active RTE for that user. Notice in the example in Figure 14 that the user's active RTE is highlighted.
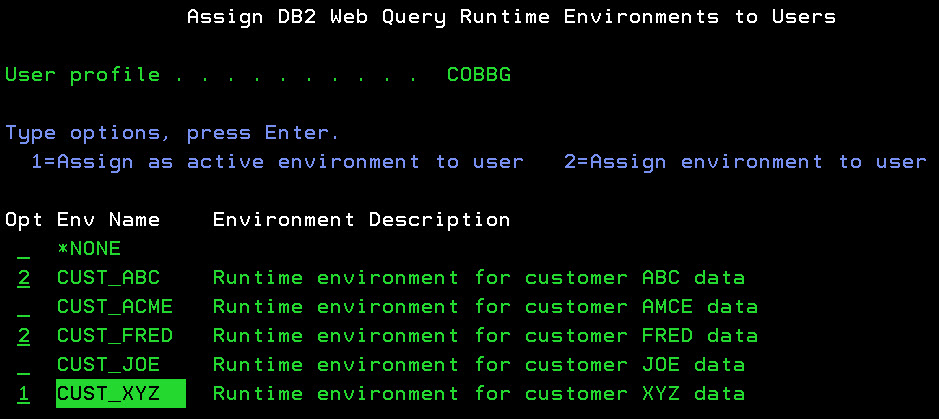
Figure 14: RTEs have been assigned to the user.
So the idea is the same, but it's just from a different perspective. Instead of assigning users to a specific RTE, you assign RTEs to a specific user. In the end, you're just making an association between the two so that whenever the user logs into DB2 Web Query, a list of valid RTEs is presented to that user and can be selected as the one to activate. In the example above, only the RTEs named CUST_ABC, CUST_FRED, and CUST_XYZ have been assigned to user profile COBBG (with CUST_XYZ being the active one). Now let's examine how this configuration can be used by the end user.
Using RTEs
At the risk of belaboring the point, I would like to make sure this is clear: An RTE must be "activated" in order for it to fire (change the library list and/or call the exit program). If it is not, then nothing happens prior to the execution of the query. Currently, there are two ways to activate an RTE for a user:
- DB2 Web Query administrator assigns an active RTE to the user (discussed previously)
- DB2 Web Query user changes the active RTE from the BI Portal
Once either of these events occurs, the active RTE is saved for that user and persists across other sessions and connections. It is also fired when a DB2 Web Query report is invoked from other interfaces such as the RUNWQFEX command, DB2 Web Query web services, and the DB2 Web Query application extension. In this article however, we focus on the primary DB2 Web Query web interface known as the BI Portal.
When DB2 Web Query users log into the BI Portal, they can see and/or change their active RTE by clicking on the Tools > Runtime Environments link on top right portion of the screen. This is shown in Figure 15.

Figure 15: Select an active RTE from BI Portal.
There are several things to take note of in this interface:
- The active RTE is always the first entry in the list and has a check mark next to it.
- Only the RTEs assigned to the user are shown in the list.
- A special RTE named *NONE is always displayed. When selected, this means that no RTE is activated and consequently the library list is not changed and no exit program is called prior to the execution of a query.
- The remaining RTEs are shown in alphabetical order and can be selected as the new active one.
When the user runs any report (based on a local DB2 CLI synonym with one-part naming), the active RTE is executed and the library list is changed to the one defined in that RTE. Figure 16 shows an example of a report based on such a synonym.
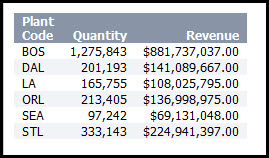
Figure 16: Run the report.
To change the active RTE, the user merely selects the desired one from this list as shown in Figure 17.

Figure 17: Users can change the active RTE.
Taking this action makes the RTE named CUST_FRED the active one. As you can see in Figure 18, it now appears as the first RTE in the list and it is checked. It is now activated!

Figure 18: The active RTE has been changed!
Now when the user runs that same report again (as the one shown in Figure 16), the library list is different, the accessed table is different, and the returned results are different. The results of this invocation of the report are shown in Figure 19.
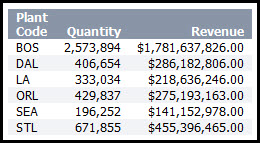
Figure 19: Different results!
Other Considerations
There are cases where the job's library list is not changed by RTE processing. Examples of this include the following:
- Administrator does not set up any RTEs.
- No RTE is assigned to the user.
- The special RTE named *NONE is assigned to the user.
- An RTE is created and assigned to the user, but the library list setting is set to *NONE.
In these cases, the job's library list is determined by the user profile's job description and is not overridden by the RTE. The job description may have an explicit library list (in the INLLIBL parameter) or it may be set to *SYSVAL to pick up the system value, but in either case, that library list is used when the RTE does not override it.
RTEs were primarily designed with DB2 Web Query runtime users in mind: those users often need the ability to quickly point to a new environment and switch library lists. DB2 Web Query metadata administrators typically do not have this same requirement; in fact, RTEs will not fire for multiple administrative interfaces (see Table 2 below). Consequently, it is not advisable to set up RTEs for those types of users. Instead, they should rely on their job description library list to locate files for administrative activities.
DB2 Web Query provides multiple interfaces for running reports. Not all of them support the firing of RTEs prior to report execution. Table 1 lists the interfaces that do support RTEs:
|
Table 1: Interfaces that support RTEs
Table 2 lists the interfaces that currently do not support the firing of RTEs prior to report execution. As stated previously, if you need library list processing for these types of interfaces, it is recommended that you rely on the library list defined in the user profile's job description.
|
Table 2: Interfaces that do not support RTEs
You Asked, We Delivered!
RTEs are another example of IBM listening to your feedback and implementing your suggestions into the product. DB2 Web Query continues to evolve and grow, and customer input has a huge role in that endeavor. One great vehicle for relaying these types of requests is to post on our DB2 Web Query developerWorks forum.
If you have a question about the product or would like to request a new feature, we would love to hear from you!


LATEST COMMENTS
MC Press Online