Are you using PC5250 Graphical Device Interface (GDI) printers to print AS/400 output to a locally attached PC printer? Do you have trouble getting the output to position correctly on the page? Do you want to print 198 characters on one line without running off the page? If you answered yes to any of these questions, then the new AS/400 Client Access Express for Windows (Express client) product might present some interesting possibilities that you can take advantage of today.
In previous articles, I discussed the three different ways that printer emulation can be set up: Host Print Transforms (HPTs), Printer Definition Tables (PDTs), and GDIs. (See “The Basics of PC5250 Printer Emulation,” Midrange Computing, February 1999, for more information.) In this article, however, I’ll look at some Express client enhancements that make PC5250 GDI printing easier. (Remember, the GDI method is just asking PC5250 to use the Windows print drivers.) I’ll look at how Express client makes it easier to work with page orientation parameters, printer margins, form settings, and a few other tricks you may not realize are in the new Express client. You’ll see that Express client makes PC5250 GDI printing easier, which might encourage you to start experimenting with Express client for your printer emulation sessions.
Notice Anything Different?
The biggest Express client PC5250 change comes after you have configured a printer emulation session. The Printer Control option under the File pull-down menu has been replaced for non-DBCS PC5250 sessions with a Page Setup option. The Page Setup panel (Figure 1) now has three tabs on it that allow you to enter specific printer settings for your GDI emulated printers: Orientation, Form Settings, and Advanced Options.
Orienting Your Output
Clicking on the Orientation tab displays a panel that controls the scaling and page orientation settings of your printed output.
The key to controlling page orientation is in whether you check the box labeled Use automatic page orientation. If this box is not checked, then your PC5250 output will be oriented according to the following specifications:
• Computer output reduction means output is always reduced and printed in landscape mode. (This option will allow you to print 198 columns on 8.5 x 11 inch paper.)
• Portrait means output is always printed in portrait mode. (If you also choose the Use best fit scaling check box, these two options together would allow you to print 132 columns on 8.5 x 11 inch paper.)
• Landscape means output is always printed in landscape mode. If the Use automatic page orientation box is checked, then the output will be printed according to the table shown in Figure 2. (Width and length are based on the PAGESIZE parameter in your AS/400 Printer File.) In simple terms, the table says if the output can fit on the paper in Portrait or Landscape mode without reduction, PC5250 will print it that way. Otherwise, the output will be reduced and printed in Landscape mode.
Setting Margins with Express Client
The Margins section of the Orientation panel is only valid if the Use best fit scaling box is checked. The bestfit option was previously specified using the BestFit= parameter in the Workstation Profile (.WS) or configurations settings file (PCSWIN.INI), but with Express client it has been integrated directly into PC5250. The use of bestfit in Express client now allows you to set the top and left margins of the pages. The bottom and right margins are then set to have the same values as the top and left margins that you enter here. In addition, you can set the margins in inches or centimeters by clicking on the drop-down box and selecting the appropriate measurement.
The margin values you enter should represent the distance from the paper’s edge, but most print drivers enforce a nonprintable border (area). The default represents the emulator’s default margins. You can change these values as long as your input value is not less than the print driver’s enforced margin. If you go below the enforced margin, the print driver’s value is automatically substituted for your entered value. On most printers, you can find your printer’s nonprintable border (area) on the Properties page of the selected printer. (Click on the Paper tab.) You can view your printer’s properties through the Printers folder of your Windows Control Panel. (Right-click on the target Printer and select Properties off the pop-up menu. Depending on the driver, you may have to search through the tabs on your printer’s Properties screen to find the nonprintable border. The nonprintable border settings for an IBM AFP 3812 printer are shown in Figure 3. You can also reach your printer’s Properties panel from the Printer Setup option of the PC5250 File pull-down menu.
You can set your PC5250 top margin as small as 0.22 inches and the left margin as small as 0.26 inches. (These measurements are based on input from the Windows print driver.) It is never a good idea to set the margins to exactly the same as your enforced margins (in this example, 0.22 and 0.26 inches) as this setting might result in some output not being printed.
Form Settings
Clicking on the Form Settings tab on the Page Setup panel gives you the Form Settings panel (Figure 4). This panel allows you to control which form types will be selected for the printer’s drawers one and two and the envelope hopper. OS/400 allows you to specify which type of paper can be used. For example, you can say that a drawer contains standard paper, which usually means 8.5 x 11 inch paper, or that it contains A4 (8 x 11.5 inch paper). This function is only valid for Windows NT PCs when the printer and
Windows print driver supports the change-source function. If the printer does not support this function, these drop-down options will not contain any form for you to select.
Advanced Options
Clicking on the Advanced Options tab gives you the Advanced Options panel (Figure 5). This panel gives you control over all of the following print control attributes:
• PC Code Page—This field allows you to specify the code page to be used for printing. This specification is important if the code pages being used on the AS/400 differ from the code page of your PC.
• No CR between fields—This option can help improve performance for impact printers. Carriage returns (CRs) will cause the print head to return to its leftmost position
before printing the next field. If the field is on the same line, the result is unnecessary movement of the print head, which reduces performance. By checking this box, you stop that movement.
• Print bold as normal—This option is often referred to as draft mode; it prints bold characters in normal fonts instead of bold fonts, so you can save your ink or ribbon when printing drafts.
• Display print status dialog—This option controls whether the (small) Print Status window is displayed. Most people will want to keep this option checked. The Print Status window allows you to do all operations (such as start, stop, and cancel the current job) from the PC instead of from the AS/400. The only reason you might want to consider changing this option is if you are in a print server environment (i.e., you have a PC dedicated to printer emulation as an area printer) and you only want your AS/400 system operators to have control over starting and stopping the printer. Deselecting this option will prevent anyone at the PC from controlling the printer emulation session from the PC.
• Use raster fonts—This option tells PC5250 to use the bitmap fonts instead of system fonts, which are scaleable fonts. Raster fonts are fixed fonts, which makes for faster printing because the print driver doesn’t need to calculate how to format the printout.
A Few More PC5250 Printer Tricks
You can select the font to be used for the output file at the printer emulation session if you enter the FONT(*DEVD) parameter on your AS/400 Spool File specifications. This option allows you to then specify the font to be used for your printouts on the PC5250 Printer Emulation Setup panel (Figure 6) by clicking on the Font for AS/400 print file drop- down box and selecting the font you want to use. This specification gives the user a viable way to control (select) the font to be used on one specific session without changing/overriding the AS/400 printer file.
In a previous article (“Even More PC5250 Functions You Never Knew Existed, AS/400 Network Expert, March/April 1999), I discussed how you could hide the PC5250 Printer emulation icon on the Windows task bar. The new Express client now allows you to say that you want to hide the PC5250 printer emulation session at the printer emulation session start up. This task can be done by adding /H as a parameter after the workstation profile:
c:Program FilesIBMClient Access Emulatorpcsws.exe c:Program
FilesIBMClient AccessEmulatorPrivatewsname.ws /H
In this case, wsname is the name of the printer workstation profile of the session to be started.
Be careful when using this option. Once you have closed any other emulation sessions, the only way you will be able to end this hidden session is to end the session via the Windows task control menu.
Better Printing Through Graphical Improvements
Printer emulation with CA/400 has come a long way in the last two years. Every year, new printer definition tables are added and every release of OS/400 supports additional HPT workstation customization objects. However, in the Express client, the biggest improvements have come in the usability of the GDI (e.g., your Windows print drivers). You now have more control than ever over how your output is printed. You can specify your own print margins, obtain better control over page orientation and output reduction, and now you can control other important aspects of your printer (such as draft mode, performance, rastor fonts) via a graphical interface. The Client Access development team continues to improve PC5250 printer emulation and would like to hear from you on any additional requirements you have. You can contact the team through the CA/400 home page at www.as400.ibm.com/clientaccess/ cafeedbk.htm
Related Reading
“Even More PC5250 Functions You Never Knew Existed,” AS/400 Network Expert, March/April 1999
“The Basics of PC5250 Printer Emulation,” Midrange Computing, February 1999. (Also posted in the March/April 1999 AS/400 Network Expert Web Edition: www.midrangecomputing. com/ane/99/03)
“Fill the Gaps with Workstation Customization Objects,” Midrange Computing, February 1999. (Also posted in the March/April 1999 AS/400 Network Expert Web Edition: www.midrangecomputing.com/ane/99/03)
“PC5250 Functions You Never Knew Existed,” AS/400 Network Expert, January/February 1999
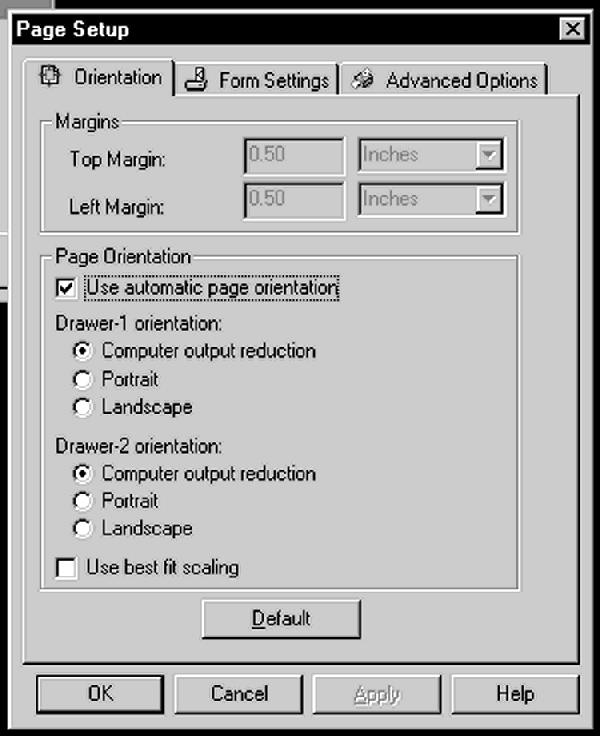
Figure 1: The Express client Page Setup panel contains three tabs that allow you to enter specific printer setting for your PC5250 emulated printers.
Figure 2: This table shows how output is printed with automatic page orientation.
Figure 2: This table shows how output is printed with automatic page orientation.
Width Length Result
<=8.5" <=11" Portrait CPI unchanged*
<=11" <=8.5" Landscape
CPI unchanged*
>11" any Landscape
CPI changed by 75% LPI changed by 70%
Any >11" Landscape
CPI changed by 75% LPI changed by 70%
>8.5" <=11" Landscape
CPI changed by 75% LPI changed by 70%
<=11" >8.5" Landscape
CPI changed by 75% LPI changed by 70%
* If the width is > than the depth, output will be in landscape.
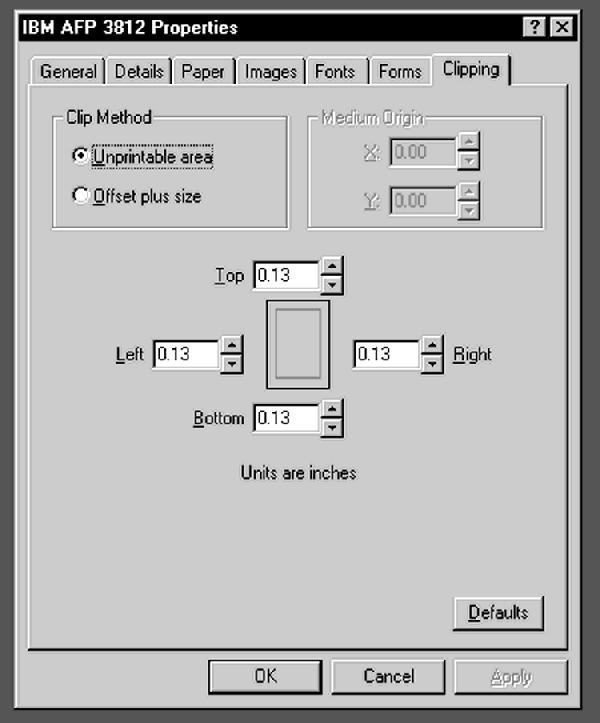
Figure 3: With some printers, you can view the unprintable area values from the printer Properties panel.
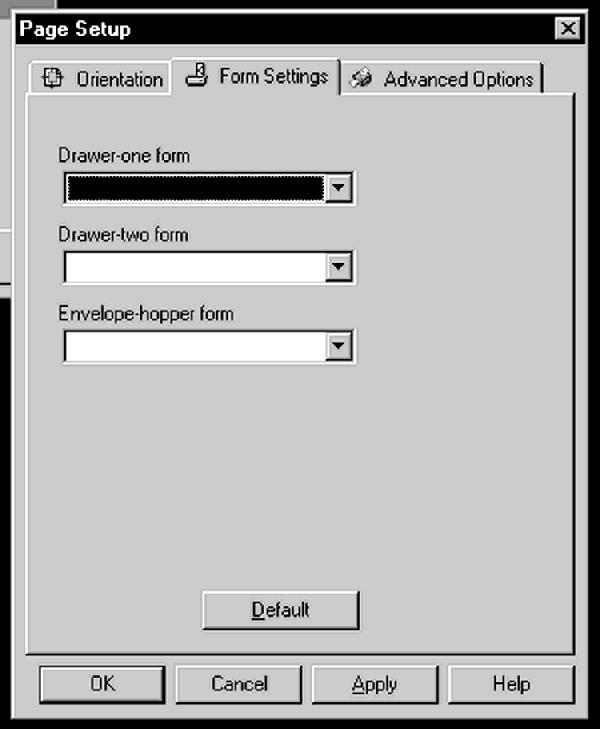
Figure 4: The Form Settings tab allows you to control which form types will be selected for the printer’s drawers one and two and the envelope hopper.
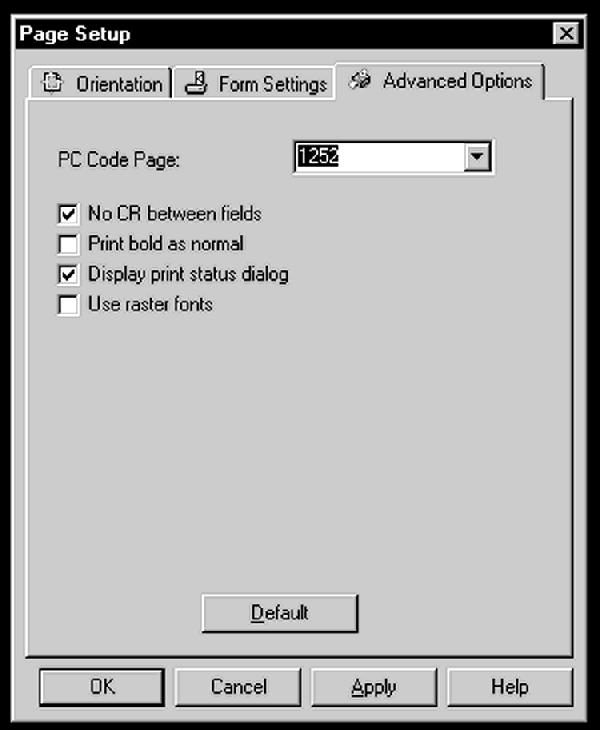
Figure 5: The Advanced Options tab gives you control over some additional print control attributes.
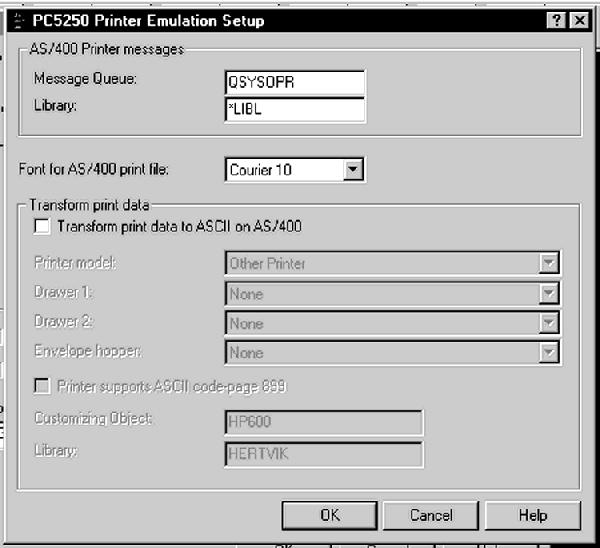
Figure 6: If you specify the FONT(*DEVD) parameter on your AS/400 Printer File specifications, you can then specify the font to be used for your printouts on the PC5250 Printer Emulation Setup panel.


LATEST COMMENTS
MC Press Online