Simply put, work enters the system, gets processed, and leaves. I think of it like a mall, full of stores that have stuff in it that we want. We go to the appropriate store. We pick out our items. We go home. The key is entering the store first. After all, we can't leave the store first, then enter the store, and then pick out our items. That wouldn't make any sense. Although this analogy is somewhat silly, it does stress the point that there is a logical progression to work management. Now, let's build on this simplistic view.
Keeping with our "store" analogy, we have to address some key components:
Who Is Going to the Store?
This would be our customer. Each user has a unique user profile (Userid) that identifies him on the system. The user profile is set via the Create User Profile (CRTUSRPRF) command. A key parameter of the user profile is the job description. Figure 1 shows an example of how to set the job description parameters.
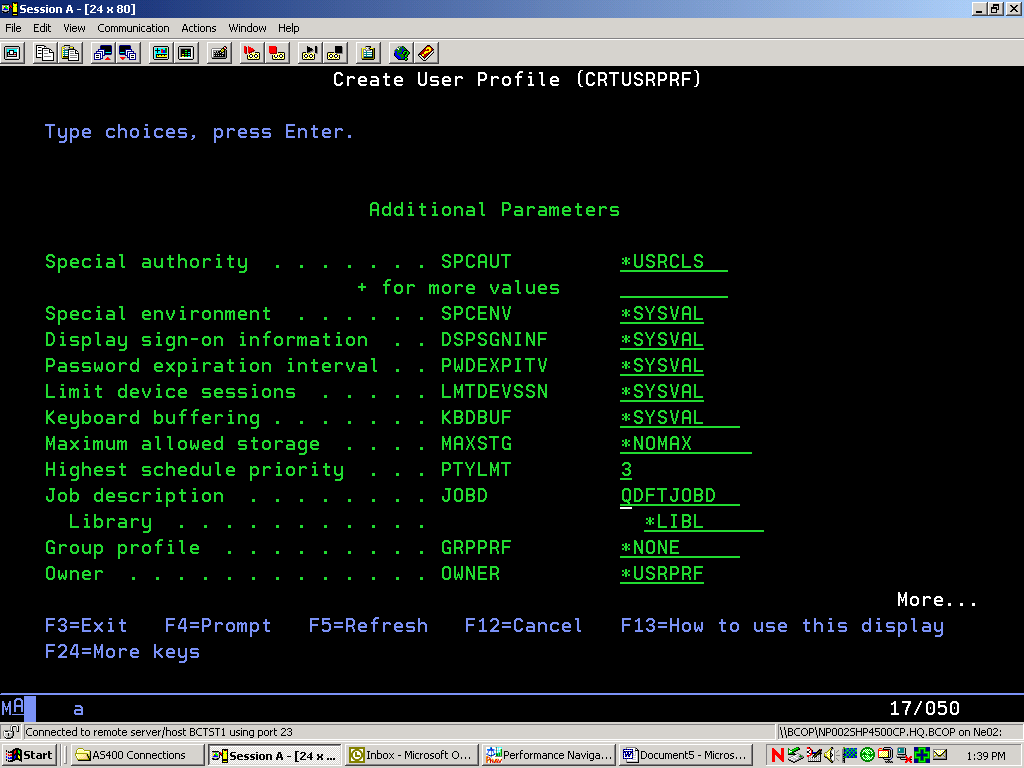
Figure 1: The Additional Parameters screen of CRTUSRPRF lets you set up the job description.
What Store Is the Customer Going To?
Most people don't just blindly go to the store. They have a plan. If they need golf balls or a 60" TV, they need a specific store. This plan is determined by a job description. A job description describes the work coming into the subsystem and contains pieces of information such as Userids, job queues, and routing data. From a basic work management flow, the job queue and routing data are the key components. Job queues point to the desired subsystem. Routing data is a compare value that will help dictate how the job is processed. The job description is set up via the Create Job Description (CRTJOBD) command. If a job description exists, you can display it via the Display Job Description (DSPJOBD) command. The key to remember with this command is to press the F10 function key. Only then will you see the routing data parameter. See Figures 2 and 3.
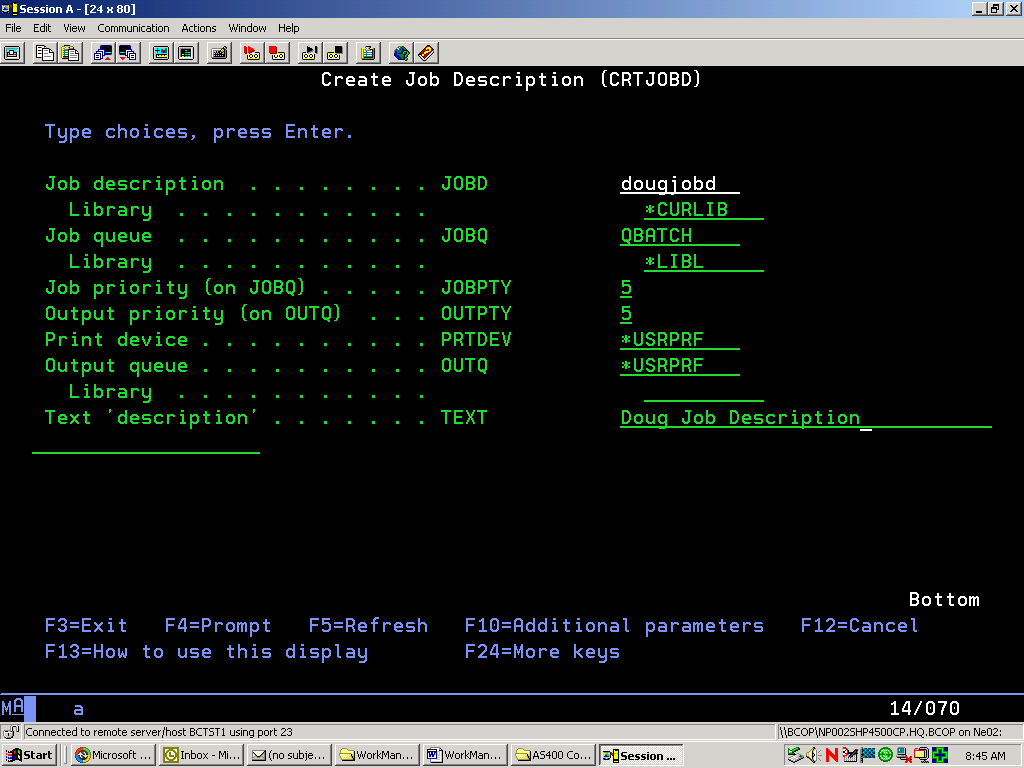
Figure 2: Notice the Job queue (JOBQ) parameter.
Pressing F10 allows you to set the routing data.

Figure 3: Set a job description's routing data (QCMDI) from this screen.
In our example, QCMDI is the routing data. This exact value will need to be set up in the subsystem description as a routing entry.
Where in the Store Does the Customer Go?
A store can have multiple departments, and the iSeries or AS/400 uses the same concept. It uses routing entries to differentiate various types of processing. The combination of routing entries and routing data (from the job description) determines how your job will be handled. The routing entry can be set up via the Create Routing Entry (CRTRTGE) command or changed via the Change Routing Entry (CHGRTGE) command. Figure 4 shows the routing entries that are already set up in IBM's QINTER subsystem.
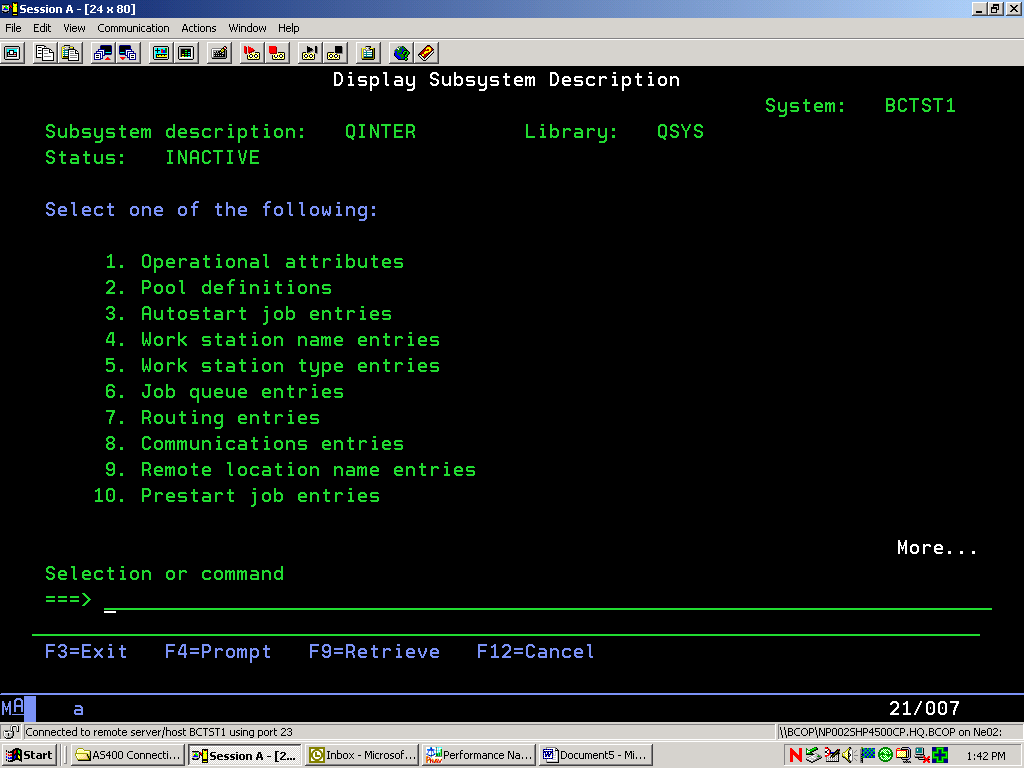
Figure 4: The Display Subsystem Description screen shows the routing entries in QINTER.
Pressing 7 brings up the Display Routing Entries screen, as shown in Figure 5.
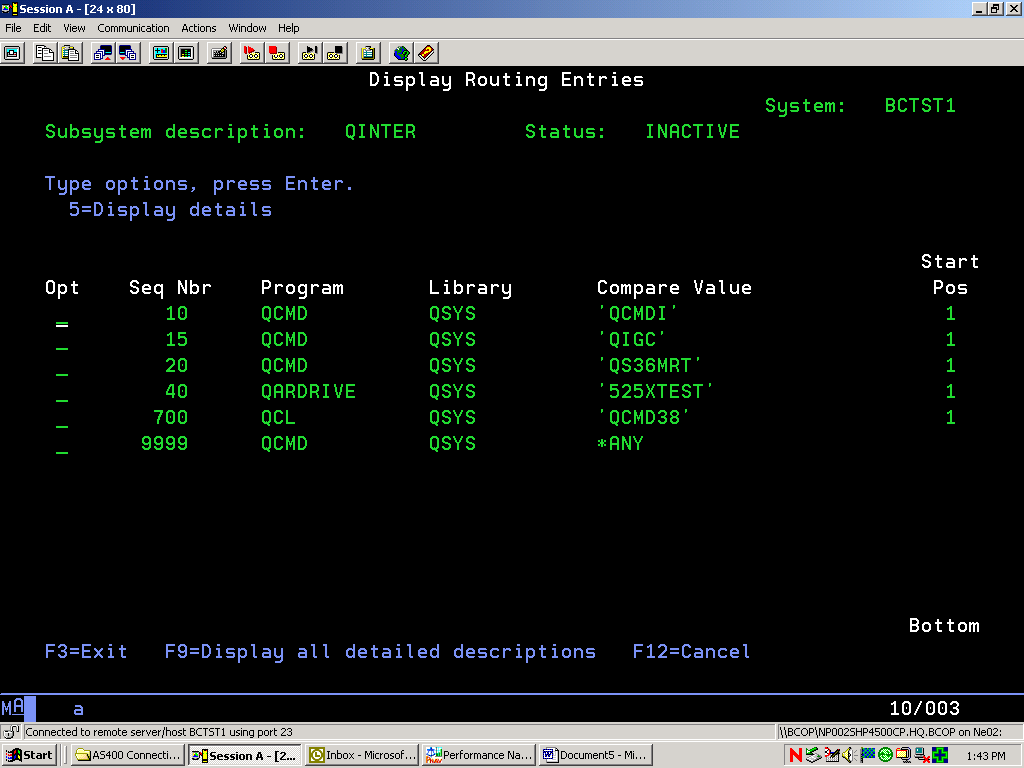
Figure 5: Note the Compare Values on the Display Routing Entries screen.
Remember the QCMDI routing data from the job description in Figure 3? It is an exact match with routing entry sequence number 10 (QCMDI). This means that, upon entering this subsystem, we will use this routing entry to help process our job. Next, we need to display the routing entry details.
What Kind of Service Will the Customer Get?
Customers have individual characteristics and needs. Consequently, they require different attention. Likewise, not every job is processed the same way. In fact, key run attributes are determined by an object called a class. The class can be set up via the Create Class (CRTCLS) command or changed via the Change Class (CHGCLS) command. What's interesting about the class is how it's referenced. Remember our routing entry in the previous section? Class is determined when there is an exact match between the job description routing data and the compare value within the routing data. Since we had an exact match, we will use that routing entry. Pressing F9 (or simply entering a 5 and pressing Enter) displays the routing entry parameters. In Figure 6, we will see the class that is referenced.
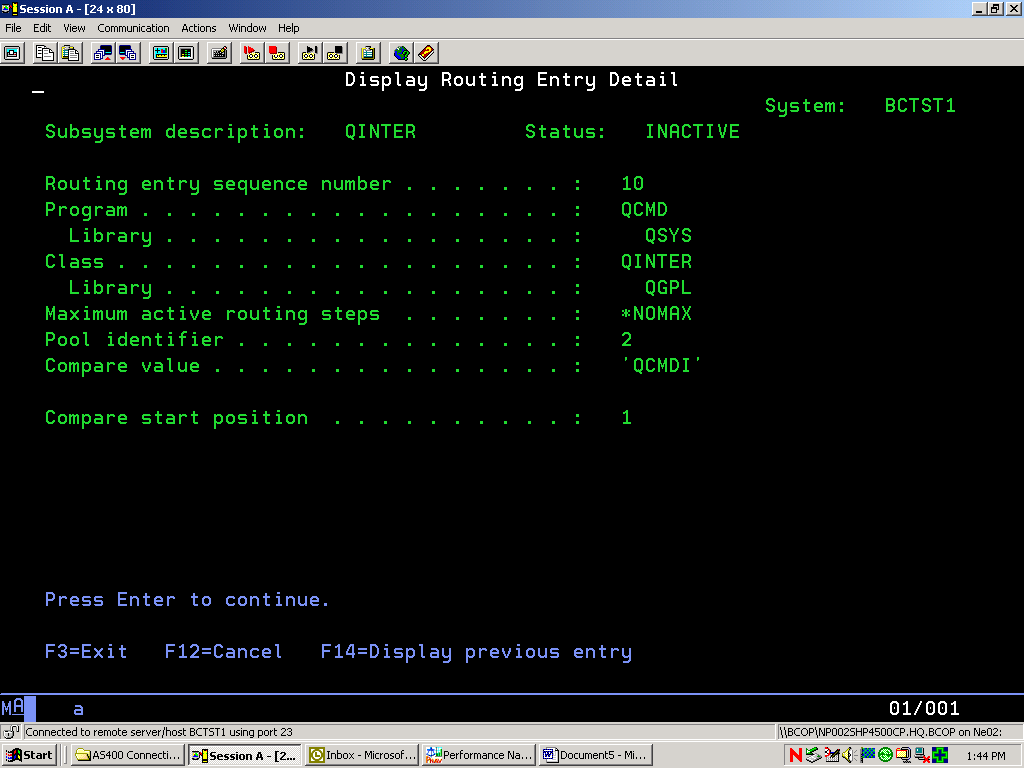
Figure 6: This screen shows the routing entry points to the class object QINTER.
Finally, we can see class screen in Figure 7.
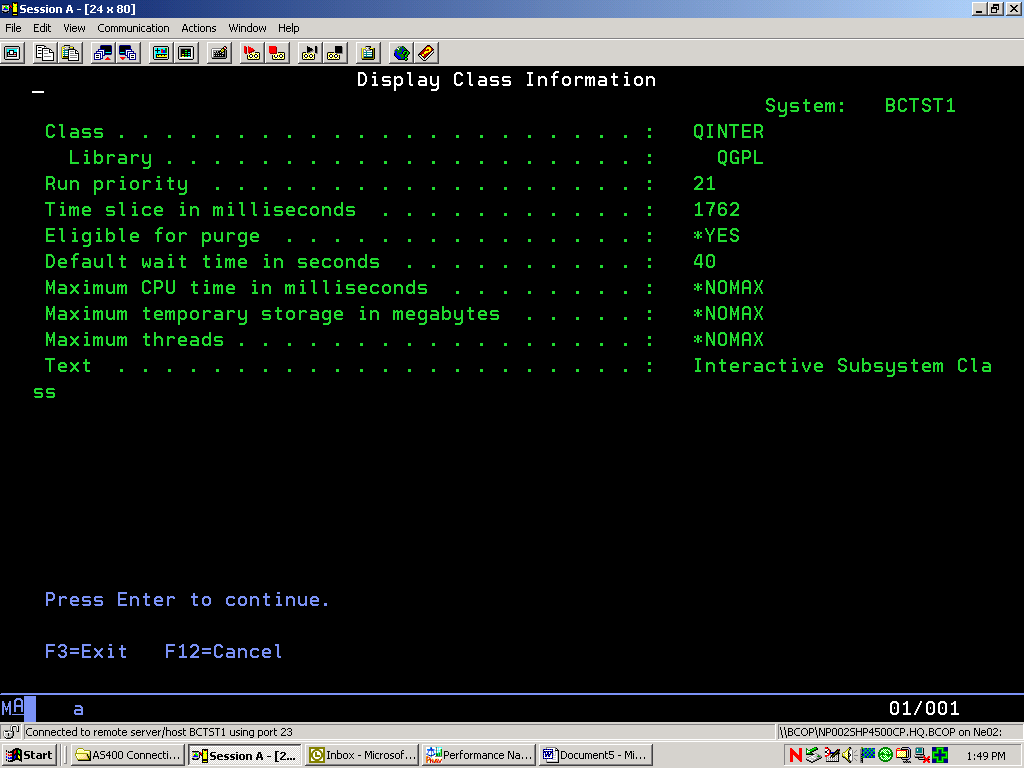
Figure 7: The Display Class Information screen shows class object parameters.
We just were hit with a lot of work management terms. The table in Figure 8 reviews them, continuing with the "store" analogy.
| Store | | iSeries or AS/400 |
| Customer | | User Profile (Userid) |
| Store | | iSeries or AS/400 System |
| What the customer needs | | Job |
| Individual store | | Subsystem |
| Plan (what store?) | | Job Description & Routing Data |
| Where in the store does the customer go? | | Routing Entry |
| What kind of service does the customer get? | | Class |
Figure 8: This cross-reference "store" analogy helps to explain work management terminology.
Another way to look at things is via a pictorial view, as shown in Figure 9. Again, we will add in our relative work management objects.
Figure 9: Pictorial view of our "store" analogy. Notice the iSeries and AS/400 objects.
The flow in Figure 9 is as follows:
Our customer (Userid) has a plan (Job D & Routing Data) and needs to go to the store (Subsystem).
Her plan (Job D) dictates that she go to the shoe store (her desired subsystem). Because she needs shoes, she ignores the sports and electronics stores (our user doesn't need those subsystems).
Her plan also specifies that she needs red shoes (routing data).
Within the shoe store, the store has two options--black shoes and red shoes. These options represent routing entries. Her red shoes request (routing data) is compared to what is in the store (red shoes and black shoes). Since our request of red shoes matches exactly to the type of shoes in the store (red), we can continue with our purchase (AS/400 processing).
The class indicates that the transaction will happen a certain way. In this case, she gets the shoes on sale.
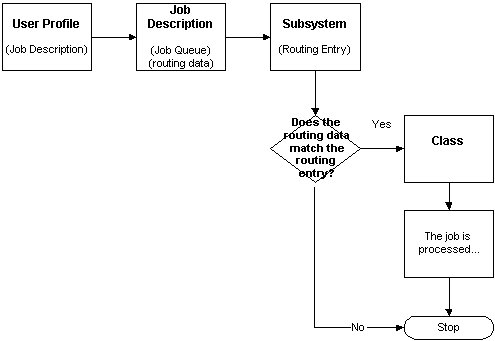
From an iSeries or AS/400 standpoint only, a basic work management flow would be as shown in Figure 10.
Figure 10: This flowchart represents basic iSeries and AS/400 work management.
Figure 10 shows us the following:
The user profile is set up. It contains a parameter called the job description.
The job description object contains the job queue, which, when active, is attached to an active subsystem. Additionally, the routing data is specified. F10 (Additional Parameters) must be pressed.
Upon entering the subsystem, the routing data from the JOBD is compared with the subsystem routing entry compare value. If it matches, the processing will occur.
Finally, the routing entry points to the class. This determines what priority our job will run in.
So now that you know a few basics, look at your own user profile (DSPUSRPRF). Note the job description it references. Display your job description (DSPJOBD) and note the job queue and routing data. Take it to the next step and look at subsystem description (DSPSBSD). Choose option 7 (routing data) and press F9. Note the compare value parameter and the class it references. Finally, display the class (DSPCLS) and note the priority.
Only the Beginning
The goal of this article was to teach people the basics, not to teach people all facets of work management. I know I barely scratched the surface. However, I did show readers who have never been exposed to work management some basic work management concepts.
There are countless books on the subject by experts whom I would bow to (including iSeries and AS/400 Work Management by IBM's own Chuck Stupca). Trying to teach every aspect in one 1,500 word article would be like trying to teach you how to play golf in one day. That's ridiculous. And that's why you'll find more work management articles coming up in future issues of MC Mag Online. Later, we'll explore system values, routing programs, pools, routing entries, and the difference between interactive and batch work management.
It's now okay to open up the manual. That is, if you can pick it up.
Doug Mewmaw is an 18-year "jack of all trades" IT veteran. He currently works at Boise Office Solutions, a business-to-business catalog order company in Itasca, Illinois, that deals in office products. Doug has been in IT since '83 and lives with his beautiful wife (Cathy) and five children (Stephanie, Abbey, Faith, Matthew, and Andrew). While his kids think he's obsessed with golf, Doug contends that he is merely a passionate golfer. His wish is to someday watch the Masters in person. He can be reached by email at This email address is being protected from spambots. You need JavaScript enabled to view it.


LATEST COMMENTS
MC Press Online