When we put jobs in separate pools, we provide protection for the pages of information that the jobs use to get their work done. If all of the jobs run in the same place, they will steal pages from each other and waste time and system resources to read the information into main storage a second time in order to use them. If there is too much contention for main storage, the results can be catastrophic.
The first minor modification that we will make is to change the system value QCTLSBSD from QBASE to QCTL. The default system setup is not changed dramatically. However, we make changes to QBATCH and QINTER instead of QBASE. While this is not a necessary modification, it makes the diagrams used in this article simpler. So, the following information has been extracted from chapters 6 and 11 of the book.
More Than One Pool for Batch
In many environments, we will find ourselves running different types of batch jobs. Let's assume that in our environment, we are running three different types of batch jobs:
- Production batch jobs submitted by our system operator
- Short-running batch jobs submitted by our interactive users
- Development jobs (compiles, etc.) submitted by our programmers
When we have three different types of batch jobs to run, we'd like the subsystem to initiate one of each type of job. However, the default settings for QBATCH will not produce the desired result. In fact, we are at the mercy of the order of the jobs on the QBATCH job queue. Also, if the system operator has just submitted a large number of longer-running batch jobs, the jobs submitted by our interactive users might not run for quite a while. Usually, they require faster turnaround time. Finally, when all three jobs are in the same pool, they will compete for the available main storage. This competition may result in slower turnaround time.
So, now we need to find a way to introduce one of each class of batch job to its own pool. While there may be many ways to do this, three methods are used more often than any others:
- One subsystem with three job queues
- Three subsystems with one job queue each
- One subsystem with one job queue using three different job priorities
Let's take a look at second method. The first thing we need to do is define two new job queues with the Create Job Queue (CRTJOBQ) command. Let's assume that we'll still use QBATCH for our short-running batch jobs and that we'll add a job queue called PRODBAT for our long-running production jobs and a job queue called PGMRBAT for our development jobs. We run these commands:
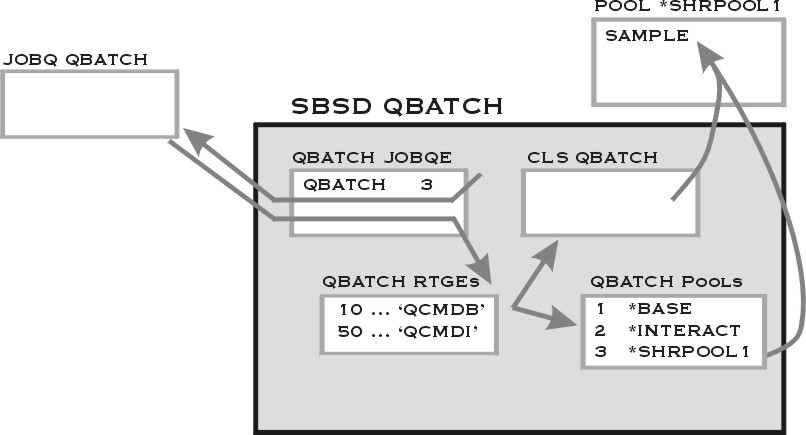
Let's start by looking at a QBATCH that has been modified to run three jobs in a pool other than *BASE. See Figure 1.
Figure 1: QBASE has been modified to initiate three batch jobs from the QBATCH job queue to run in *SHRPOOL1.
Let's start by creating two new subsystems with the Create Subsystem Description (CRTSBSD) command:
CRTSBSD PGMRBAT POOLS((1 *SHRPOOL3)
As you probably guessed, the subsystem PRODBAT will be used to run our production batch jobs in *SHRPOOL2, and PGMRBAT will run our development batch jobs in *SHRPOOL3. When we create the subsystem description, it is only necessary to specify the pools--we can use the defaults for the other parameters.
Well, that's a start. Now, we need to define two new job queues with the Create Job Queue (CRTJOBQ) command. Let's assume that we'll still use QBATCH for our short-running batch jobs and that we'll add a job queue called PRODBAT for our long-running production jobs and a job queue called PGMRBAT for our development jobs. We run these commands:
Next, we need to provide a connection between the subsystems and the job queues that we have just created. We make this connection by adding job queue entries to our new subsystems with the Add Job Queue Entry (ADDJOBQE) command:
ADDJOBQE PGMRBAT JOBQ(PGMRBAT) MAXACT(1)
Then, we need to tell the subsystem how to initiate the jobs that are submitted to the job queues. The subsystem uses routing entries to determine the attributes of any job that it initiates. Routing entries for a subsystem are defined via the Add Routing Entry (ADDRTGE) command:
ADDRTGE PGMRBAT SEQNBR(10) CMPVAL(QCMDB 1) PGM(QCMD) CLS(QBATCH) POOLID(1)
All of the parts are there, but the mechanism to start jobs doesn't exist yet--we have not started the subsystem. But, before we start the subsystems, we still need to make sure that our users get their jobs to the right job queues. And, since we have not allocated storage to either *SHRPOOL2 or *SHRPOOL3, it's not a good idea to start the subsystem at this time.
We've made good progress so far. Let's keep going. Now, let's insure that our users get their work to the right job queue. It is easy for us to accomplish this with our user profiles and job descriptions. So, let's create two additional job descriptions with the Create Job Description (CRTJOBD) command:
CRTJOBD JOBD(PGMR) JOBQ(PGMRBAT)
In order to make sure that our users get their jobs to the right queue, we need to be sure that their user profiles specify the correct job description.
Finally, let's allocate storage and set the tuning parameters for *SHRPOOL1, *SHRPOOL2, and *SHRPOOL3 (Figures 2 and 3):
Work with Shared Pools System: TSCSAP01 Main storage size (M) . : 4352.00 Type changes (if allowed), press Enter. Defined Max Allocated Pool -Paging Option-- Pool Size (M) Active Size (M) ID Defined Current *MACHINE 325.00 +++++ 325.00 1 *FIXED *FIXED *BASE 220.50 4 220.50 2 *CALC *CALC *INTERACT 3739.00 197 3739.00 3 *CALC *CALC *SPOOL 35.00 1 35.00 4 *CALC *CALC *SHRPOOL1 10.00 1 10.00 5 *CALC *CALC *SHRPOOL2 10.00 1 10.00 6 *CALC *CALC *SHRPOOL3 10.00 1 10.00 7 *CALC *CALC *SHRPOOL4 .00 0 *FIXED *SHRPOOL5 .00 0 *FIXED *SHRPOOL6 .00 0 *FIXED More... Command===> F3=Exit F4=Prompt F5=Refresh F9=Retrieve F11=Display tuning data F12=Cancel
Figure 2: The first Work with Shared Pools display is used to provide main storage allocations for *SHRPOOL1, *SHRPOOL2, and *SHRPOOL3. *INTERACT has been increased to support interactive work.
Work with Shared Pools System: TSCSAP01 Main storage size (M) . : 4352.00 Type changes (if allowed), press Enter. -----Size %----- -----Faults/Second------ Pool Priority Minimum Maximum Minimum Thread Maximum *MACHINE 1 6.16 100 10.00 .00 10.00 *BASE 2 4.99 100 10.00 2.00 100 *INTERACT 1 10.00 100 5.00 .50 200 *SPOOL 2 1.00 100 5.00 1.00 100 *SHRPOOL1 2 .01 1 10.00 2.00 100 *SHRPOOL2 2 .01 1 10.00 2.00 100 *SHRPOOL3 2 .01 1 10.00 2.00 100 *SHRPOOL4 2 1.00 100 10.00 2.00 100 *SHRPOOL5 2 1.00 100 10.00 2.00 100 *SHRPOOL6 2 1.00 100 10.00 2.00 100 More... Command===> F3=Exit F4=Prompt F5=Refresh F9=Retrieve F11=Display text F12=Cancel
Figure 3: The second Work with Shared Pools display is used to provide the Minimum and Maximum Size % values for *SHRPOOL1, *SHRPOOL2, and *SHRPOOL3.
All right, we're finally ready to use these new subsystems. We only need to run the following commands:
STRSBS PRODBAT
STRSBS PGMRBAT
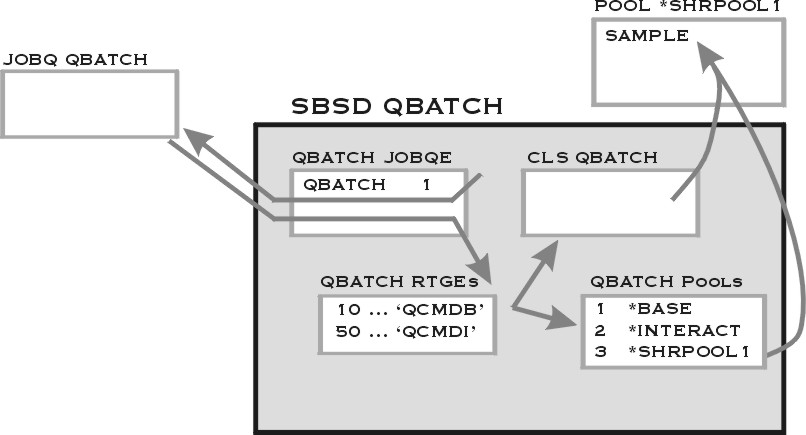
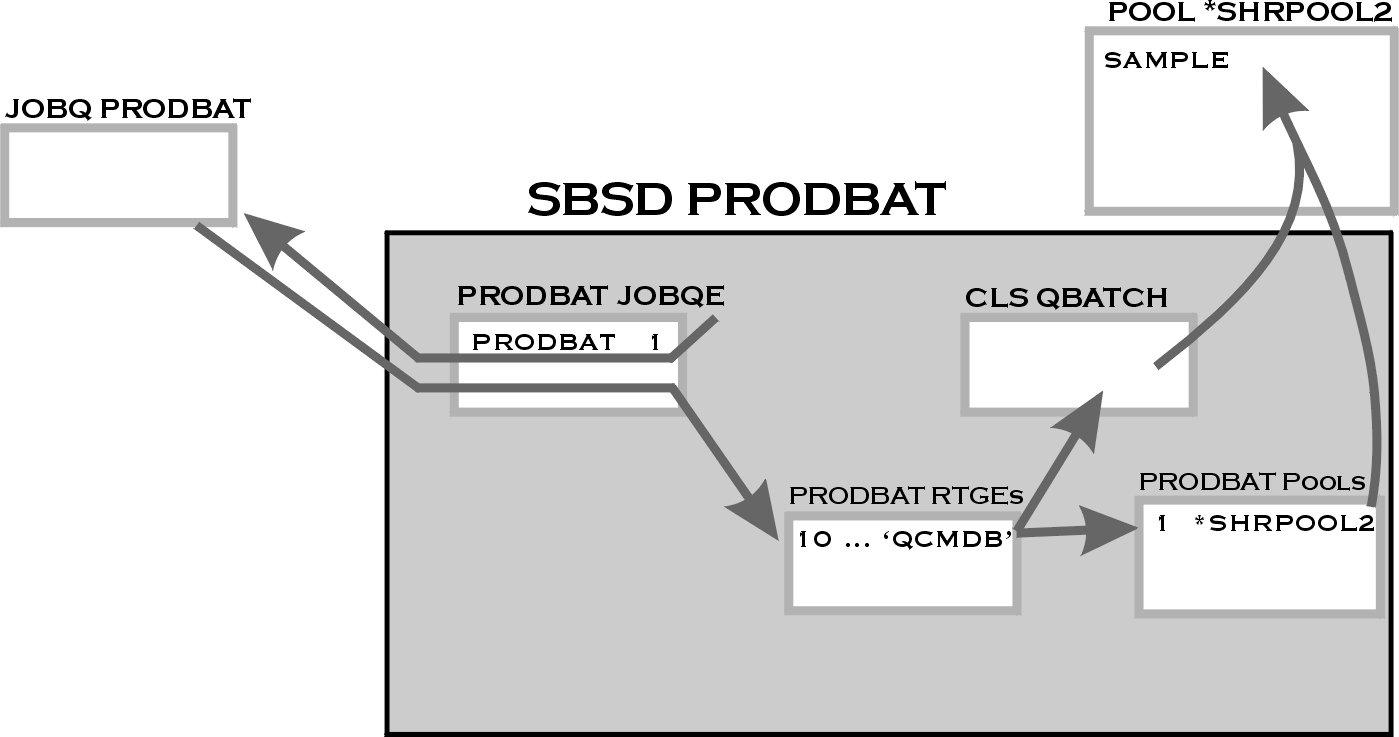
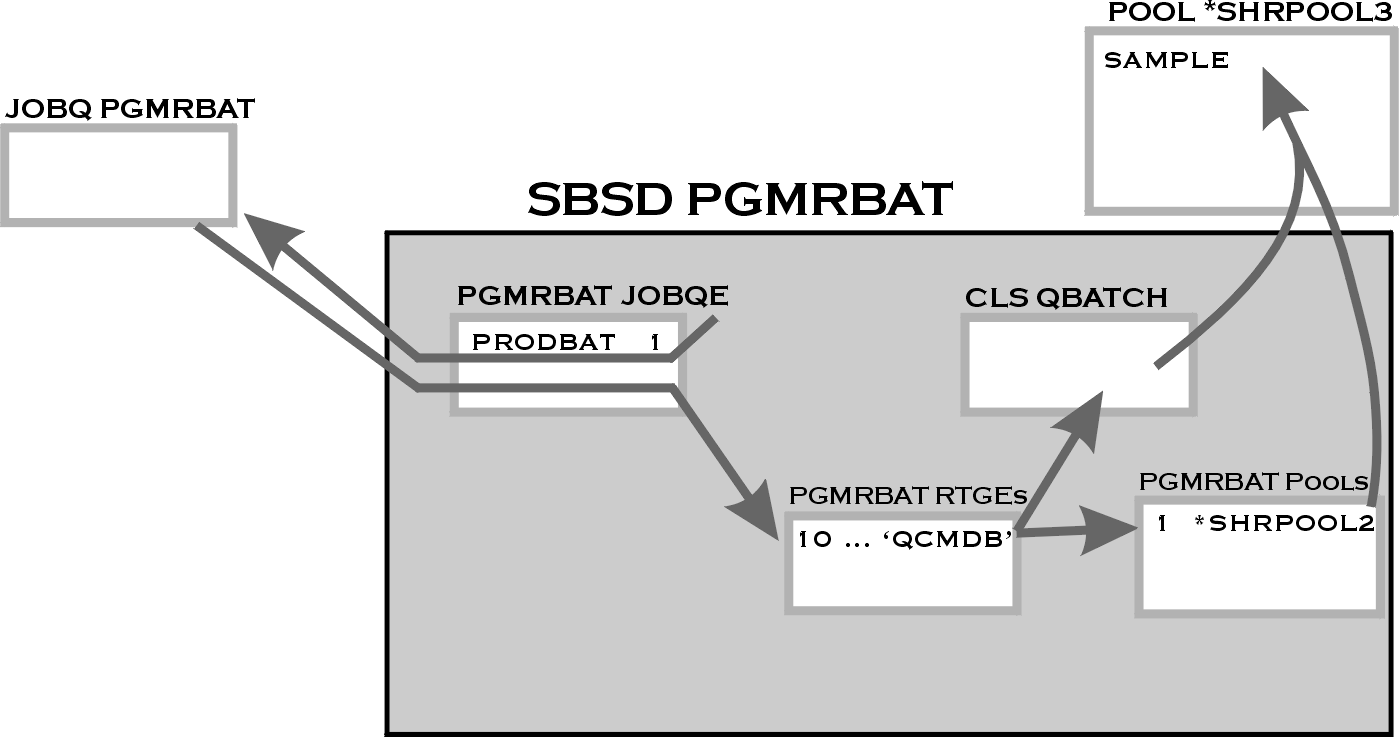
Now, one job at time will be run from each of the job queues by a different subsystem. Let's look at the operational characteristics of our subsystems, shown in Figures 4, 5, and 6.
Figure 4: QBASE has been modified to initiate one job at a time from the QBATCH job queue to run in *SHRPOOL1.
Figure 5: Subsystem PRODBAT is created to run one job from the PRODBAT job queue to run in *SHRPOOL2.
Figure 6: Subsystem PGMRBAT is created to run one job from the PGMRBAT job queue to run in *SHRPOOL3.
Notice that we have specified what appears to be a very low percentage of the available main storage to the batch pools. However, since our system's main storage is quite large, we have actually specified a minimum of 4 MB of main storage for each pool. This setting should provide sufficient storage for most batch jobs to run.
In a similar fashion to the manner in which we have separated batch jobs, we may need to separate interactive work. Typically, this involves separating programmers from production users and providing special treatment for more important production users. We will accomplish these changes by modifying the QINTER subsystem.
Let's start by looking at the default QINTER environment (Figure 7) which shows only the routing entry that used 'QCMDI' as a compare value (the other routing entries are not relevant to our example).
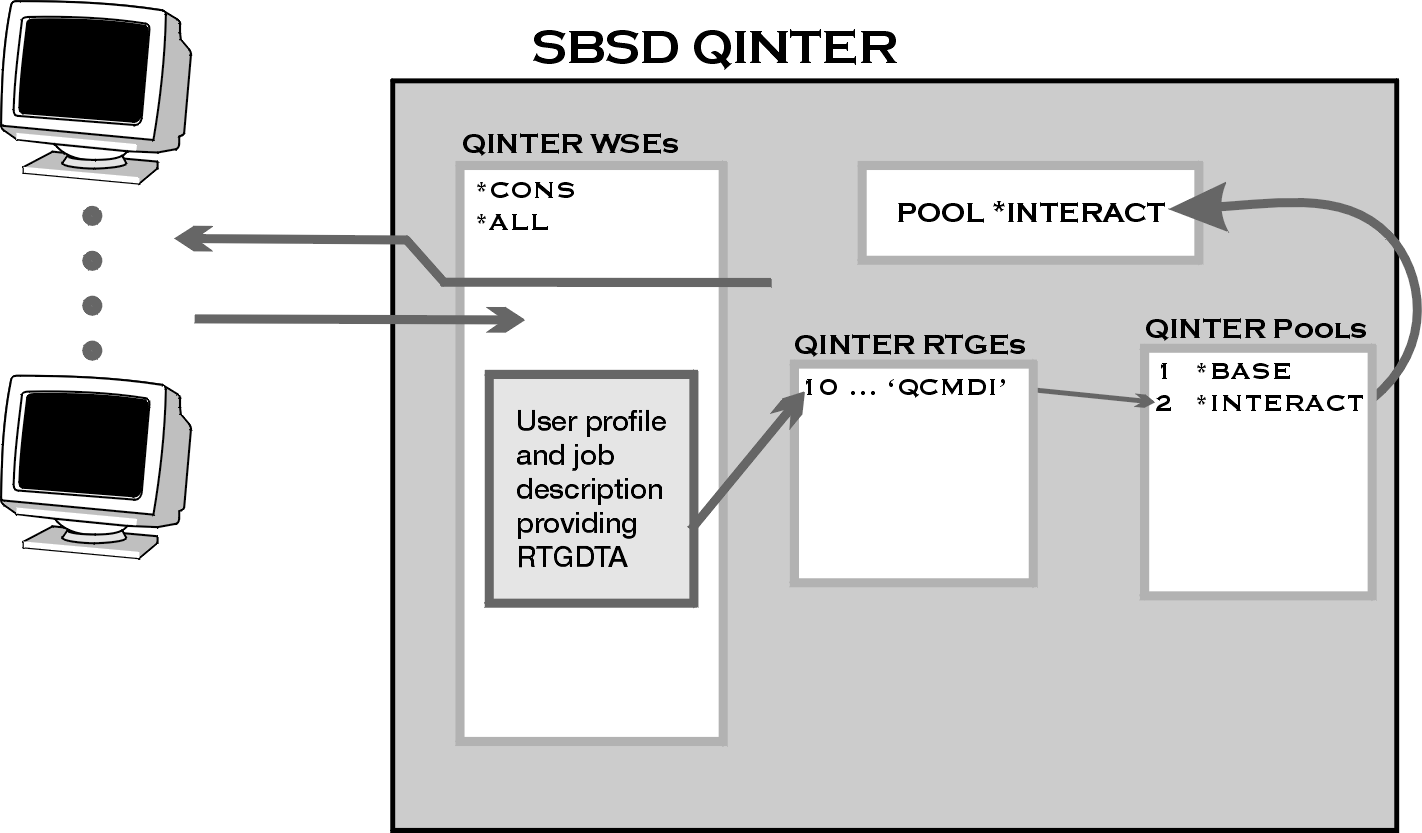
Figure 7: The default environment of QINTER will run all interactive jobs in *INTERACT.
Let's start the QINTER modification by adding two pools and two routing entries to QINTER:
ADDRTGE QINTER SEQNBR(11) CMPVAL('PGMR' 1) POOLID(3)
ADDRTGE QINTER SEQNBR(12) CMPVAL('FRTDSK' 1) POOLID(4)
While working with the batch job modifications, we created and/or modified the user profile and job descriptions for our programmers. So we only need to deal with our special users. We need to create a new job description, size the interactive pools and set the tuning parameters, and adjust our new user profile. Here are the commands we run:
CHGUSRPRF xxxxxx JOBD(FRTDSK)
That should eliminate any conflicts that we might have had. Let's move on to allocating storage and setting the tuning parameters for *SHRPOOL4 and *SHRPOOL5. Once again, we are using shared pools so that the system tuning adjustment function can reallocate storage if we don't set it up quite right. So what should we use as initial values for the pool size and activity level (MAX ACT) of *SHRPOOL4 and *SHRPOOL5?
Let's look at *SHRPOOL4 first. Since this is an interactive pool, let's start with a 10 MB allocation and add 1.0 MB for each potential user. In this case, we'll start with an allocation of 19 MB. For an activity level, we will assume that at most a third of the workstations will have a transaction in process at the same time. Since we have nine workstations, our MAX ACT should be set to 3.
Now, let's look at the users who need special attention. Even if we have fewer than 10 special users, we want to ensure that these users have a large amount of main storage--they are the most important users. So let's reallocate 80 MB of main storage from *INTERACT to *SHRPOOL5 and set the MAXACT to 5.
Let's go back to the Work with Shared Pools (WRKSHRPOOL) command and make our changes. The PAGING option for both pools should be changed to *CALC.
Work with Shared Pools System: TSCSAP01 Main storage size (M) . : 4352.00 Type changes (if allowed), press Enter. Defined Max Allocated Pool -Paging Option-- Pool Size (M) Active Size (M) ID Defined Current *MACHINE 325.00 +++++ 325.00 1 *FIXED *FIXED *BASE 220.50 4 220.50 2 *CALC *CALC *INTERACT 3720 197 3739.00 3 *CALC *CALC *SPOOL 37.50 1 37.50 4 *CALC *CALC *SHRPOOL1 10.00 1 10.00 5 *CALC *CALC *SHRPOOL2 10.00 1 10.00 6 *CALC *CALC *SHRPOOL3 10.00 1 10.00 7 *CALC *CALC *SHRPOOL4 19 3 *CALC *SHRPOOL5 80 5 *CALC *SHRPOOL6 .00 0 *FIXED More... Command===> F3=Exit F4=Prompt F5=Refresh F9=Retrieve F11=Display tuning data F12=Cancel
Figure 8:The first display of Work with Shared Pools is used to define the pool size, activity level, and paging options of *SHRPOOL4. The size of *INTERACT is changed at the same time in order to provide storage for *SHRPOOL4.
Notice that we are taking the storage for our new pool from *INTERACT. Since we are moving interactive users, this makes sense, right? Press the Enter key. When the display returns, it will show the pool descriptions we entered in Figure 8.
So far, so good. Now, we need to set the tuning parameters for *SHRPOOL4 and *SHRPOOL5. Our initial allocation for *SHRPOOL4 is 19 MB or approximately .05% of all of the main storage in the system. Let's set the minimum size of our pool to .03%. For the maximum pool size of *SHRPOOL4, let's double the maximum allocation of our batch pools and set this value to 2%. For the Faults/second values, let's use the same values as *INTERACT. Finally, since in most people's minds, development is less important than production, let's leave the priority value as low--2. For *SHRPOOL5, let's set the priority to 1 (high), the minimum % to 2, and the maximum % to 4. We'll use the same values as *INTERACT for Faults/second. By pressing PF11 on the display above, we get the screen shown in Figure 9.
Enter the values on the display as shown below and press Enter.
Work with Shared Pools System: TSCSAP01 Main storage size (M) . : 4352.00 Type changes (if allowed), press Enter. -----Size %----- -----Faults/Second------ Pool Priority Minimum Maximum Minimum Thread Maximum *MACHINE 1 6.16 100 10.00 .00 10.00 *BASE 2 4.99 100 10.00 2.00 100 *INTERACT 1 10.00 100 5.00 .50 200 *SPOOL 2 1.00 100 5.00 1.00 100 *SHRPOOL1 2 .01 1 10.00 2.00 100 *SHRPOOL2 2 .01 1 10.00 2.00 100 *SHRPOOL3 2 .01 1 10.00 2.00 100 *SHRPOOL4 2 .05 2 5 .50 200 *SHRPOOL5 2 2 4 5.00 1.00 200 *SHRPOOL6 2 1.00 100 10.00 2.00 100 More... Command===> F3=Exit F4=Prompt F5=Refresh F9=Retrieve F11=Display text F12=Cancel
Figure 9: Tuning parameters for *SHRPOOL4 are entered on the second display of Work with Shared Pools.
Now, QINTER is set up to provide separate storage pools for three different classes of users. The subsystem looks like the one shown in Figure 10.
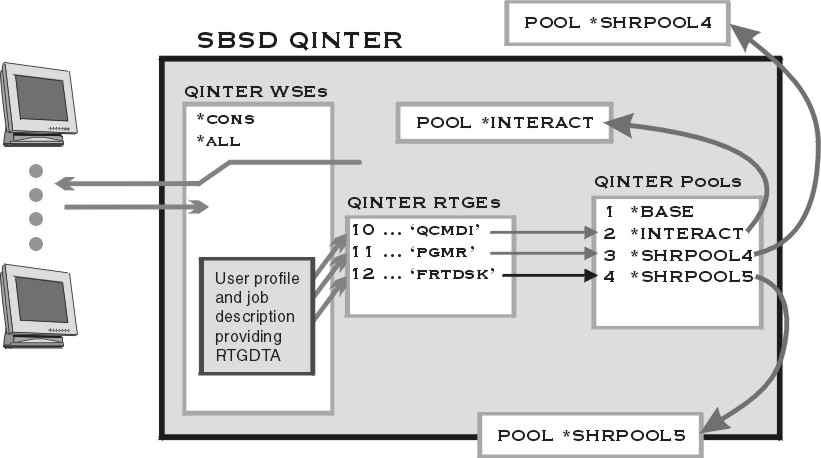
Figure 10: QINTER has been modified to run three different types of interactive users in three different pools.
With Work Management modified to have different interactive users in different pools, we have provided protection for their pages and will allow all of the interactive users to experience better performance. As you can see, making these changes was fairly simple and can be done without making major changes to your system operations.
This article has given you some of the basics for modifying Work Management to accommodate different types of interactive users and different types of batch jobs. Much more information and detailed explanations of the concepts that have been discussed in this article are available in my book, iSeries and AS/400 Work Management. In my next article, we'll take a look at some of the other performance aspects that you can manage when you introduce work to your system.
Chuck Stupca is a Senior Programmer in the IBM iSeries Technology Center in Rochester, Minnesota, where he is responsible for performance, clustering, and Independent ASP education and consulting. He can be reached via email at This email address is being protected from spambots. You need JavaScript enabled to view it..


LATEST COMMENTS
MC Press Online