jQuery Mobile might seem like a real sea monster, so let's tame it!
Summer is here in Denmark, and that means vacation and spending time with the family. No work, no stress, just a pale body in the sun. Many people buy a good book and spend the free hours reading it; others make puzzles or look after the garden. What do I do? Every summer, I tend to challenge myself by learning some new "computer" fun. This year I have decided it should be jQuery Mobile version 1.4+.
I started learning before my vacation, mainly because I wanted to do a mobile interface to the Lean/Takt software, and as I am not clever enough to learn Java or Objective C, I found that RPG, PHP, and jQuery Mobile would be the tools to accomplish the task.
So I fired up my browser and headed over to the jQuery Mobile website and started surfing around. Boy, did I get a overwhelmed! It's not a big task; it's a huge task. Once again, very clever people have done a great job for mortal people like me and developed a package that allows me to create a mobile app that will run on the most common mobile devices with a reasonable amount of time for me to spend.
I decided to share this with you, and let me start by saying that I don't know every ripple in the jQuery Mobile ocean, but that's why you should continue reading the article: I'm a beginner, and therefore, I might target the same problems you'll encounter if you also want to sail this part of the ocean of developing mobile apps.
"Write Less, Do More"
The sentence above is the mantra found on the jQuery Mobile website, and I think it pretty much says what this is all about.
I also have to quote the sentence that springs into your eyes when looking at the introduction page: "jQuery Mobile is a touch-optimized HTML5 UI framework designed to make responsive web sites and apps that are accessible on all smartphone, tablet and desktop devices."
Please note that during this article I will not explain every keyword and attribute because it would take up way too much space. At the end of the article, I have included a link section where you can dive deeper into everything.
jQuery Mobile—Pages
So let's make our first simple page by setting a few simple rules.
Rule 1: The page must start with <!DOCTYPE html>, which is the HTML5 definition.
Rule 2: After the title keyword, place the viewport meta tag in order to make browsers on mobile devices display zoom level and dimensions correctly.
<meta name="viewport" content="width=device-width, initial-scale=1">
Rule 3: A page in jQuery Mobile has elements with the "data-role" attribute set. The data-role="page" will be the container that defines the page. Also a data-role="header", class="ui-content", and data-role="footer" are basic for a page.
So with that information, our first page will look like this.
<!--
//=============================================
//
// Function: jQuery Mobile - first page
//
//=============================================
-->
<!DOCTYPE html>
<html>
<head>
<title>MCpressonline.com - our first page</title>
<meta name="viewport" content="width=device-width, initial-scale=1">
<link rel="stylesheet" href="http://code.jquery.com/mobile/1.4.5/jquery.mobile-1.4.5.min.css" />
<script src="http://code.jquery.com/jquery-1.11.1.min.js"></script>
<script src="http://code.jquery.com/mobile/1.4.5/jquery.mobile-1.4.5.min.js"></script>
</head>
<body>
<div data-role="page">
<div data-role="header">
<h1>Dipping your toes in the jQuery Mobile ocean</h1>
</div><!-- /header -->
<div data-role="content">
<p>Summer is coming...</p>
</div><!-- /content -->
<div data-role="footer">
<h4>My left foot...</h4>
</div><!-- /footer -->
</div><!-- /page -->
</body>
</html>
Figure 1: This is our first jQuery Mobile page.
To see it live, point your mobile phone, iPad, PC, or all here. Please notice how the various browsers display the page according to the dimension of the screen. Really cool and no programming required from you.
In jQuery Mobile, a single HTML document can contain multiple pages. This means that all the "pages" load at once with a data-role="header" for each page. Each page is then contained inside a <div> with a unique ID. By clicking a link or button, the framework will load the internal page and display it to the user. So let's try to make a page with three different pages.
The page I have created here will show some weather reports on various places in the world (good to know when you're on the sea), and to get a little local "folklore," the examples will be in Danish.
The code will look like this (I will comment in bold inside the code).
<!--
//======================================================================================
//
// Function: jQuery Mobile - multiple pages
//
//======================================================================================
-->
<!DOCTYPE html>
<html>
<head>
<title>MCpressonline.com - multiple pages</title>
<meta charset="ISO-8859-1">
<meta name="viewport" content="width=device-width, initial-scale=1">
<link rel="stylesheet" href="http://code.jquery.com/mobile/1.4.5/jquery.mobile-1.4.5.min.css" />
<script src="http://code.jquery.com/jquery-1.11.1.min.js"></script>
<script src="http://code.jquery.com/mobile/1.4.5/jquery.mobile-1.4.5.min.js"></script>
Handle the image size on large screens so the image does not scale up too much.
<style>
@media screen and (min-width: 1200px)
{
img {
width: 50%;
max-width: 50%;
}
}
</style>
</head>
<body>
This is the container that holds the data for page 1 with a unique ID of "page1."
<!-- Page: #page1 -->
<!-- page one start -->
<div data-role="page" id="page1">
<!-- header -->
<div data-role="header">
<h1>Odense weather</h1>
</div>
<!-- content -->
<div data-role="content" >
<p>The id of the page is: <code>id="page1"</code>
<p>This is the weather in Odense on 2015-07-11 (in Danish)</p>
<p>Gradvist mere skyet og i eftermiddag måske stedvis lidt regn.<br>Temp. op mellem 15 og 18 grader, og svag til let vind fra vest og sydvest.<br>I aften mest skyet og endnu mulighed for lidt regn, men i nat mest tørt og stedvis ret klart vejr.<br>Temp. ned mellem 10 og 15 grader, og svag til let vind fra sydøst.</p>
In the links to the next pages, note the link to page3 has a data-transition="flip", which means that the page will be shown using the flip transition.
When the Back button is pressed, the framework will automatically apply the reverse version of the transition that was used to show the page.
Note: In the link section, there is a link to the various transitions you can use.
<a href="#page2">Weather: San Diego, US (link)</a>
<p>
<a href="#page3" data-dialog="true" data-transition="flip">Weather: Reykjavik, Iceland (dialog)</a>
</div>
<!-- footer -->
<div data-role="footer">
<h4>Copyright Someone - Some Rights Reserved</h4>
</div>
</div>
<!-- page one end -->
This is the container that holds the data for page2 with a unique ID of "page2."
<!-- Page: #page2 -->
<!-- page two start -->
<div data-role="page" id="page2">
<!-- header -->
<div data-role="header">
<h2>San Diego weather</h2>
</div>
<!-- content -->
<div data-role="content">
<p>The id of the page is: <code>id="page2"</code></p>
<img src="/ex2.png" width="100%">
<p><a href="#page1" data-rel="back">Back to Odense weather</a></p>
</div>
<!-- footer -->
<div data-role="footer">
<h4>Copyright Someone - Some Rights Reserved</h4>
</div>
</div>
<!-- page two end -->
This is the container that holds the data for page 3 with a unique ID of "page3."
Note that in the div tag with the data-role="page", the data-dialog="true" is specified, which means that the page will be shown as a dialog. The framework will add all the code needed to create the dialog.
<!-- Page: #page3 -->
<!-- page two start -->
<div data-role="page" id="page3" data-dialog="true">
<!-- header -->
<div data-role="header">
<h2>Reykjavik weather</h2>
</div>
<!-- content -->
<div data-role="content">
<p>The id of the page is: <code>id="page3"</code></p>
<img src="/ex2a.png" width="100%">
The data-rel="back" will ensure that you will always navigate back to the previous page.
<p><a href="#page1" data-rel="back">Back to Odense weather</a></p>
</div>
<!-- footer -->
<div data-role="footer">
<h4>Copyright Someone - Some Rights Reserved</h4>
</div>
</div>
<!-- page two end -->
</body>
</html>
Figure 2: Show the weather in various places of the world.
See the example live here.
Note that I have added some pictures to pages 2 and 3 and that I have given them a width of 100%. This will make the pictures show very nicely on a mobile phone and on an iPad while on a PC it will look a little odd.
To overcome that, I have used the @media screen in the header section, but of course this could have been done using a jQuery plug-in. I have included a link later on that shows some examples of this.
Let's say we want to have some buttons instead of links. Is that difficult?
Well, not really. All you have to do is add this class="ui-btn" link to each link, and the links will be transformed into buttons. By adding calls "ui-corner-all", the buttons will have rounded corners.
I have also added a small icon to each button on the first page just by using the "ui-icon-xxxx" class, where xxxx is the name of the icon. In my example, I have used the "ui-icon-arrow-r" class, which is a right-pointing arrow. To place the arrow on the right of the button, use the "ui-btn-icon-right" class. This means that the button code will look like this:
<a href="#page3" class="ui-btn ui-corner-all ui-btn-icon-right ui-icon-arrow-r" data-dialog="true" data-transition="flip">Weather: Reykjavik, Iceland (dialog)</a>
And the interface will now like this:
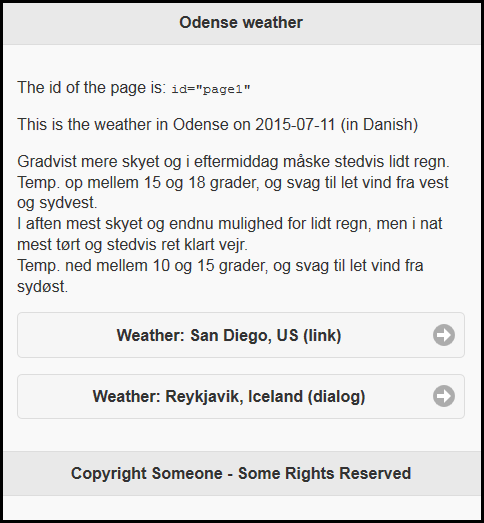
Figure 3: You have built your first page!
See it here. Get the code here.
All links in jQuery Mobile are handled by what is called the"AJAX navigation system," and as the name says, linking is done in AJAX. That might leave you with the question "What about external links?" Well, jQuery Mobile will handle it and use AJAX if possible and "normal" linking if not. So domain-crossing issues will automatically be handled by the framework.
Until now, I have paddled in only a very small part of the jQuery Mobile ocean, but generally speaking the framework is more and less built over the same "model," so if you understand one part, it will be very easy for you to dig into all the other elements in the framework.
Before I move on to events, I will just briefly show you a quick example of the Listview widget that the framework provide.
jQuery Mobile—Listview
A listview is defined by an unordered or ordered list with a wide range of features. To define a listview, add data-role="listview" attribute to the list and you're set.
Let's define a very simple unordered list that contains a list of song with the word "ocean" in the title.
<!-- page start -->
<div data-role="page" id="page1">
<!-- header -->
<div data-role="header">
<h1>Sailing the jQuery Mobile ocean</h1>
</div>
<!-- content -->
<div data-role="content">
<p>
<h4>Song with the word "Ocean"</h4>
<p>
<ul data-role="listview" >
<li>Fountains of Wayne - A Dip in the Ocean</li>
<li>Mick Harvey - A Drop, An Ocean</li>
<li>Pixies - Another Toe in the Ocean</li>
<li>The Vaccines - Aftershave Ocean</li>
<li>Tom Waits - The Ocean Doesn't Want Me</li>
<li>The Mountain Goats - Oceanographer</li>
<li>Someone Still Loves You Boris Yeltsin - Oceanographer</li>
<li>Erza Furman - At The Bottom Of The Ocean</li>
</ul>
</div>
<!-- footer -->
<div data-role="footer">
<h4>Copyright Someone - Some Rights Reserved</h4>
</div>
</div>
<!-- page end -->
This will look like this:
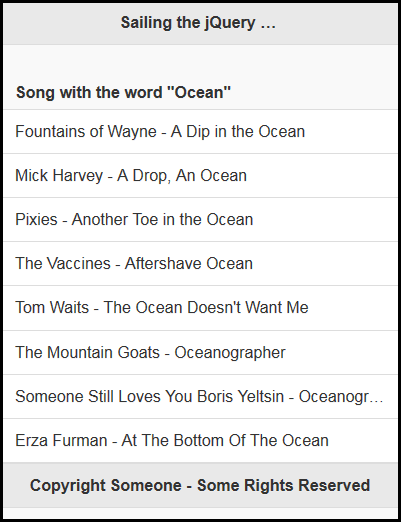
Figure 4: Here's a jQuery Mobile listview with an unordered list.
Now let's make it possible to add a filter to the list. This is done by adding the attribute to the <ul> line, so it now looks like this:
<ul data-role="listview" data-filter="true" data-filter-placeholder="Search songs...">
And the result will then look like this:
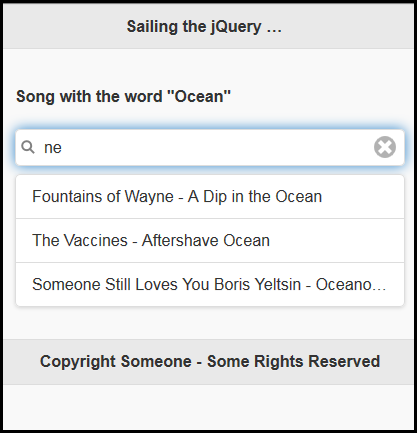
Figure 5: Now the listview has a "ne" filter applied.
See it live here:
Pretty cool and not much work to do if you ask me.
Moreover, the feature list just continues and continues with attributes like Filter reveal, List dividers, Autodividers, and Count bubbles. The features are endless, and you really get the "wow" feeling when you look into it. Look in the link section for a link to this nice feature.
I hope you can see the strength of this framework. I have only two things left in this article that I will touch before we have to sail back into the safe coast and catch our breath.
The first thing is the "event." This nice feature makes a mobile app a real mobile app, with things like "swipe" and "taphold" and all the other things that those clever app guys do all the time.
And now the time has come for you to sail that boat on the ocean.
jQuery Mobile Events
Before we begin, I must say that I have already made this article much longer than I planned in the first place, mainly because to cover this huge subject just takes up space, but also because when you get started it just is so cool and effective that stopping is pretty hard. But I will just show you some quick examples of how to use the events and from then on you're on your own, but hopefully with enough wind in the sails to keep the boat in motion.
Let's start by testing the "tap" and "taphold." In this example, we'll create a small page that has three buttons.
One button will act on a tap/tab event, and one button will act on a taphold/tabhold event; this means that the button must be held down longer than one second. The last button is a reset button. All that happens is that some messages will be shown below the buttons to notify you what just happened. Not very useful, but good enough to show how to trigger the events.
I have also tried to combine the tab and tabhold. It doesn't work very well if you ask me, but you can test that yourself.
Here is the code (comment is bold):
<!--
//======================================================================================
//
// Function: jQuery Mobile - events
//
//======================================================================================
-->
<!DOCTYPE html>
<html>
<head>
<title>MCpressonline.com - events</title>
<meta charset="ISO-8859-1">
<meta name="viewport" content="width=device-width, initial-scale=1">
<link rel="stylesheet" href="http://code.jquery.com/mobile/1.4.5/jquery.mobile-1.4.5.min.css" />
<script src="http://code.jquery.com/jquery-1.11.1.min.js"></script>
<script src="http://code.jquery.com/mobile/1.4.5/jquery.mobile-1.4.5.min.js"></script>
CSS classes to handle the colors.
<style>
.setTabColor {
background-color: #D52B1E;
color: #FFFFFF;
}
.setTabHoldColor {
background-color: #4572A7;
color: #FFFFFF;
}
</style>
<script language="JavaScript">
<!--
//=============================================================================
// jQuery
//=============================================================================
$(document).ready(function() {
$(function(){
Bind the event to the buttons and call a function when the event occurs. This could be done in various ways, but this example is taken from the jQuery Mobile API reference and modified to suit my needs. If you head over to the w3schools.com website, they have examples that make the same stuff in a different way. I have included the links at the end.
$( "#myButton1" ).bind( "tap", tapHandler );
$( "#myButton2" ).bind( "taphold", tapHandlerHold );
$( "#myResetButton" ).bind( "tap", tapHandlerReset );
// Function that to handle the tab
function tapHandler( event ){
$( "#myResult" ).html( "I was tapped..." ).removeClass('setTabHoldColor').addClass('setTabColor');
}
// Function to handle the long press
function tapHandlerHold( event ){
$( "#myResult" ).html( "I was long pressed..." ).removeClass('setTabColor').addClass('setTabHoldColor');
}
// Function to handle the rest
function tapHandlerReset( event ){
$( "#myResult" ).html( " " ).removeClass('setTabColor setTabHoldColor');
}
});
});
// -->
</script>
</head>
<body>
<!-- page start -->
<div data-role="page" id="page1">
<!-- header -->
<div data-role="header">
<h1>Events - tap / taphold</h1>
</div>
<!-- content -->
<div data-role="content">
<p>
<button id="myButton1">Tab me</button>
<button id="myButton2">Hold me down for more than a second</button>
<p>
<button id="myResetButton">Reset</button>
<p>
<div id="myResult"> </div>
</div>
<!-- footer -->
<div data-role="footer">
<h4>Copyright Someone - Some Rights Reserved</h4>
</div>
</div>
<!-- page end -->
</body>
</html>
Figure 6: This example shows tap (tab) and taphold (tabhold).
See it live here.
The last event example I will show is a page where you can swipe left on one button and swipe right on another and then a reset button where you can just swipe. When swiped, a Collapsible (another widget) will be shown telling you a little Elvis Costello info.
The code looks like this:
<!--
//======================================================================================
//
// Function: jQuery Mobile - swipe
//
//======================================================================================
-->
<!DOCTYPE html>
<html>
<head>
<title>MCpressonline.com - events</title>
<meta charset="ISO-8859-1">
<meta name="viewport" content="width=device-width, initial-scale=1">
<link rel="stylesheet" href="http://code.jquery.com/mobile/1.4.5/jquery.mobile-1.4.5.min.css" />
<script src="http://code.jquery.com/jquery-1.11.1.min.js"></script>
<script src="http://code.jquery.com/mobile/1.4.5/jquery.mobile-1.4.5.min.js"></script>
<style>
Some CSS to style the Collapsibles
.setSwipeLeft {
background-color: #D52B1E;
color: #FFFFFF;
}
.setSwipeRight {
background-color: #4572A7;
color: #FFFFFF;
}
</style>
<script language="JavaScript">
<!--
//=============================================================================
// jQuery
//=============================================================================
$(document).ready(function() {
$(function(){
Handle the swipes on the buttons and expand the collapsible in question.
$( "#myButton1" ).bind( "swipeleft", swipeLeftHandler );
$( "#myButton2" ).bind( "swiperight", swipeRightHandler );
$( "#myResetButton" ).bind( "swipe", swipeHandlerReset );
// Function that to handle the swipes
function swipeLeftHandler( event ){
//$("#col2").collapsible( "collapse" ); // Remove to test
$("#col1").collapsible( "expand" );
}
// Function to handle the long press
function swipeRightHandler( event ){
// $("#col1").collapsible( "collapse" ); // Remove to test
$("#col2").collapsible( "expand" );
}
// Collapse all
function swipeHandlerReset( event ){
$("#col1,#col2").collapsible( "collapse" );
}
});
});
// -->
</script>
</head>
<body>
<!-- page start -->
<div data-role="page" id="page1">
<!-- header -->
<div data-role="header">
<h1>Events - swipes</h1>
</div>
<!-- content -->
<div data-role="content">
<p>
<button id="myButton1">Swipe left</button>
<button id="myButton2">Swipe right</button>
<p>
<button id="myResetButton">Just swipe</button>
<p>
<div id="myResult"> </div>
Define the collapsible.
<div id="col1" data-role="collapsible">
<h4>My Aim is true</h4>
<p class="setSwipeLeft">Released in 1977 on Stiff Records</p>
</div>
<div id="col2" data-role="collapsible">
<h4>King of America</h4>
<p class="setSwipeRight">Released in 1986 on F-Beat Records</p>
</div>
</div>
<!-- footer -->
<div data-role="footer">
<h4>Copyright Someone - Some Rights Reserved</h4>
</div>
</div>
<!-- page end -->
</body>
</html>
Figure 7: Here's an example of swipe.
See it live here.
This completes the event intro and what I have to show about the subject. Of course, there's much more to be said about this subject and—yes, you guessed right—a link can be found in the link section.
If you're still with me, we have come to the last subject I will talk about in this article, which is "theming," so let's take a deep breath and dive into this very exciting feature.
jQuery Mobile Theming
jQuery Mobile has a very powerful and sophisticated theming tool inside the framework. Up to 26 set of toolbars, content, and button colors are supported in what is called a "swatch." When I first looked into it, I didn't get the idea, but then suddenly the penny dropped and I did understand that a "swatch" is the collection of colors and looks that define a theme.
Each "swatch" is defined by a letter, starting at "a" and going up. This means that by adding the attribute data-theme="a" to any element, it will get to colors and shapes for that theme. If you add the data-theme on the page level, all widgets inside the page container will automatically inherit the theme.
And how do you define a theme? you might wonder. Well, the answer is "ThemeRoller." ThemeRoller is a tool that lets you define everything—and I mean everything—that has to be defined for a theme, and does so in a very easy drag-and-drop way.
Define your theme, download it, and use it in your own project. You can save your theme on the jQuery Mobile server and share the URL to anybody else on Twitter or Facebook and become the master of "themes."
Go to ThemeRoller by clicking on this link. You will see something like this:
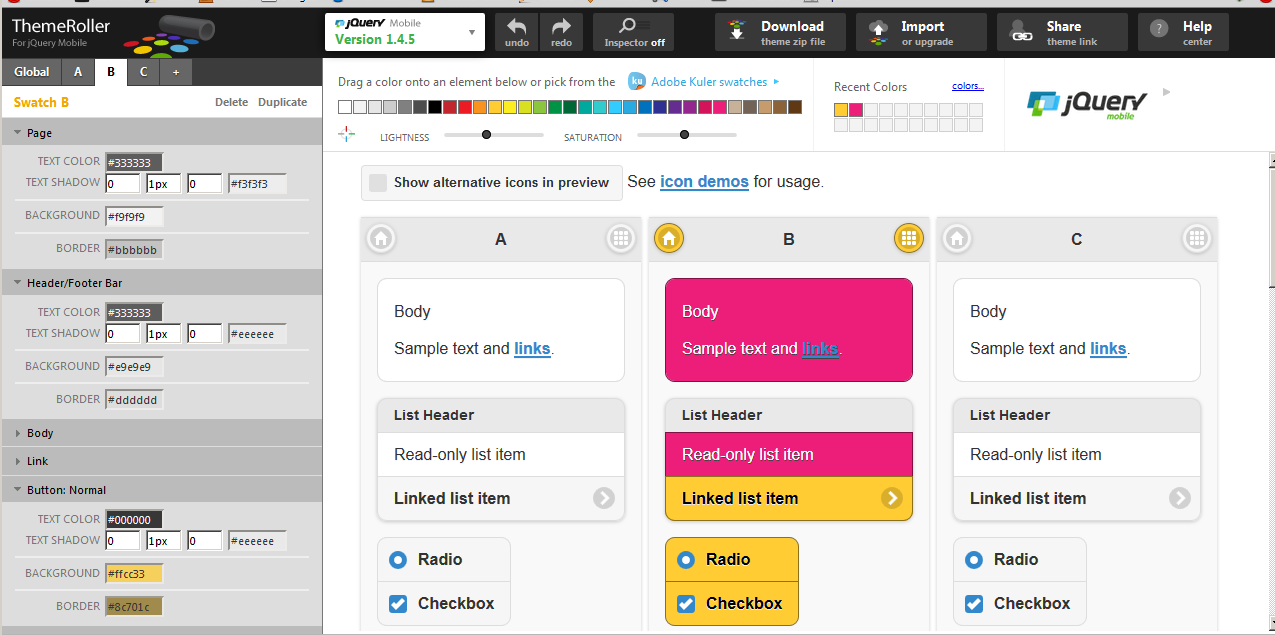
Figure 8: This is the jQuery Mobile ThemRoller interface.
As you can see, you can select the swatch you want to work with, and you can then fold out the various elements on the left or you can drag and drop colors to the elements in the center of the screen. When you're done, click the download button at the top. Give the theme a name and save it, and you're ready to go.
The save screen looks like this.
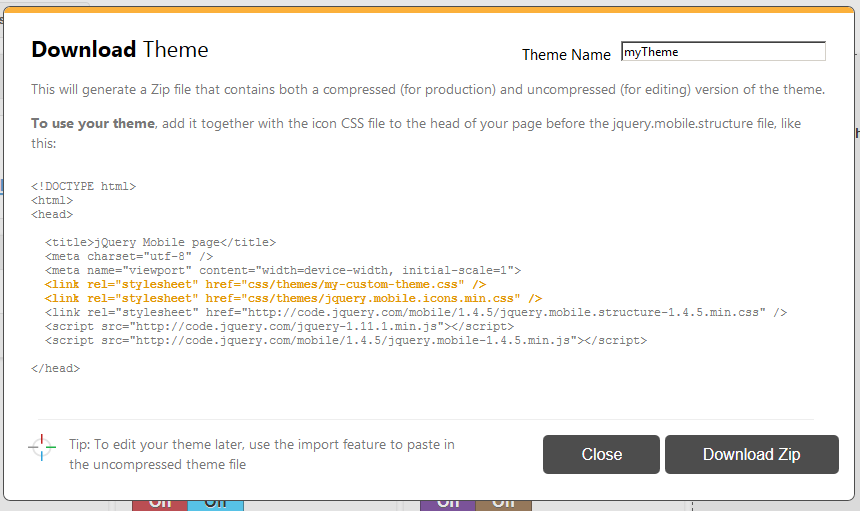
Figure 9: Save a theme from ThemeRoller.
You will get a zip file from the tool. Here's my advice on how to handle it. Create a folder called "css-themes" in the place where you have your jQuery Mobile project. Then create a folder with the name of the theme you made when saving. This way you can have more than one theme inside the css-themes folder.
In my example, I created a theme named "myTheme," so my folder structure will look like this:
/root -> css-themes -> myTheme
The myTheme folder will contain all the files needed for the theme to function.
Now let's use the theme from the previous example 7 code (see downloadable code). I have made a copy and it is now called example 8.
This is how the new header sections look:
<link rel="stylesheet" href="/css-themes/myTheme/myTheme.min.css" />
<link rel="stylesheet" href="/css-themes/myTheme/jquery.mobile.icons.min.css" />
<link rel="stylesheet" href="http://code.jquery.com/mobile/1.4.5/jquery.mobile.structure-1.4.5.min.css" />
<script src="http://code.jquery.com/jquery-1.11.1.min.js"></script>
<script src="http://code.jquery.com/mobile/1.4.5/jquery.mobile-1.4.5.min.js"></script>
As you see, I have added the theme created in ThemeRoller according to the structure described above.
Note that the "jquery.mobile.structure-1.4.5.min.css" has been added. This file contains the barebonea CSS for the jQuery Mobile structure and is needed when you use your own theme.
Then on the "page" section I have added the data-theme="a" attribute like this:
<div data-role="header" data-theme="a">
And that's it. You have now implemented your own theme.
If you want to change to Swatch b, just change the data-theme="a" to data-theme="b" and you will see that everything changes.
Below are the various looks according to the theme:
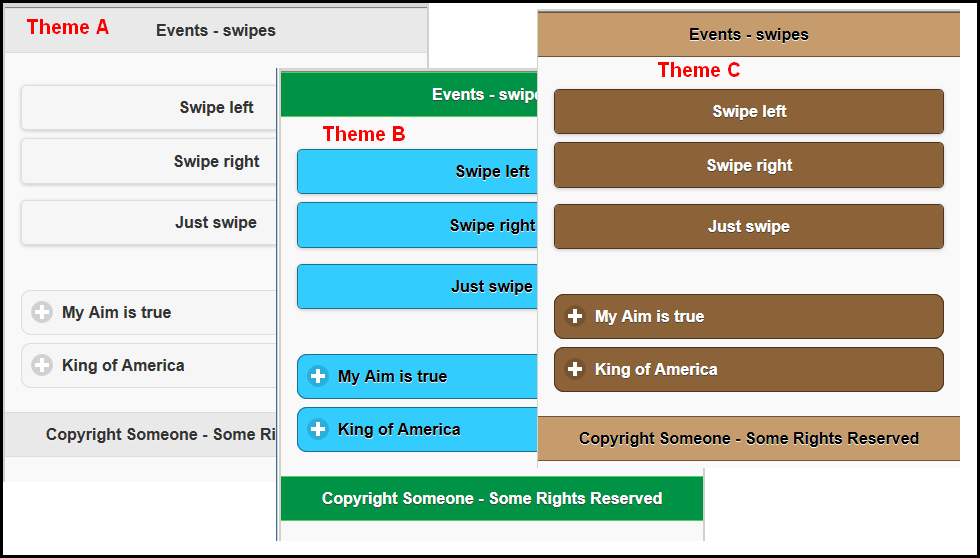
Figure 10: Various themes are applied to the same page.
See it live here.
Downloads
Download the code used in the examples.
jQuery Mobil—Link Section
jQuery Mobile Demo
http://demos.jquerymobile.com/1.4.5/
Quick-start guide (previous version, but gives a good overview)
http://demos.jquerymobile.com/1.2.1/docs/about/getting-started.html
jQuery Mobile—Pages
http://demos.jquerymobile.com/1.4.5/pages/
jQuery Mobile—Transitions
http://demos.jquerymobile.com/1.4.5/transitions/
jQuery Mobile—Listviews
http://demos.jquerymobile.com/1.4.5/listview/
jQuery Mobile—Icons
http://demos.jquerymobile.com/1.4.5/icons/
jQuery Mobile API—Events
http://api.jquerymobile.com/category/events/
jQuery Mobile API—taps/taphold
http://api.jquerymobile.com/1.3/tap/
http://api.jquerymobile.com/1.3/taphold/
jQuery Mobile Events (w3schools.com)
http://www.w3schools.com/jquerymobile/jquerymobile_ref_events.asp
ThemeRoller
http://themeroller.jquerymobile.com/
Advanced jQuery Mobile Tutorial—Part 1, Responsive Design:
http://www.gajotres.net/advanced-jquery-mobile-tutorial-part-1-responsive-design/
Now this has been a long journey, and I think that it's about time we head back to a safe haven. I hope that you can see some of the potential this framework can provide to you and your organization. If I could make a picture of how big this is, it would be that I have tried to fill an ocean into a bucket; there's still so much you can learn and do.
So till next time, get your business data out of the IBM i and present it on users' mobiles. I am sure you will then be the new Neptune.


LATEST COMMENTS
MC Press Online