I've always been a believer in the philosophy of centralized file storage. For the user, a centralized file server provides a single place to find his files, which is particularly important if he tends to move from desk to desk via the Window's "Roaming Profiles" feature. For the administrator (read: you and I), a centralized server simplifies backup and maintenance. Once configured, the centralized server scenario provides a semblance of serenity for everyone. (Try to say that last sentence three times fast!) Unfortunately, laptop computers were dropped squarely in the middle of our tranquil pond of computing, causing a big splash and massive waves that continue to lap at its shores. Once laptops (and more recently PDAs and PMTs) came onto the scene, a method of synchronizing offline files with those on the file server became necessary, since the whole point of mobile computing is to allow mobility from the office and its server. What to do?
One solution available to Windows users is My Briefcase. This brute-force approach compares the timestamps of files contained within the Briefcase folder with their counterparts on the file server, ensuring that the newest version ends up in the appropriate place. I describe this feature as being "brute force" because, when compared with the topic of this month's article, it is. A more elegant solution is the rsync tool.
My Briefcase on Steroids
What makes rsync elegant? For starters, rsync uses an algorithm created by Andrew Tridgell (of Samba fame) that creates a diff (difference) between the two files being compared and transmits that diff instead of the entire file. While not terribly important for smaller files, this feature can yield a huge performance improvement while syncing large files over a dial-up or otherwise bandwidth-constrained connection. On top of this, rsync can compress the diff file for transmission, further enhancing the effect.
Rsync can do more than just synchronize files. It can synchronize entire directories. This feature can be used to produce mirrors between systems--such as a primary Web server and its backups. Similarly, I maintain a simple Web site on my laptop computer. When I'm ready to publish it, I run a script that invokes rsync. This is shown in Figure 1.
|
Figure 1: This simple script permits me to easily publish a Web site.
For securely syncing across a public network, rsync can use secure shell (ssh) as its transport. This ensures that the credentials used during the rsync initialization process can't be snooped.
Since it can perform its magic over directories, rsync is quite adept at being a backup solution for laptop computers. I have a script scheduled on my laptop that performs a backup on a nightly basis, copying the changed files to my desktop. Rsync will accept command line parameters (or parameters from a text file) that indicate which files or directories are to be included or excluded, so I can easily omit browser caches. If I want my backup to look like the current state of my laptop, I can instruct rsync to delete files on the server that are missing on the laptop. Alternatively, I can let deleted files live on the server.
I have just scratched the surface of what rsync can do. For a better picture of rsync's capabilities, visit the project Web site and check out the features page and the examples page.
Although developed primarily for *nix-like operating systems, rsync can run on Windows via the Cygwin environment (discussed last month) as well as on the iSeries under PASE. Cygwin and most distributions of Linux already include rsync. If you want the latest version (or you want to run it under PASE), you can point your browser to the rsync home page.
Rsync and iSeries
Running rsync under Cygwin or Linux is straightforward, but it's beyond the scope of this article. Running rsync on the iSeries requires a minimal amount of additional effort. The reason? Normally, an invocation of rsync from a client to a server causes the server to invoke a copy of rsync with which the copy running on the client will communicate. Using rsync on the iSeries requires a different technique. To successfully synchronize between an iSeries and any other platform, you'll need to run rsync in daemon mode. The additional effort I mentioned comes from having to create two additional files that will define the behavior of the rsync daemon. But before I discuss them, let me show you how to get rsync installed on your iSeries.
Installation
Installation on the iSeries involves the following steps:
1. Obtain the rsync program.
2. Load it onto the iSeries IFS.
3. Add some configuration files.
4. Run it.
Let's examine each of the steps in more detail now.
Step one is very easy to complete. The iSeries PASE enables you to run AIX binaries and, conveniently, rsync is available precompiled for AIX 4.5 from the rsync download page. Download the binary (which, at the time of this writing, is rsync-2.4.5.AIX43.tar.gz) and use FTP to transfer the file to a directory in the IFS of your iSeries (making sure you use the FTP "bin" directive when uploading the file).
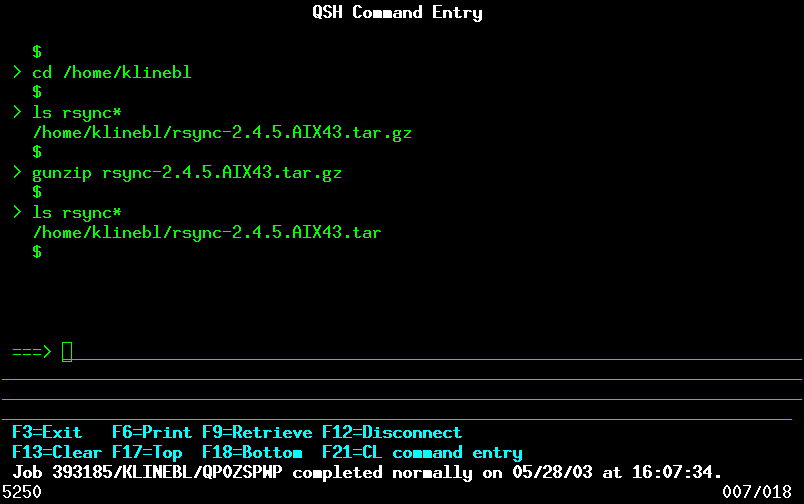
Step two requires a few more gyrations. The file that you downloaded is a tape archive (tar) file and is compressed using gzip (as indicated by the tar.gz extension). This provides the first obstacle because it needs to be "gunzipped" prior to installation. Curiously, gunzip is not provided on my V4R5 edition of PASE (newer versions may have it); but, surprisingly, it is available using QSHELL. So, the first thing you must do is start a QSHELL session via the OS/400 command QSH or STRQSH. Once you are presented with a prompt ("$"), change to the directory in which you FTPed the file; then issue this command:
This creates the file rsync-2.4.5.AIX43.tar. This file is the tar file from which you'll do the installation. All of this is shown in Figure 2.
Figure 2: These steps result in a tar file usable from PASE. (Click images to enlarge.)
Next, end the QSHELL session by pressing F3; then, start a PASE session from an OS/400 session by typing this command:
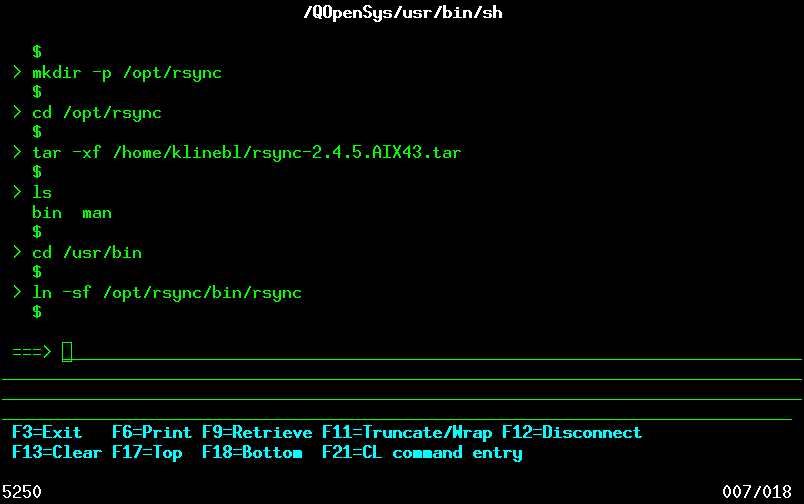
As a matter of course, I tend to place files that I am adding to an existing system in the /opt directory. This makes it easier to maintain or remove them later. I use the following command to make the directory into which I'm going to install rsync:
I then make that directory the current directory by issuing this command:
Finally, I extract the binaries by issuing this command:
A quick ls command confirms the success of the operation.
Now, create a symbolic link from the rsync binary into the /usr/bin directory so that it can be run without providing the complete path name. This is accomplished via cd /usr/bin followed by the command ln -sf /opt/rsync/bin/rsync. All of this is shown in Figure 3. Please note that the tar file also includes the manual pages. You can delete those with the command rm -rf /opt/rsync/man, since PASE doesn't include the *nix manual reader.
Figure 3: This screen shows the command that will provide you with a working rsync client on the iSeries.
At this point, you have an active rsync installation that requires only the addition of two configuration files. The first, /etc/rsyncd.conf, contains the configuration information that rsync uses when in daemon mode. The second, /etc/rsyncd.scrt, contains authentication information. These are shown in Figure 4, along with comments about the entries.
|
Figure 4: The contents of the configuration files for rsync are shown here. This is an extremely simple example.
I created these files on my Linux machine and used FTP to transfer them to the /etc directory on my iSeries. You could do the same thing via the Windows Notepad utility. The full documentation on the configuration files is available on your Linux box (if you have one) via man rsyncd.conf. Alternately, the docs are available on the Web Site.
Step four is simply to run the command to start rsync. From the qp2term command session, issue this command:
If things are working properly, you should be returned to a command line. To verify that the program is really running, switch to an OS/400 command line and type netstat. From the menu presented, select option 3 (Work with TCP/IP connection status); then, scroll down until you find a listener on port 873. That's rsync awaiting your command.
Final Check and Check Out
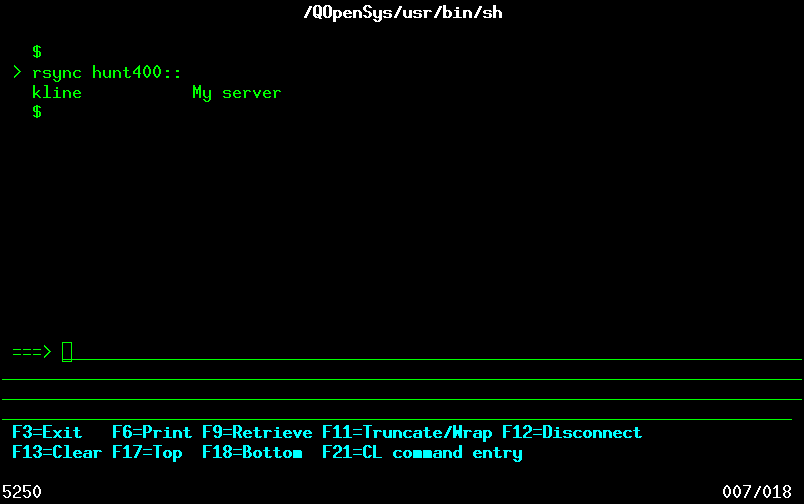
When everything is up and running, you can check out your installation by running the following command from the qp2term session:
If you are successful, you should see a screen that looks something like Figure 5. Obviously, the values that you provide in your rsyncd.conf file will determine the results you see from this test.
Figure 5: This is the result of a successful installation.
In this article, I given you instructions on how to perform a basic setup on your iSeries, since this is non-intuitive and not specifically mentioned in the documentation. There are far too many different combinations of client/servers and too many scenarios for which rsync can be utilized for me to describe them all. Your best bet is to visit the rsync Web site and nose around. Once you get started, you'll find rsync to be an invaluable tool.
Barry L. Kline is a consultant and has been developing software on various DEC and IBM midrange platforms for over 20 years. Barry discovered Linux back in the days when it was necessary to download diskette images and source code from the Internet. Since then, he has installed Linux on hundreds of machines, where it functions as servers and workstations in iSeries and Windows networks. He recently co-authored the book Understanding Linux Web Hosting with Don Denoncourt. Barry can be reached at This email address is being protected from spambots. You need JavaScript enabled to view it..


LATEST COMMENTS
MC Press Online