Editor's Note: This article was adapted from materials in the IBM Press book Building Applications with IBM WebSphere Studio and JavaBeans. In this book, the authors take you step by step through creating applications, gradually building the complexity of the applications until you feel comfortable using the WebSphere Studio Visual Editor for Java and understand the power of creating applications with JavaBeans.
In Building Applications with IBM WebSphere Studio and JavaBeans, Steph Parkin and I take you on a guided tour to building applications with the WebSphere Studio Visual Editor for Java and JavaBeans. We show you how to quickly and easily construct GUIs with the new WebSphere Studio V5 Visual Editor and how to use JavaBeans to build applications with the Visual Editor. In this article, I'll give you a taste for how to use WebSphere Studio to generate your own JavaBeans for processing XML data and how to use the Visual Editor to build an application with your Beans.
Introduction to XML
Before I jump into showing you the neat features that WebSphere Studio has for working with XML applications, let's look at a brief introduction to XML concepts. As you're most likely already aware, XML stands for eXtensible Markup Language. You use XML to create your own markup language (or "vocabulary") to describe data for a particular application. XML doesn't provide any functions to format or process the data; you do that with other tools or applications that you write. XML just gives you a mechanism to describe your data in a convenient and concise way that makes it easy for other programs to understand the data and work with it. With XML, you break your data into elements, define the relationships between the elements, and give the elements names that make sense to you.
The MyBooks application that you'll build on the guided tour uses XML to keep track of a list of books, such as books in your personal library. Figure 1 shows an example of what an XML file might look like for the MyBooks application. This vocabulary has a root element called books that contains child elements called book. The book elements, in turn, contain child elements called title, author and copyrightDate that describe a particular book.
|
Figure 1: This is some sample XML data for the MyBooks application.
This sample for the MyBooks application is well-formed XML data, which just means it has matching start and end tags for each element, elements are all nested properly, and so on. All XML data must be well-formed, or the programs that parse the data can't process them properly. In addition, XML data is considered valid if the data conforms to the application's vocabulary. How do you define the vocabulary? There are actually several ways. This article shows you how to use Document Type Definitions (DTDs), and in the book, we also show you how to use XML Schemas.
You use DTDs to identify the rules for your vocabulary, such as what element names are allowed, how many times a particular element can be present, and how the elements are related to one another. Figure 2 shows what a DTD file looks like to define the vocabulary for the MyBooks application. This DTD defines each of the elements for the vocabulary (books, book, title, and so on), the relationships between the elements, and what type of data each element may contain.
|
Figure 2: Here's the DTD file for the MyBooks application.
As you can see from the preceding examples, DTDs and XML are clearly intended for programs to read, not humans. Fortunately, WebSphere Studio includes special editors to work with both DTD and XML files, and the editors take care of all the syntax details for you.
The last piece to this introduction to XML is a discussion of parsers. The purpose of a parser is to read your XML data and break it down into its individual elements. All parsers do this. In addition, some parsers validate your XML data using the vocabulary rules (such as a DTD) and tell you if there are any errors. The various parsers available for working with XML data work in different ways. Some parsers build an in-storage copy of your data called a Document Object Model (DOM), which you navigate through to get the particular element you want. Other parsers just fire events when they reach certain points while processing an XML file, such as finding the start of an element, and then you have to keep track of where you are in the file.
The JavaBeans that WebSphere Studio generates to work with XML data use a DOM parser. This parser creates an in-storage tree structure with nodes to describe the XML data. The tree has a document node with information from the document type declaration, element nodes for each XML element, and other types of nodes, depending on the content of the XML file. The tree can get fairly complicated, but the JavaBeans that WebSphere Studio generates shield you from much of the details, so you can just think in terms of the individual XML elements.
The MyBooks Application
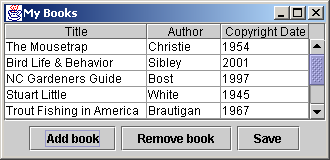
With that as a whirlwind introduction to the basic concepts of XML and DTDs (we go into much more detail in the book), you're ready to build an application that shows how to use them. The application you'll build in the guided tour is shown in Figure 3.
Figure 3: This figure shows the MyBooks application in action. (Click images to enlarge.)
The MyBooks application saves information about your list of books (such as title, author, and copyright date) in an XML file. The application presents the information in a JTable component and lets you edit listings and add or remove books. When you click the Save button, the data is saved back to the XML file.
To build the MyBooks application, you use the XML perspective in WebSphere Studio to...
- Create the DTD file that defines the vocabulary for the application
- Create the initial XML file for the application
- Generate JavaBeans from the DTD
You then use the Java perspective to build the application with the generated JavaBeans. The following sections give an overview of how you complete each of these steps.
Creating the DTD File
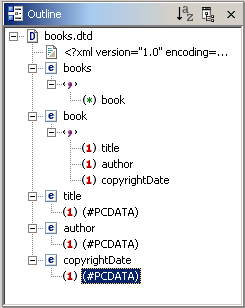
As I mentioned, you don't have to know the details of DTD syntax to create a DTD with WebSphere Studio. Instead, you can use the DTD Editor. With this editor, you enter the names of elements you want to add to your vocabulary and then define their relationships and any other characteristics by choosing options presented in the editor. For example, you can identify whether the element has child elements and how many times the element can be present (just once, one or more times, and so on). As you enter the element names and select their options in the editor's Design tab, the layout of your DTD is shown graphically in an Outline view. The book takes you step by step through creating your DTD file and shows how the Outline view changes at each step. The Outline for the final DTD is shown in Figure 4. This graphical view corresponds to the DTD source shown in Figure 2 but gives a clearer picture of relationships, such as the fact that the books root element contains one or more book elements and the book element contains one each of the title, author, and copyrightDate elements.
Figure 4: This is the Outline view for the final DTD for the MyBooks application.
Creating the XML File
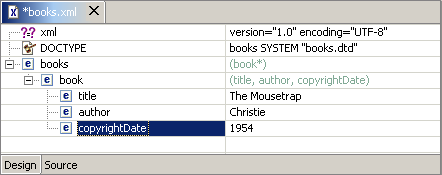
Creating the XML file is even easier. You just right-click on the DTD file name and select Generate > XML File... from the pop-up menu. After selecting a few options (most of which are already preset with the values you want), your new XML file opens in the XML Editor. Once in the editor, you expand the content of the XML elements and enter the data you want for each element, as shown in Figure 5. Notice that the generated XML file includes a DOCTYPE reference to your DTD file (books.dtd, in this example). The XML Editor uses the DTD to know what the structure of your XML file should be and to help you with code assist features, such as adding new book elements. 
Figure 5: This figure shows how to enter data for an XML element in the XML Editor.
Generating JavaBeans from a DTD
You now have a DTD file that describes the vocabulary for the MyBooks application and an XML file that contains data for use in the application. The next step is to generate JavaBeans from the DTD, which you will use to build the application. Generating JavaBeans is also incredibly simple. You just right-click on the DTD file name, and select Generate > JavaBeans... from the pop-up menu. After selecting a few options (most of which are already preset with the values you want), WebSphere Studio creates the Java classes for each element in your DTD and adds those classes to your application package. It also automatically adds the necessary JAR files to your Java project's build path, so everything your JavaBeans need, such as XML parser classes, is available.
Creating the Application
Finally, you create the application itself in two steps. You use the Visual Editor to create the application's GUI, and then you use the standard Java editor to create the table model that manages the actual book information in your XML file.
For the visual portion of your application, you create a new visual class and open it with the Visual Editor. If you're familiar with VisualAge for Java's Visual Composition Editor, then you should have no trouble learning how to use WebSphere Studio's Visual Editor. When you open your visual class, you'll see a palette of JavaBeans along the left edge of the window, a design surface where you visually work with the JavaBeans, and just below that, a source pane with the source code for your program. The Bean palette contains all the standard Java widgets for the Abstract Window Toolkit (AWT) and Swing, as well as a Choose Bean option, which you can use to select any custom JavaBeans that aren't already built into the palette.
You just select the Bean you want from the palette and drop it on the design surface, placing visual Beans within the visual surface for your application and placing non-visual Beans in the free-form area. After adding the Beans you want to the design surface, you customize their properties to set the values you want to use, such as setting a button's label. As you work with Beans by resizing them on the design surface or modifying their properties, the Visual Editor automatically generates the underlying code and presents it in the source pane. You can also modify code directly in the source pane, and changes that you make there are automatically reflected in the design surface and Properties view. Once you've added the Beans you want and customized their properties, you use the Visual Editor's code assist features, such as its event-handling templates, to add the code to connect the Beans together.
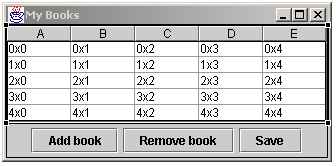
And that's all there is to it: Select the Beans you want, add them to the design surface, customize their properties, and add the code to connect them together. For the MyBooks application, you'll use Swing widgets, such as JPanel, JButtons, JScrollPane, and JTable, so your visual surface will look like Figure 6. 
Figure 6: These are the visual elements for the MyBooks application.
Notice that when you drop the JTable Bean on the visual surface, the Visual Editor shows a preview of what a table with five rows and five columns might look like. You define the actual table by creating a non-visual TableModel class and associating it with the JTable. In the TableModel class, you implement methods to specify such things as how many rows and columns are in the table, what the column headers are, and what data is contained in each table row. The JTable uses these methods to present its view of the table data. The TableModel class is also where you use the JavaBeans that you generated from your DTD. These custom-built JavaBeans have all the methods you need to parse the XML file, read it into an in-storage tree structure, get the number of rows in the table (i.e., the number of books in your XML file), and get or set the data for a specific table row (i.e., work with a particular book element in the XML file).
To run the MyBooks application, you just specify the name of the XML file to be used as an input argument. To add a row to the table, click Add Book. The new row is added to the end of the table, where you can enter values for the new book's title, author, and copyright date. To remove a row, select it with the mouse, and click Remove Book. To save your changes back to the XML file, click Save.
Want to See More?
This article just gives you a taste for how to use WebSphere Studio to generate your own JavaBeans for processing XML data and how to use the Visual Editor to build an application with your Beans. In Building Applications with IBM WebSphere Studio and JavaBeans, we take you step by step through building this application and many more, showing you how quick and easy it is to build applications with the new Visual Editor for Java and JavaBeans.
Colette Burrus retired from IBM after more than 20 years of programming and project management. Her last assignment was project manager for the IBM alphaBeans project, working with the "JavaBeans Around the World" team. She coauthored VisualAge for Java for Non-Programmers and Building Applications with WebSphere Studio and JavaBeans. She can be reached at the This email address is being protected from spambots. You need JavaScript enabled to view it. email ID established for readers of these books.


LATEST COMMENTS
MC Press Online