I so had to avoid saying something like "Bananas for Eclipse" in the title, but I restrained myself.
Time to Get Back to the Technical Details
With all that has transpired in the community over the past year, we've spent a whole lot of time recently concentrating on some non-technical or at best tangentially technical topics. The whole V6R1 AD repackaging scheme, while crucial to the financial planning of your company, has less to do with development than with paying for it. And while I've gotten some great comments on those articles, I've also been hearing a pretty regular refrain that I ought to be covering more technical topics.
Well, here we go. This is the first of what I hope to be a long semi-regular series of articles on using WDSC (and RDi in the very near future) for programming. I'll hearken back to some of my more technical treatises and focus on ways to use the tool to make your life easier. Other technical series will include programming topics (I've been doing quite a few of those on EGL lately), and then I might even be able to slip in the occasional piece about open-source topics.
Extending WDSC
And right off the bat I'm going to tell you how to extend your programming environment. WDSC already has some nice ways to extend the editor. One is its powerful template capability, which allows you to define one or more lines of code with optional substitution variables and then include that whole chunk of code with just a couple of keystrokes. You'll be prompted for any substitutions, and then the code will be added. It's simple and good for what it does, which is to quickly write new code. Then, on the other end of the spectrum, you can write your own Java commands that access the editor and update your source code. With this, you can do anything from changing the case of existing code to generating entire new source files.
What's missing, though, is the ability to easily toss together a script that will modify a line or two of code (especially since templates are limited to specific source types and really only add new code). Back in the ancient era of green-screens, we had something called an SEU exit program, which could be invoked by typing a specific two-character command in the SEU line number area. I won't go into a ton of detail on that particular capability, but it did allow clever programmers to extend the SEU editor to perform custom functions. And if you used REXX, you didn't even have to compile the code; it was like running a script inside SEU. There's really no native capability like that in WDSC today. But that's one of the beautiful things about an extensible framework.
Today's Tool: Eclipse Monkey
Today there's a new kid in town, and that kid is Eclipse Monkey. The page linked to is actually the page for something called Project Dash, but don't let that fool you. One of the things you can download is Eclipse Monkey, a very cool tool. To be honest, if you dive down into the guts of the tool, it's so cool that it's scary, but today's article will only touch on the higher-level capabilities. As I get more involved with the inner workings, I'll let you know.
Getting the Tool
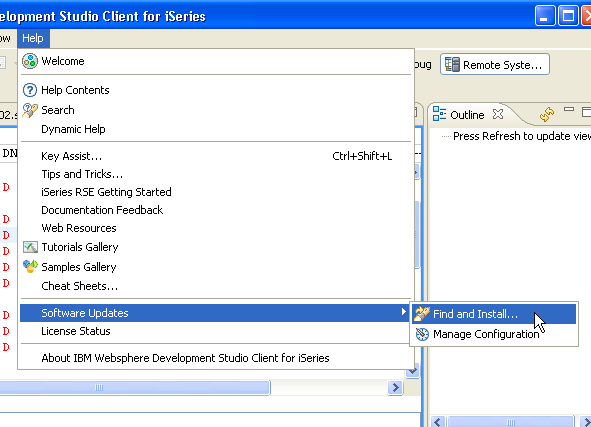
Getting the tool is fairly easy, but you have to be careful because you don't use the standard WDSC update technique. Since this is a third-party plug-in, you will use the Software Updates option from the Help menu, as shown in Figure 1.
Figure 1: Select Help > Software Updates > Find and Install... from the main menu. (Click images to enlarge.)
If you've been reading and following along with my tech tips on plug-ins, you'll be familiar with the Find and Install dialog. Here are the specifics:
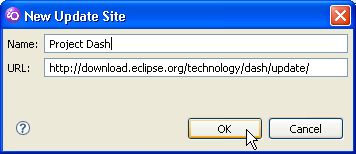
Figure 2: Add the Project Dash update site.
First, you'll have to add the Project Dash update site. Make sure to use the URL above.
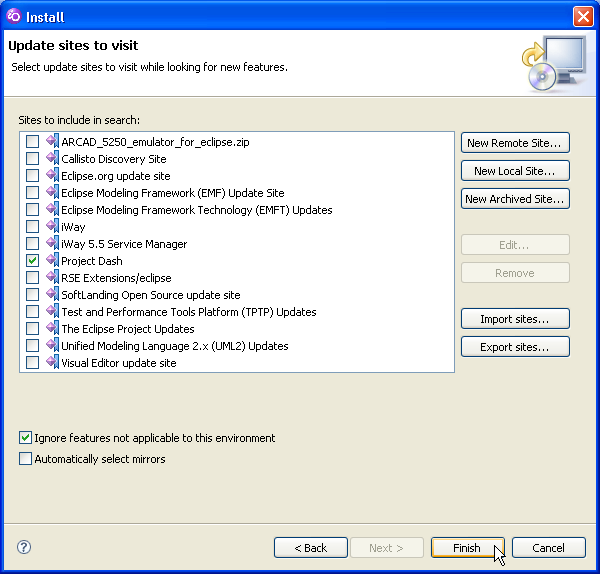
Figure 3: Select the Project Dash update site and hit Finish.
Once you've added Project Dash, select it and hit Finish.
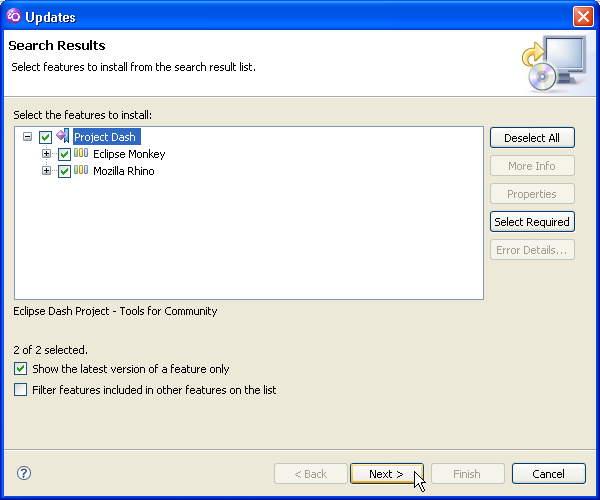
Figure 4: Make sure that both Eclipse Monkey and Mozilla Rhino are selected, and continue on.
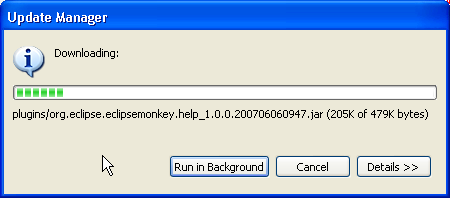
Once you've done that, make sure both the Monkey and Rhino projects are selected as shown in Figure 4, and then continue with the standard installation process. The installer will download all of the features with dialogs like the one in Figure 5, and then finally you may be asked to restart the workbench.
Figure 5: The download dialog shows you the progress of the Eclipse Monkey download.
Using the Monkey
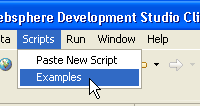
Now that you've got the Monkey installed, it's time to use it. The first thing you probably want to do is install the example scripts. It's a simple operation. Once your workbench is restarted, you'll see a new menu option, Scripts. Under that menu, select the Examples option as shown in Figure 6.
Figure 6: Select menu option Scripts > Examples.
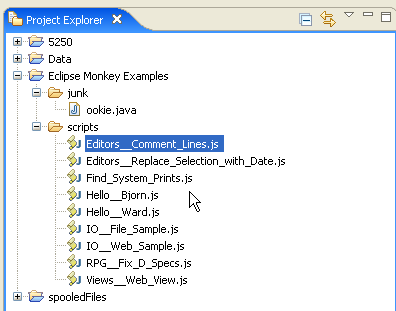
This will build a new project in your workspace that you can then browse using the Project Manager. The project will look something like this:
Figure 7: The Eclipse Monkey Examples project contains a number of example Monkey scripts.
You'll see a new project called Eclipse Monkey Examples, with a folder called Scripts in it. You won't see the junk folder; I added that for testing, and you can ignore it. Neither will you see the RPG__Fix_D_Specs.js file. That's mine, but that one we will talk about shortly.
Anyway, this folder is built with several interesting scripts. Not only that, but once you've added these scripts, they automatically register themselves to the Scripts menu so that you can invoke them. That's part of the language, and it's a rather elegant answer to a tough problem (although I still need to see the code to figure out exactly how elegant it really is).
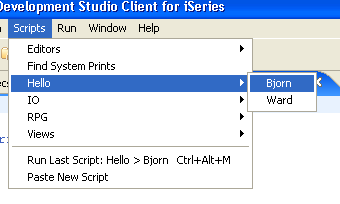
Figure 8: The Scripts menu now has a number of script categories added.
Figure 8 shows an example. Now that you've added the examples, that menu option is gone, and instead, a number of categories have been added. You'll see a Hello category with two options, Bjorn and Ward. Note that you won't see the RPG category; that's one I added in my workspace, and we'll look at it later.
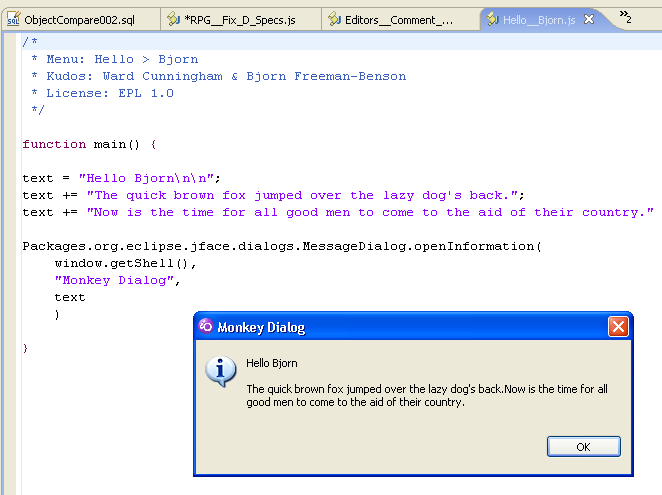
Figure 9: This is the source for the Hello Bjorn option and the dialog it displays.
Figure 9 shows the source for the simple Hello Bjorn script. One of the more important things is the comment block at the top of the source file, particularly the line that reads Menu: Hello > Bjorn. This is the line that is scanned by the system and used to create the menu option we see in Figure 8. I'm not quite sure of the mechanism, but whenever you add a new JavaScript to the Monkey project, that script is scanned for the special Menu: comment, and if it exists, the script is added to the Scripts menu. It's all automatic and pretty slick.
You can also define a shortcut key, although that particular feature is rather limited because the Eclipse editor grabs a whole lot of the available keystrokes. You're left with the somewhat awkward Alt-Shift combinations, but if you can work within that limitation, they work just fine.
Extending the Monkey
About this time, you're probably wondering why exactly you want to mess with this. OK, great, you've created a way to pop up messages from a menu, but seriously that's not going to make your job any easier. Well, you can look through several of the other examples to see that there's a lot more to it than that. First off, because a standard way to invoke JavaScript is provided, you can easily write arbitrary tools without having to learn a ton of Java or having to actually package jar files to extend the workbench. This is as close to BASIC for Java as you can get: Just change the source code, save it, and execute it.
And just because it's interpreted doesn't mean that it's a kiddie tool. JavaScript is actually very powerful; in some ways it is more powerful than Java and certainly more flexible. For example, even the simple Hello Bjorn example shows how you can use the JavaScript Packages object to access any public class in Java, including the powerful JFaces user interface classes. And note that I don't have to worry about telling the class that text is an object of type String. JavaScript is a loosely typed language; that stuff is just details.
At the same time, the Eclipse Monkey package has a nice built-in set of predefined JavaScript methods to let you access the Eclipse editor class, which means you don't have to mess around with it. For example, Eclipse Monkey surfaces an Editor class that allows you to look at the current editor (and I think you can even get a list of all the editors currently open). It includes a number of classes and methods designed to allow you to directly manipulate the source of an editor, which means you can actually change the source code.
This is pay dirt!
Our First Real Example: Fixing D-Specs
So let's use this new tool, shall we?
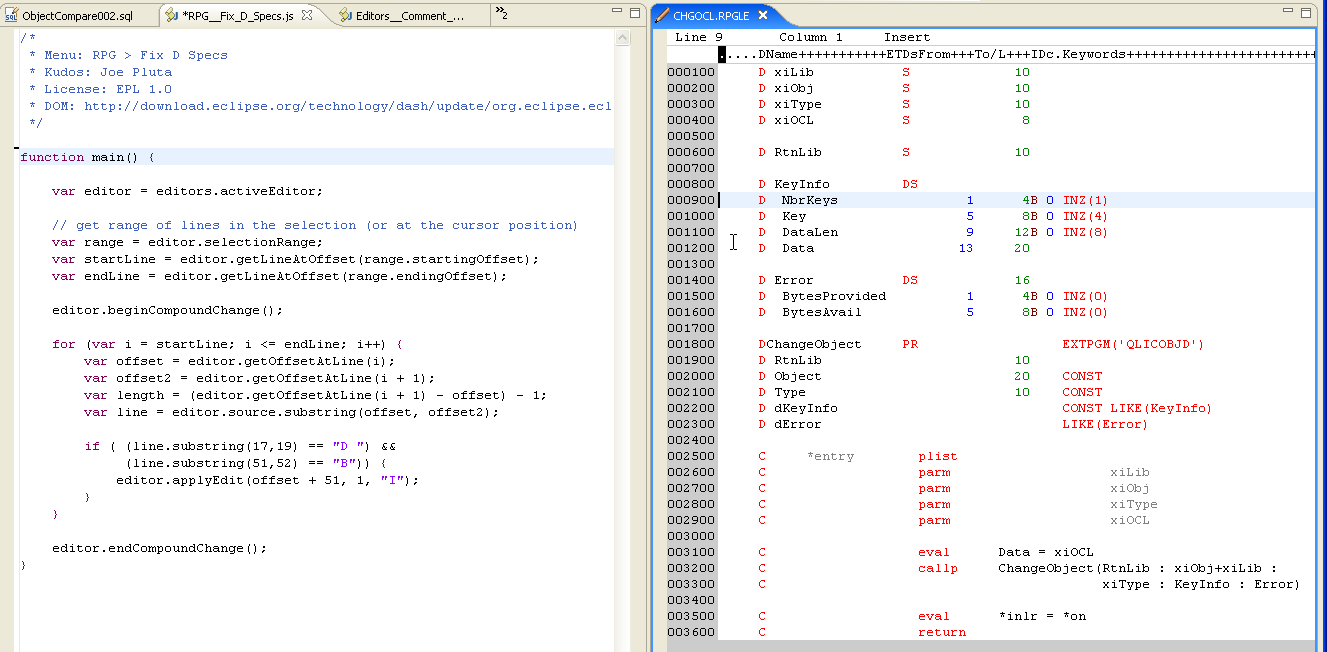
Figure 10: This shows the source for the Fix D-Specs script and the RPG code I'll use it on.
Figure 10 is rather large, but I wanted to show you something that really epitomizes the integrated nature of Eclipse Monkey: You edit the Eclipse Monkey scripts inside a regular Eclipse editor, which means that (provided you have enough real estate) you can easily have the Eclipse Monkey script code side by side with the source code you will test it on. Make a change to the script, save it, click on the program source, run your script. That's about as immediate a development cycle as you're going to find.
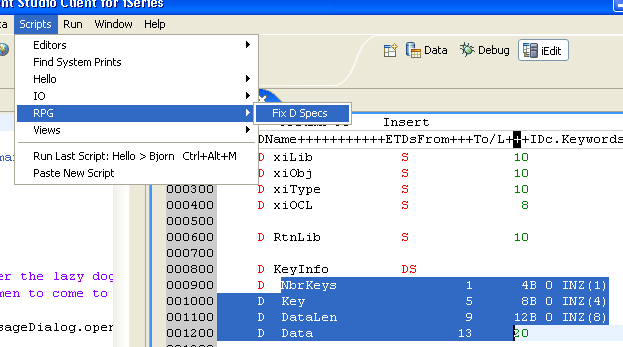
Figure 11: Mark one or more lines of text and then select Scripts > RPG > Fix D Specs.
Figure 11 shows the mechanics of the operation. You simply mark one or more lines of text (or even just put your cursor on a line if that's the only line you want to process) and then select the desired Script from the Scripts menu. In our case, you want to select the Fix D Specs script from the RPG category.
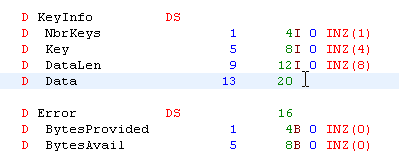
Figure 12: Here is the result: Type B variables are changed to type I.
Figure 12 shows the result of the script. Each line in the range is checked, and if it's a D-spec defining a type B variable, that variable is changed to a type I. Now this is a very superficial example, since it will work only when you specify both the from and to lengths, but it serves to demonstrate the capabilities of the tool.
How Does It Do That?
It's actually quite cool. I'll walk you through the code, albeit at a slightly elevated level.
/*
* Menu: RPG > Fix D Specs
* Kudos: Joe Pluta
* License: EPL 1.0
* DOM: http://download.eclipse.org/technology/dash/update/org.eclipse.eclipsemonkey.lang.javascript
*/
This is the standard comment block required for proper processing of a Script Monkey script. The menu entry is the first line. It says that the name of this option is Fix D Specs and that it belongs to menu category RPG. That menu category will be created under the top-level Scripts menu if it doesn't already exist.
function main() {
This is the standard main function, which identifies the body of code to execute when this option is selected.
var editor = editors.activeEditor;
Here you see the first of the predefined Script Monkey JavaScript objects. Script Monkey uses this to encapsulate a bunch of Eclipse code. I'm just learning how the Java-to-JavaScript interface works; all I need to know for now is that this line of code returns a reference to the active editor screen.
// get range of lines in the selection (or at the cursor position)
var range = editor.selectionRange;
var startLine = editor.getLineAtOffset(range.startingOffset);
var endLine = editor.getLineAtOffset(range.endingOffset);
Similarly, these lines of code are used to interface with existing workbench code. The first line invokes a Java method that extracts some information from the editor and then aggregates it into a JavaScript object, which is then stored in range. The next two lines extract the aggregated information (basically the start and end lines of the selected text). This completes the interface between the Java code of the Eclipse workbench and the temporary variables in my JavaScript code.
editor.beginCompoundChange();
This indicates that I will be executing multiple changes, although I'm not entirely certain why I need to do this.
for (var i = startLine; i <= endLine; i++) {
I'll roll through each line of code.
var offset = editor.getOffsetAtLine(i);
var offset2 = editor.getOffsetAtLine(i + 1);
var length = (offset2 - offset) - 1;
var line = editor.source.substring(offset, offset2);
Remember that the editor really treats the entire source as one long stream of text. In order to deal with it line by line as we're used to in the SEU world, we need to get the beginning and end of each line and extract the line. The getOffsetAtLine method returns the offset of the first character of a line. I get the offset of the start of the current line and the start of the next line and use those in conjunction with the substring function to extract the line. The length calculation is just there for debugging purposes and isn't used anymore.
if ( (line.substring(17,19) == "D ") &&
(line.substring(51,52) == "B")) {
editor.applyEdit(offset + 51, 1, "I");
}
Now the logic. This is actually the easy part! Check position 6 and 7 to see if it's a D specification. Remember that the offset is 0-based, but also that there are 12 characters of information at the beginning of each line: the sequence number and the source change date. So I want my substring for comparison to start at offset 17. Substring is a bit counter-intuitive; to identify the length of the substring, you don't specify the length or even the offset of the last character. You specify the offset of the character after the last character. It actually makes the same sort of sense as the zero-based array concept makes sense; regardless, you have to learn how to do it.
Anyway, I check position 6 and 7 for D and blank, and then I check position 40 for a B. If both those conditions are met, then I change the B to an I. The applyEdit method works using the offset from the very beginning of the entire source, so you need to take that into account. But that's basically it: Replace one character starting where the B is with an I. Done!
}
editor.endCompoundChange();
}
And that's it. We run an endCompoundChange to put the changes into the source, and then we're done.
I realize that some of this might seem a little on the crazy side, but if you think about it, much of the code can be encapsulated and reused over and over again. You can easily write your own little JavaScript procedures to hide some of the offset craziness and make it easier to concentrate on the logic rather than the technical details. And once you've done that, I can see writing a whole range of powerful commands. And you only need to learn JavaScript!


LATEST COMMENTS
MC Press Online