Building Web sites and designing pages that are served from your AS/400 is what WebSphere Studio for AS/400 does best. Programming for the Web is becoming more complex all the time; WebSphere Studio for AS/400’s development environment hides a lot of this complexity by guiding you though the Web programming process. The development environment includes tools specifically designed for AS/400 Web programmers; those tools include a graphical WYSIWYG page editor, wizards, and automated deployment tools.
It would be a stretch to say that WebSphere Studio for AS/400, hereafter referred to as WSS400, makes the complex task of designing, building, and deploying Web sites simple. However, the tools provided with WSS400 do simplify many of the required tasks. If you are interested in leveraging your ILE applications to support full-scale Web development, WSS400 is a great starting point. I’ll explain more about that in a bit.
In addition to WSS400, there are several versions of WebSphere Studio, including WebSphere Studio Entry Edition, WebSphere Studio Professional Edition, and WebSphere Studio Advanced Edition. WSS400 is an enhanced version of WebSphere Studio Professional Edition. Those enhancements include setup wizards, ILE program support, and debugging support that targets AS/400 applications. The help text describes all of these tools in detail and contains examples describing how to use WSS400 for Web development that targets the AS/400.
Identifying the Study Group
The WSS400 product is part of the WebSphere Development Tools product. WebSphere Development Tools contains several other products that target the AS/400. Those products are CODE/400, VisualAge RPG, VisualAge Java for AS/400. For a description of CODE/400, see my article “WebSphere Development Tools: Getting Started with CODE/400,” (MC, December 2000). All of the WebSphere Development Tools products share common components that provide debugging and communication services.
If you plan to build dynamic Web pages with WSS400, you will need the WebSphere Application Server for iSeries product, which is available in two versions—standard and advanced. The Standard version is free and, like WSS400, does not support Enterprise JavaBeans (EJBs). WebSphere Studio Advanced Edition is the only version of WebSphere Studio with support for EJBs. It’s likely that your AS/400 has a version of WebSphere Application Server installed, but check to make sure that you have either version 3.02 or 3.5.2. The product numbers for WebSphere Server Standard and
WebSphere Server Advanced are 5769—AS3 and 5769—AC3, respectively. At the current time, the client configuration software that ships with versions 3.02 and 3.5.2 will run only on Windows NT or Windows 2000, but IBM is working on a browser based configuration client.
Examining Studio
To run WSS400, go to the Windows Start menu and select Programs, followed by WebSphere Development Tools for AS/400, WebSphere Studio for AS/400. From there you will find several options; selecting IBM WebSphere Studio v3.5 will run the program. Also, you can select documents, including a guide on getting started and guides for Studio for AS/400 and Studio. The getting-started guide and AS/400 guide do a good job of explaining how to use WSS400 and its many features.
The first time you run WSS400, a file selection prompt is displayed. Unless you have existing WebSphere Studio projects to open, close the file open dialog. If you want to work with the WebSphere samples, which are stored in a compressed archive format, you need to use the Open Archive dialog located on the file drop-down menu. The samples are in Studio35/Samples/AppServer3.5, located in the installation directory, and have a .wsr or
.war extension. Another way to get started working with existing Web content is to import a Web site or page using the import dialog. This dialog is located on the file drop-down menu. On the first page of the dialog, enter the URL of the Web site you want to import. On subsequent pages, specify whether the import should use HTTP or FTP, how to navigate the site and the type of content to import. When WSS400 is finished importing the site, a report comes up that describes problems and provides statistical information about the imported pages. In some cases, you will have to repeat the import process to capture dynamically linked pages.
As you begin working on a Web site, you will notice a vertical split in the work area. The panel on the left is File View. The File View shows the structure of your Web site in a hierarchical tree format that reflects how the Web site is stored on your local workstation or server. This structure does not have to match the structure of the Web site, as it exists on your Web server.
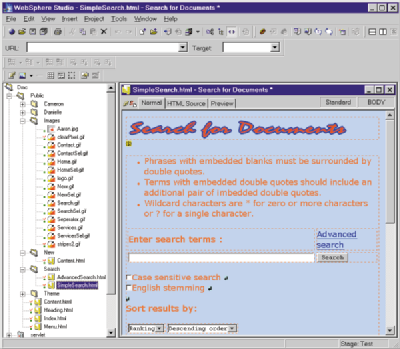
The panel on the right side of the work area is where you will be editing, publishing, and analyzing the components of your Web site. Some of the tools that share this area are the Page Designer, Relations View, and Publishing View. The first of these, the Page Designer, is a WYSIWYG Web page editor. Within this tool, you can view Web pages several different ways, including the WYSIWYG editor shown in Figure 1. You can also view Web pages as HTML editor, browser preview, and frame views.
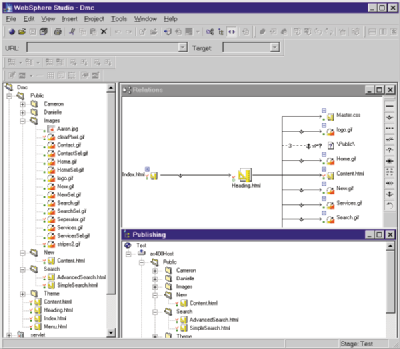
The Relations View shows how individual pages and components of your Web sites are related. You can also filter the relations to include or omit relationships by clicking on the buttons displayed on the right side of the window. For example, you can just display relations with broken links. The Publishing View shows a hierarchical representation of your Web pages and components, as they will reside on the Web server. Figure 2 shows an example of these views. If you already have favorite Web design tools, you can use them in WSS400. By identifying your tool to WSS400, you can use it as though it were a part of the WebSphere environment. If for example, you use Allaire’s HomeSite HTML editor and want to make it available in WS440, select Tools Registration from the Tools drop-down menu. Next, enter the file extension associated with the tool, in this case HTML. Next click on the Edit button. In the displayed window, select the Editing Applications tab and click on Browse. Locate and click on the executable file for the application; for HomeSite, this would be homesite4.exe. Clicking on the Set as default button sets the application as the default for the selected file type.
Publishing
In WSS400, the term publishing is used quite frequently. Publishing moves the files that comprise a Web site to a new stage. The two default stages provided with WSS400 are Test and Production. You can modify or delete these default stages or create your own. For each stage, specify a Web server and its attributes, which include target directories and publishing methods (FTP or file). You can specify different attributes for each type of file. For example, you can publish servlets to one directory and HTML to another.
You must save your changes before you publish them. Selecting Save All from the File drop-down menu is the easiest way to do this. It took me quite a while to get used to this—it would be nice if a reminder window were displayed. One way around this is to auto-publish changes saving changes. To set up auto-publish, right-click on the publishing stage (if you went with the defaults, this would be Test), and select properties. Next, select Publish this stage automatically from the stage tab.
The publishing of your Web site and subsequent changes to your AS/400 is one area in which WSS400 really stands out. Before publishing to your AS/400, you will need to run the publishing setup wizard, which steps you through the AS/400 publishing setup process. Run this wizard by selecting the icon that looks like a green box and arrow pointing to an AS/400, or by selecting Publishing Setup Wizard from the Wizards tab of the Tools drop-down menu. As you progress through this wizard, it collects information about your Web site, directory structures, and servlets. When you have completed the Publishing Setup Wizard, WSS400 will have enough information to publish to your AS/400. You can change this information directly during the publishing process or by rerunning the Publishing Setup Wizard. You must run this wizard at least once for each target AS/400.
Before publishing, you may also want to generate a Project Integrity Report. This report shows any broken links or orphaned files, I generally bypass this step unless I have made quite a few changes, because the Project Integrity Report is generated at the end of the publishing process. To run this report, select Check Project Integrity from the Tools drop-down menu.
You are now ready to publish! Bring up the Publishing View and select the files and folders you want to publish. You can use the control and shift keys to select more than one item. Right-click on a selected item and then click on the Publish option. The dialog that follows guides you through the publishing process. To find out what the options do, click on the Help button.
Cataloging Parts
The Content Manager, which is displayed when you select Content Manager from the View drop-down menu, allows you to add pre-built images and components to a Web site. You can scroll through thumbnail views of pre-built images and components. Although there are a lot of cute and useful items you can choose from, finding them is difficult, because
there’s no search facility. The Content Manager adds selected items to the root directory of your project in the local file system; you will probably want to move them and update the link on your page.
Style sheets help supply a consistent look and feel to your Web site. You can select pre-defined styles using the Content Manager, or use the Style Sheet Manager to create and maintain your own style sheets. You can access the Style Sheet Manager from the Page Designer by clicking on the red S icon or by selecting Style Sheet Manager from the View drop-down menu.
Whizzy Wizards’ Dynamic Content
The wizards built into WSS400 guide you through the steps necessary to complete complex tasks. Two of these wizards work together, helping you to add dynamic database elements
on your pages. These are the SQL and Database Wizards. The SQL Wizard builds SQL statements used as input to the Database Wizard. The Database Wizard builds Java and HTML statements that enable you to quickly query, update, and add information to database files. Both of these wizards are accessible from the Wizards tab of the Tools drop- down window.
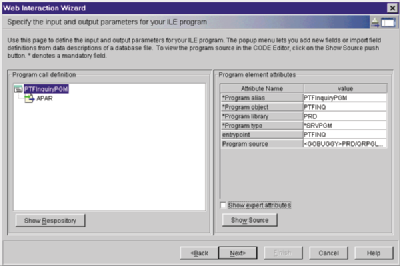
The Web Interaction Wizard is a feature that AS/400 programmers writing ILE procedures will want to look at. This wizard, shown in Figure 3, guides you through the setup of ILE procedure calls made from a Web application. The procedure calls made to support an interactive Web application pass and retrieve information from an ILE service program. You may want to make some changes to your ILE procedures to better support Web interaction. Rather than using a single program to determine the flow of the application, Web applications usually use information stored in session variables to determine the flow of the application. In many cases, this means breaking up large multifunction procedures into smaller single-function procedures. Also, you may want to store and retrieve session-specific information in a database and use procedures to retrieve that information rather than pass it directly as parameters. This last change makes it easier to access and share this information.
To start the Web Interaction Wizard, select your page in the File View window and select Web Interaction Wizard from the Wizards tab of the Tools drop-down window. Once the wizard starts you will enter information that links ILE procedures and parameters to the pages that support input, output, and messages.
Another way that you can add dynamic elements to your pages is to use Microsoft’s Design-time ActiveX Controls in your pages. You add these design-time controls to your pages from the normal view of Page Designer by selecting the Design-time controls dialog from the Insert drop-down menu. You can use the controls to embed form elements like entry fields, list boxes, push buttons, and even subfiles in your Web pages.
Taking Notes
I have described quite a few of WSS400’s tools and features. There are many more. You are likely to discover new ways of using these tools, adding your own creative touch to your Web sites. One of the tools that I found a creative use for was the logo editor. It makes it easy to create nice-looking navigation buttons.
While using WSS400, I also found a few quirks, some of which are minor irritations. To address others, I had to come up with some workarounds. Most of these quirks appear related to the infancy of the WSS400 product, and the fact that several groups within IBM contributed to the development of this product. One missing feature is an incremental save—I’m terrible at remembering to save my work as I progress.
The help support in WSS400 is complete and contains several good tutorials and useful quick tours. In general, the help option is easy to navigate; however, it does exhibit some annoying quirks. Throughout the product, help appears in different formats and styles. In some cases, help text uses the Windows Help APIs. In other cases, help text comes up in a browser. The browser-based help text covers most of the tutorials, extensions, and AS/400 specific features. The browser-based help text also insists on opening a lot of windows; because of this, I would often have a dozen or more browser windows open at one time as I tried to understand a complex task.
Identify Your Sources
There are several ways to order WSS400. The first is to go to IBM’s WebSphere Application Server for iSeries home page, www.iseries.ibm. com/products/websphere, and click on the ShopIBM button displayed at the top of the screen. Next, select AS/400 Software from the Fast Access to Popular Products drop-down list. From the iSeries and AS/400 Software page, you can order both WebSphere Development Tools for AS/400 and
WebSphere Application Server. The other way to order these products is through your IBM or Business Partner sales representative.
Once you have ordered WSS400 and WebSphere Application Server, you will need to visit the WebSphere Application Server for iSeries home page and select the PTFs link. From the PTFs page, select the version of WebSphere Application Server that you will be using with WSS400 and order the latest FixPack and PTFs.
There are also several PTFs and fixes that you will need for WebSphere Development Tools for AS/400. On V4R5, they are SF62384, SF63978, and MF25455. On V4R4, they are SF62384, SF63732, SF59540, SF56281, SF56084, SF54570, MF23397, and MF21785. Before ordering these PTFs, it would be a good idea to check if they are superceded by a newer PTF at IBM’s PTF Cover Letters Database at http://as400service.ibm.com. Follow the Fixes and Updates link and search for these PTFs from the All PTF Cover Letters by Number link. In addition to the PTFs, download and install any fixes listed at www-4.ibm.com/software/ad/wdt400/support.html. At the time this article was written, there were two fixes: one to fix the publishing wizard and another to fix subfile design-time controls.
One way to get a feel for WebSphere Studio development environment without spending a lot of time—or any money—is to order WebSphere Studio Entry Edition. You can download and install this product by going to www.ibm.com/websphere. Select WebSphere Studio from the drop-down list at the bottom of the page and click on the Download the Complementary Studio V3.5 Entry Edition! link.
Cramming for the Final
Although WSS400 is a first-release product, it accomplishes the goals of developers at IBM, which was to simplify AS/400 Web development. If this release is any indication of what developers are capable of, I expect to see continuing enhancements and improvements that will help AS/400 developers deliver the Web-enabled applications their customers are demanding.
I was very impressed with the guidance that WSS400 provided for Web programming and development tasks. WSS400 will also help you build better-looking and more functional Web sites. It certainly deserves consideration if you are looking for a product to jump-start your AS/400 Web site development efforts.
REFERENCES AND RELATED MATERIALS
• iSeries and AS/400 Technical Support page: http://as400service.ibm.com
• WebSphere Application Server for iSeries home page: www.iseries.ibm.com/products/websphere
• WebSphere Software Platform page: www.ibm.com/websphere
WebSphere Studio for AS/400 • $300
IBM Corporation New Orchard Road Armonk, NY 10504 Tel: 914-499-1900 Fax: 877-411-1FAX Web: www.iseries.ibm.com

Figure 1: What you see is what you get with the Page Designer HTML editor.
Figure 2: Organize your Web site with the File, Relations, and Publishing views.


Figure 3: The Web Interaction Wizard helps you set up calls to your ILE programs.


LATEST COMMENTS
MC Press Online