In the fall of 2014, IBM introduced the Node.js platform to IBM i. Learn what it is and what you can do with it.
Right now is a very exciting time for open source on IBM i. Not only have a number of new technologies like Ruby and Node.js garnered formal ports to the machine, there are also hints of what's coming next from IBM on their developerWorks site—in particular, Python, gcc, and Git. Each of these has already been made to work on IBM i by way of perzl.org, but now IBM is making them additions to the new 5733OPS licensed program, which means they are fully supported. That's a big deal because it conveys intent and direction!
Speaking of 5733OPS and Node.js, head on over to the IBM i Node.js developerWorks site to get installation instructions. It's free! If you can't install Node.js on your IBM i today, then take a look at http://c9.io to set up a free browser-based development environment in the cloud. c9.io is written in Node.js, runs on IBM i, and is what I used to develop this tutorial!
Once 5733OPS is installed, you can run the following commands in PASE to set up your environment. Doing this will allow you to invoke Node.js from any directory while in PASE. PASE can be accessed either through CALL QP2TERM from the 5250 command line or SSH into your machine using a terminal client (I like this Chrome plugin). If you'd like more info on SSH config for your IBM i, please check out this page I've set up.
$ export PATH=/QOpenSys/QIBM/ProdData/Node/bin:$PATH
$ export LIBPATH=/QOpenSys/QIBM/ProdData/Node/bin:$LIBPATH
The PATH environment variable is like a library list in that it declares what directories should be searched when commands are run. Similarly, the LIBPATH environment variable declares where to look for shared libraries that the node binary requires. Note that a "shared library" is completely different than a QSYS.LIB library.
Now we can test to see if we have access to the node binary by typing the node -v command, as shown below.
$ node -v
v0.10.29
I may have gotten ahead of myself. At this point, you've set up Node.js but don't yet know what it is. Over at nodejs.org, we're able to obtain the following definition:
"Node.js® is a platform built on Chrome's JavaScript runtime for easily building fast, scalable network applications. Node.js uses an event-driven, non-blocking I/O model that makes it lightweight and efficient, perfect for data-intensive real-time applications that run across distributed devices."
Lots of words in that definition that don't actually describe what it's most used for: web applications on the Internet. Wait...what? Another web-capable language on i? We already have RPG, PHP, Java, Ruby, and other languages. Why would I consider Node.js? Well, one thing that has my attention is the fact that Node.js is written in JavaScript. That means we can use a single language on both the client and the server side of our development. There's also an extensive package system named Node Package Manager (NPM). This tool makea it incredibly easy to share code. To emphasize that point, I'm going to show how easy it is to save a PDF up to Amazon's S3 service by downloading their package (aka module) named aws-sdk.
Amazon's S3 service can be used for many business and personal things. For example, I back up my Mac to S3 using the Arq tool. Another use is for Content Delivery Network (CDN) purposes: a way to offload bandwidth-hogging files to other servers on the Internet. The latter is what we'll focus on with a described business need of putting PDFs from the IFS up on S3.
First things first: Start up a shell session and create a new folder for this tutorial titled nodejs_s3, as shown below.
$ mkdir nodejs_s3
$ cd nodejs_s3
Next, we want to obtain the aws-sdk module using the npm install command, as shown below. Note: "aws" stands for Amazon Web Services, and "sdk" stands for Software Development Kit. You can find Amazon's Node.js SDK documentation here.
$ npm install aws-sdk
This email address is being protected from spambots. You need JavaScript enabled to view it. node_modules/aws-sdk
??? xmlbuilder@0.4.2
??? xml2js@0.2.8
??? sax@0.5.3
This is where some cool stuff happens. Communication is made to the npmjs.org server to see if a module with the name of aws-sdk exists. If it does, the server will download it and inspect its package.json file for dependencies, which will then also be downloaded and installed. The package.json file can contain many details about a module or Node.js application, including what other modules it depends on, including xmlbuilder, xml2js, and sax, in this case. You can learn more about the package.json file here.
Next, we need to use the APIs from the aws-sdk module to send a PDF in the IFS to Amazon. Below is an entire app.js program that accomplishes the task at hand.
---app.js---
var AWS = require('aws-sdk');
var fs = require('fs');
AWS.config.update({
accessKeyId: 'AKxxxxxxxxxxxxOA',
secretAccessKey: 'OdxxxxxxxxxxxxxxxxxxxxxxxxxxxxxCn',
region: 'us-east-1'
});
var fileName = 'hello.pdf';
var s3 = new AWS.S3();
s3.putObject({
Bucket: 'litmis',
Key: fileName,
Body: fs.createReadStream(fileName),
ACL: 'public-read'
}, function (err) {
if (err) { throw err; }
});
The first two lines are bringing in outside functionality, much like RPG's /COPY statement. The Node.js runtime will first search the current directory for a node_modules directory to resolve module aws-sdk, which in this case will be found because we just installed it. The 'fs' require statement is bringing in file system functionality from the base Node.js implementation. This will be used later, when we start uploading to Amazon.
Next, we see the AWS.config.update for credentials (repeated again below). This is how we authenticate with the Amazon S3 server. You can find the documentation for getting your own credentials here. Also in this portion of code is where we specify the location of our region, a value specified when you create a bucket in S3. A bucket is a means of organizing things on Amazon's end.
AWS.config.update({
accessKeyId: 'AKxxxxxxxxxxxxOA',
secretAccessKey: 'OdxxxxxxxxxxxxxxxxxxxxxxxxxxxxxCn',
region: 'us-east-1'
});
Now, we're going to create a new s3 variable so we can gain access to the s3.putObject() method. To learn more about JavaScript objects, head over to w3schools.com. The first parameter of putObject is a JavaScript object with properties for the file to be uploaded. The Bucket property needs to already exist and can be created through the Amazon AWS console. They Key property is the name of the file as we want it on S3. The Body property is the contents of the hello.pdf file, which will be streamed vs. read in full. The ACL property is how we can set access control—or rather, permissions. By default, S3 will deny access to public, but if we want to make this PDF available to everyone, we need to set the ACL to 'public-read'.
The second parameter to putObject is an anonymous function that will be called if an error occurs while putting the object on Amazon S3. Understanding how functions work in JavaScript is very important because they have a number of characteristics that make them different from what we have with RPG subprocedures. You can learn more about JavaScript functions here.
var fileName = 'hello.pdf';
var s3 = new AWS.S3();
s3.putObject({
Bucket: 'litmis',
Key: fileName,
Body: fileStream,
ACL: 'public-read'
}, function (err) {
if (err) { throw err; }
});
To run app.js, you can do the following from your shell session. If your PDF is small, it should only take a second or two.
$ node app.js
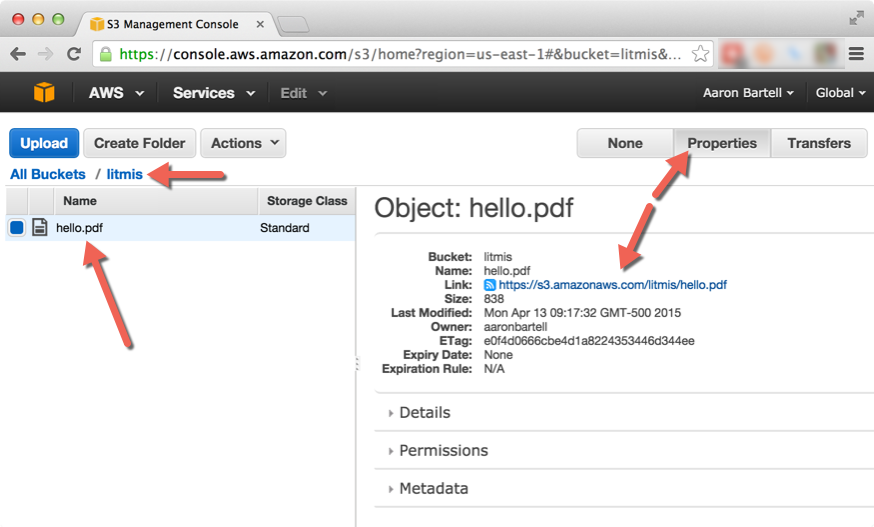
Once complete, and if no errors are thrown, you can go and check your Amazon S3 account. It should look similar to the below screenshot. As you can see, we are in the "litmis" bucket looking at the link property for file hello.pdf.

Figure 1: The litmis bucket shows the link property for file hello.pdf.
Clicking on that link will allow me to download the PDF from Amazon S3 instead of from the IBM i. Next steps would be to put that link into a webpage being served up by a Node.js application on IBM i, like so:
<a href="/https://s3.amazonaws.com/litmis/hello.pdf">Show PDF</a>
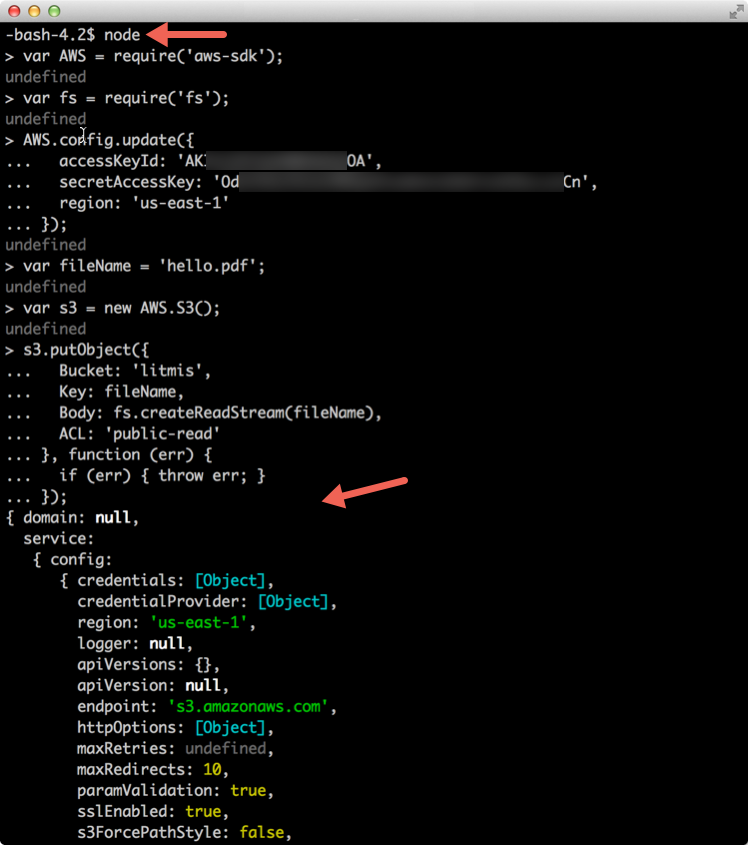
One last thing I want to introduce you to is the Node.js REPL (Read, Eval, Print, Loop), which can be used for testing your Javascript code interactively. For example, while writing this tutorial, I had a Node.js REPL session open and incrementally changed the Javascript until I had it just right and working. This is a big timesaver because it allows me to not only make changes and test them quicker, but also see other properties of objects. Below is a screenshot of pasting the entire finished program into a node REPL session. You start the REPL by entering node with no parameters in the shell prompt. You'll notice toward the end of the screenshot that the response from Amazon is output to the screen, which is helpful for debugging purposes.

Figure 2: You can paste the finished program into a node REPL session.
That completes this tutorial. Hopefully, you now have some perspective for how simple it is to obtain a module written by another party and include it in your application. This functionality truly allows the next generation of languages and frameworks to take off much faster, all the while giving your business a competitive advantage by delivering solutions in a more timely fashion.
On final note, you can bookmark the Litmis Bitbucket Node.js wiki to keep up to date on everything the Litmis team is doing with Node.js.


LATEST COMMENTS
MC Press Online