If you're anything like me, you want to participate in the open-source community but don't want to screw things up. I invite you to participate in a safer side of open source.
I ended my previous open-source article with the following open-ended question:
"At the end of the day, open source means community. It means IT professionals coming together and sharing information, ideas, and code. Will you participate?"
Sometimes, knowing what to do first is the hardest part of engaging in the open-source community. It's for that reason I am going to use this article to document the entire storyline of me engaging in an open-source scenario.
I get daily updates from the LinkedIn IBM i OSS group. Being informed is the first step of being part of the IBM i open-source community. You can overcome the vast amounts of new terminology only by exposing yourself to it on a regular basis. In short, subscribe to that LinkedIn group. It also would be good to get a Twitter profile and follow the #IBMiOSS hashtag.
As I was sipping my coffee this morning, I received an email update from the LinkedIn group where Chris Hird was declaring an update to his recently released open-source project. You can see a screenshot in Figure 1.
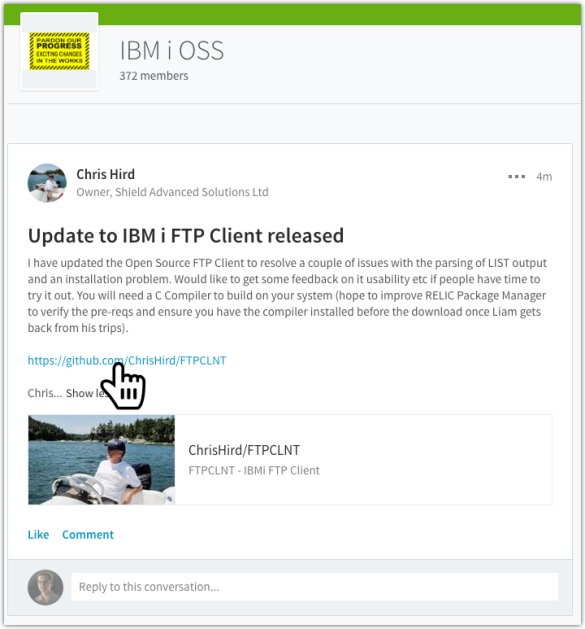
Figure 1: Chris Hird announces an update to his FTPCLNT project.
I don't currently have a need for an FTP client on my IBM I, but I am intrigued to see what Chris has been working on. Being curious is a personality ingredient that's important in being part of the open-source community. I set aside a couple times a day for my curiosity to take place (otherwise, I would be curious all day long). I come into work early to review social media and my inbox to get a pulse of what's going on. I also review over lunch.
I clicked the github.com link from the LinkedIn update and was presented with the project page for the FTPCLNT GitHub page, as shown in Figure 2.
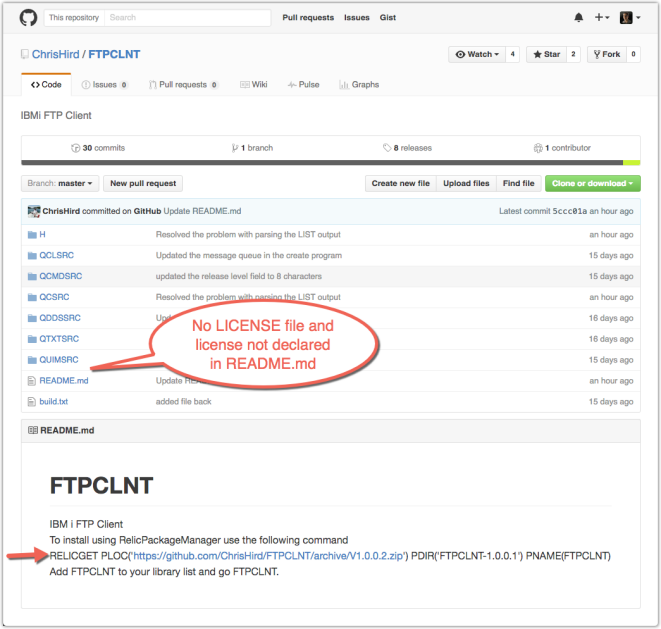
Figure 2: Here’s the FTPCLNT GitHub project home page.
I notice a few things out of the gates that could be enhanced. The FTPCLNT project has a README.md file but it could use some additional formatting, and the project is also missing the declaration of which license it operates under. I could stop at this point and keep my thoughts to myself, but that wouldn't help the FTPCLNT project to go further. Instead, I engage and endeavor to remedy the two things I believe should be addressed. This is my opinion, and Chris might not agree, and we'll learn whether he does at a future point in time.
So how do I engage at this point? As a first step, I want to make modifications to the README.md file so the RELICGET command is in a code block to make it easier to read. I do not have authority to edit the ChrisHird/FTPCLNT project, so I need to "fork" the repo and make the changes in my own copy. Click the "Fork" button in the upper right to make your own copy of the repository, as shown in Figure 3.
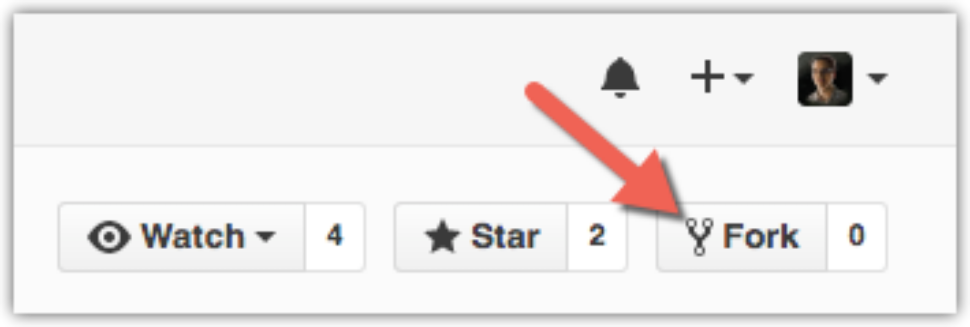
Figure 3: Fork a repository by clicking this icon.
Figure 4 shows the result of forking the repository. As you can see, it now has my profile in the URL path and declares where it was forked from. You can also see that it brought over the entire history (note the 30 commits).
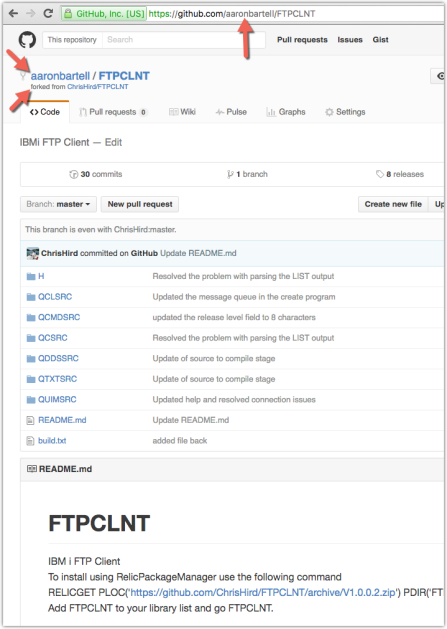
Figure 4: The repository has been forked.
At this point, I could clone this repository to either my IBM i or my laptop and make the changes to the README.md, but for changes like this I usually just edit the file in GitHub. Click the edit pencil as shown in Figure 5.
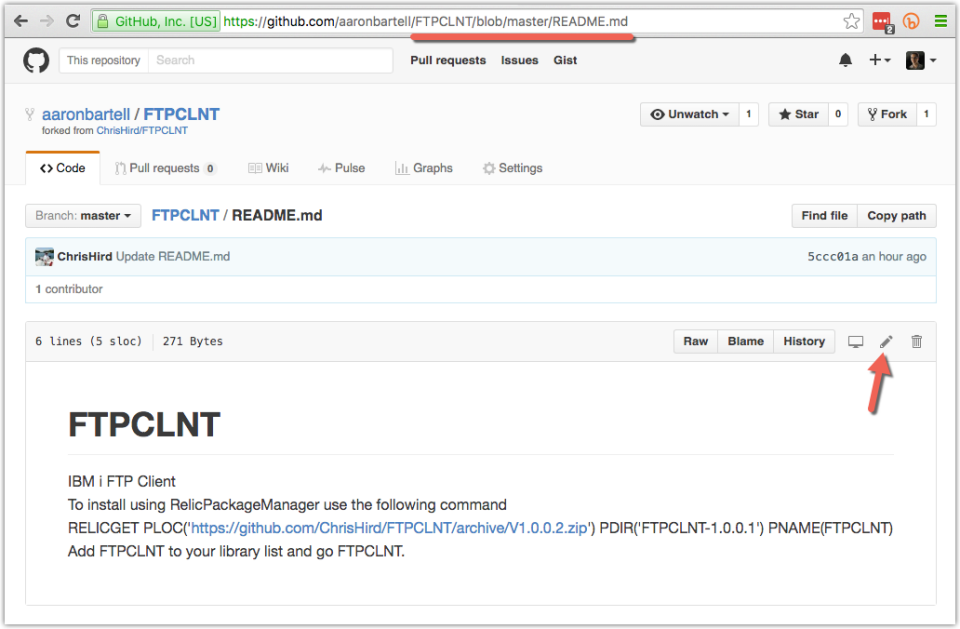
Figure 5: Edit the README.md file.
Figure 6 shows the GitHub file editor. The .md file extension stands for Mark Down, a method of adding things like headings, code sections, bolding, links, and images—all while using text. You can learn more about Mark Down here.
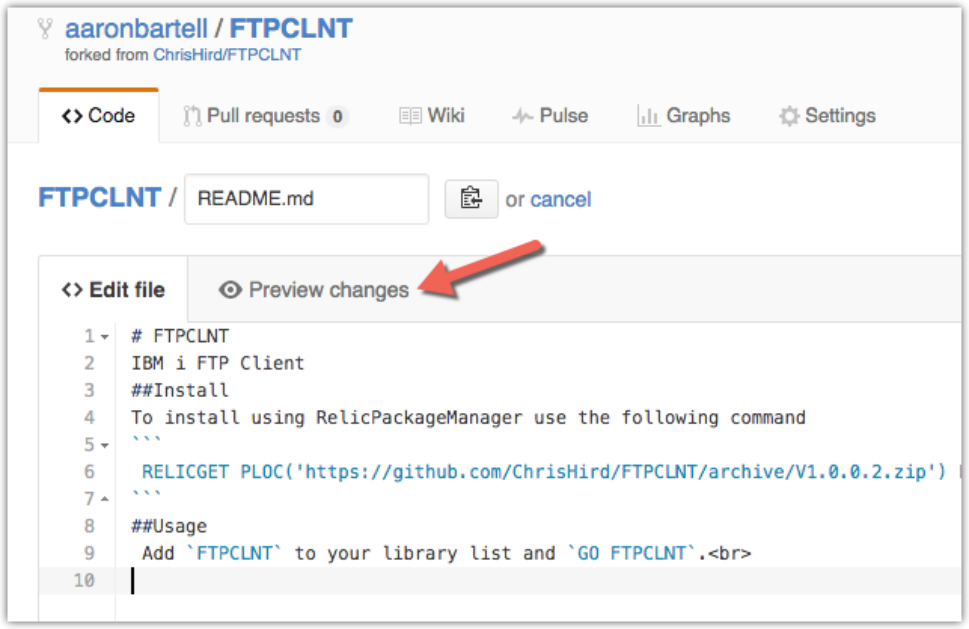
Figure 6: Make changes to README.md using MarkDown syntax.
As I am making my changes, I will often click the "Preview changes" tab to see how things look. Figure 7 shows the "Preview changes" tab using red to show which lines have been changed or removed and green to convey added lines.
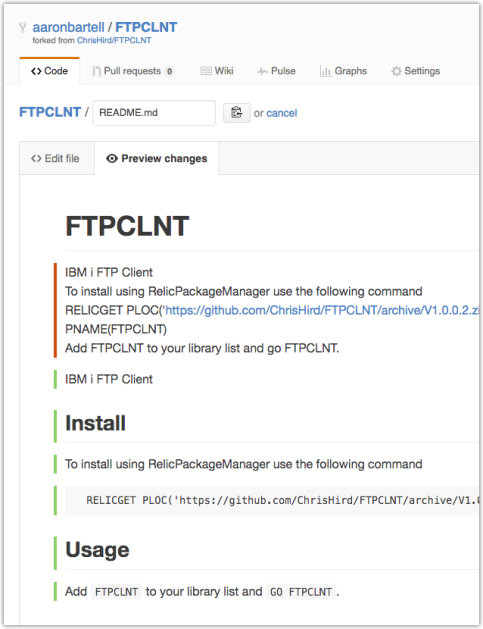
Figure 7: Preview changes to see what's been added, changed, or removed.
I think this looks better and am now ready to save the changes. Saving changes is called "committing" in Git nomenclature. The commit form is below the file editor, as shown in Figure 8. The best practice is to have a succinct title. I don't often add an extended description unless it's necessary, and in this case it's not.
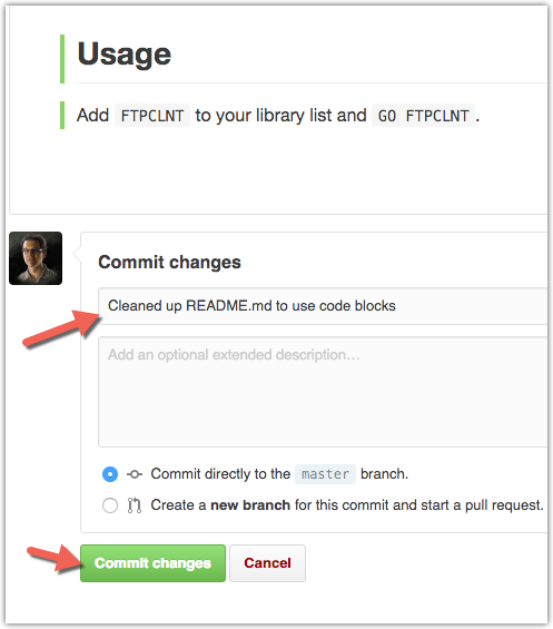
Figure 8: Commit changes to history.
After the changes are committed, you will be presented with a screen similar to Figure 9. Notice the changes were committed to my personal repository. Chris doesn't yet know about my changes. You can see the commit has a unique id of 500a6637 and both Chris and I are now seen as contributors.
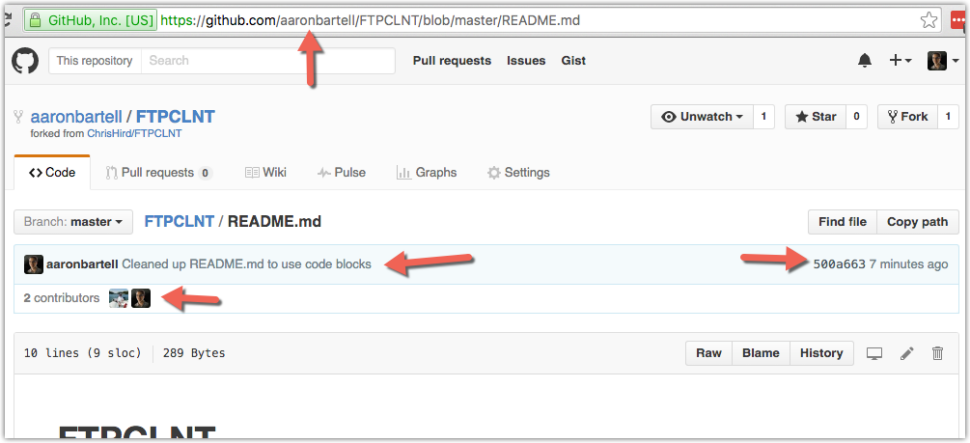
Figure 9: Changes are committed to my personal fork.
I am now ready to share my changes with Chris so they can be included back into the parent repository. Figure 10 shows how to click on the "Pull requests" tab and then select the "New pull request" button.

Figure 10: Do a new pull request.
You will now be presented with a screen that compares the changes you've made in your fork to those that currently exist in the parent repository, as shown in Figure 11. Notice it declares these changes can be merged automatically because there aren't any merge conflicts. A merge conflict can exist when two people have modified the same line of a file; then a human decision needs to be made as to how the conflict should be resolved. Select the "Create pull request" button.
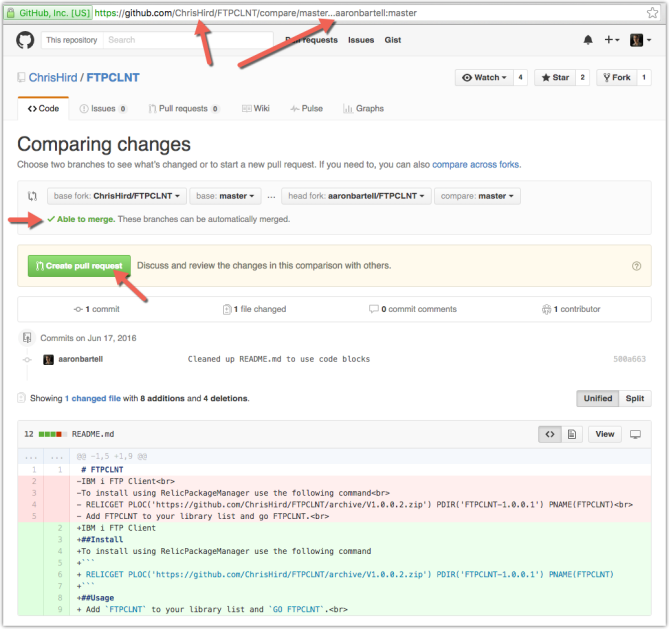
Figure 11: Create the pull request.
You will now be presented with a screen where you can make changes to the pull request subject or description, as shown in Figure 12. In this case, the defaults will be used. Selecting the "Create pull request" button will finalize this process and notify Chris that somebody has made a pull request. Chris then has the opportunity to accept or reject the changes.
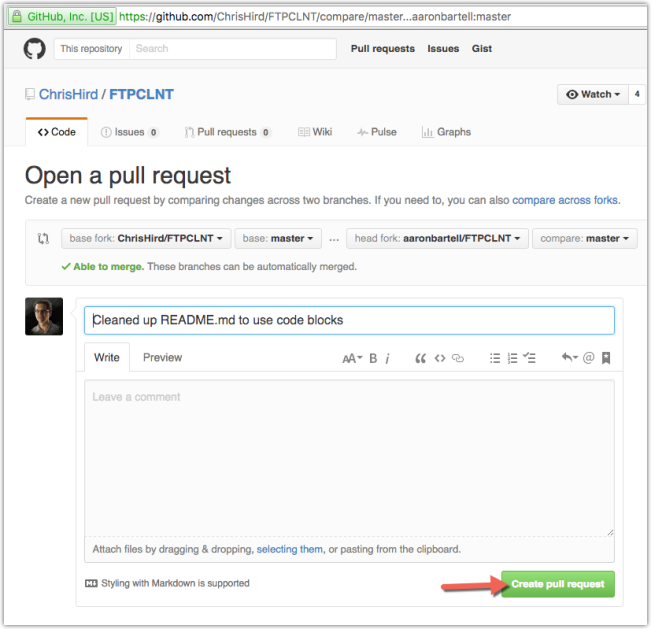
Figure 12: Finalize the pull request.
After the pull request is submitted, you will be presented with the screen shown in Figure 13. Notice we are in project ChrisHird/FTPCLNT on the "Pull requests" tab. The world can now see this change because it is public. Others could also comment on the changes made to convey any concerns or voice support for the changes. Remember, at this point Chris still hasn't accepted the changes into the parent repository.
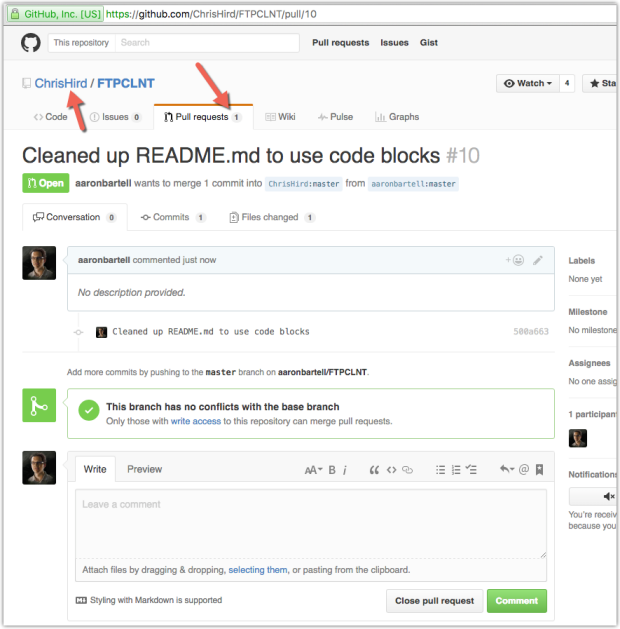
Figure 13: The pull request is complete and awaits acceptance or rejection.
The next thing I wanted to look into was the fact the license isn't declared. After digging some more, I found Chris does in fact have the license included in this repo and it is included in every file, as shown in Figure 14.
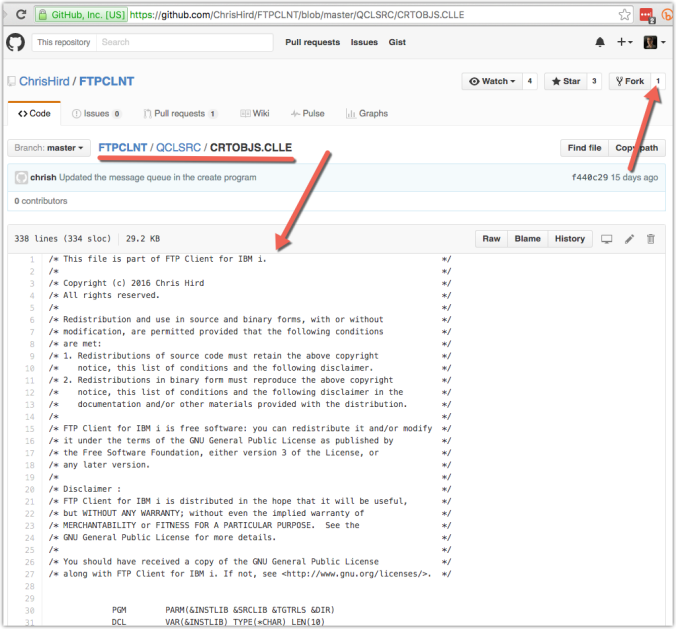
Figure 14: The copyright found at the top of source files.
I am of the opinion this should be included in at least the README.md if not also a separate file named LICENSE in the root of the repo. I determine to make a change to the README.md (simplest solution) and need to navigate back to my fork of this project. Figure 14 shows where you can click to see all forks of this repository, and Figure 15 shows the resulting screen.
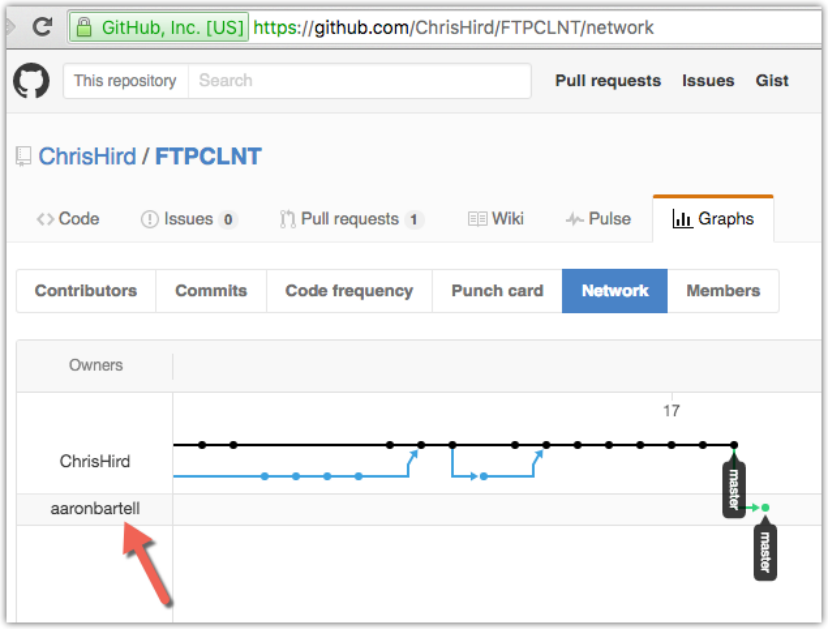
Figure 15: View and select a fork.
In this case, I select the "aaronbartell" fork so I can get back to my repository and begin making a second round of changes to README.md. There are a variety of ways to get back to my fork, including going to my GitHub home page. Once back in my fork of FTPCLNT, I navigate to the README.md, select it, and edit it with the content shown in Figure 16.
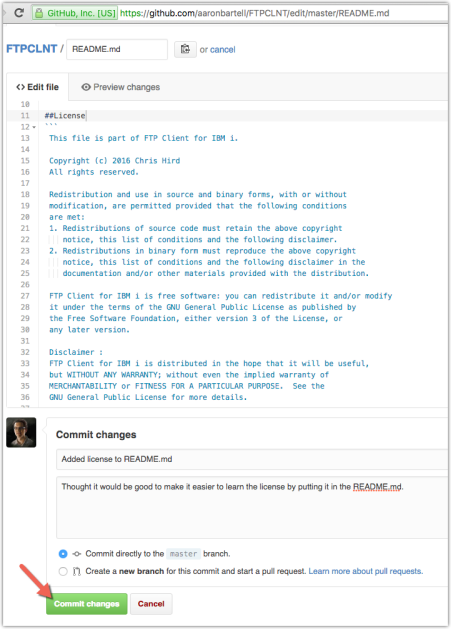
Figure 16: I added a license section to README.md.
From here, I go through the same process of creating a pull request and submitting it to Chris. Again, it's up to Chris as to whether he accepts this second pull request into the parent repository. That's a key aspect to open source with GitHub and Bitbucket: I can't commit changes directly to the parent repository; instead I can only suggest changes via pull requests. This allows all changes to be adequately filtered by the repo owners to make sure all the code and changes are good.
Now it's your turn. The community is aggregating a list of IBM i open-source repositories on this Git-controlled wiki. Not all of them are in Git repositories, but for the ones that are, feel free to peruse them and see if there are small changes you could make to clarify the project like I did in this article.
What other questions do you have about the "how" of open source? Please comment below or email me at This email address is being protected from spambots. You need JavaScript enabled to view it. with any questions you have.


LATEST COMMENTS
MC Press Online