Often, the biggest problem with writing an application is figuring out how to get started. In OS/400 V4R4, the AS/400 Toolbox for Java has made it easier to start building a Java GUI application for the AS/400 by including a new set of tools called the Graphical Toolbox.
The Graphical Toolbox enables AS/400 application developers to build the graphical portions of their AS/400 interface, such as panels and properties pages. The Graphical Toolbox takes advantage of Panel Definition Markup Language (PDML), a new markup language developed by IBM using Extensible Markup Language (XML). PDML defines the user interface look and feel, including the size and layout for all components of a GUI. When using PDML, the user interface definition is separated from the underlying technology. Currently, PDML is set up to be used within a Java environment. However, if the underlying technology were to change, the user interface definition would not need to change since it is XML-based. In addition, since the panel definition is not embedded in code, it does not require repeated edit, compile, and debug cycles of the code to define the user interface.
The Graphical Toolbox includes two tools that create the GUI for your Java application using PDML: the GUI Builder and the Resource Converter. After building the “on-the-glass” portion of the GUI, you can use a set of classes in the AS/400 Toolbox for Java to control the GUI. If you are starting to build a Java application for the AS/400 or an Operations Navigator Java plug-in, this is the place to start—by using the tools available in the Graphical Toolbox.
You’ll Need the GUI Builder—Here’s Why
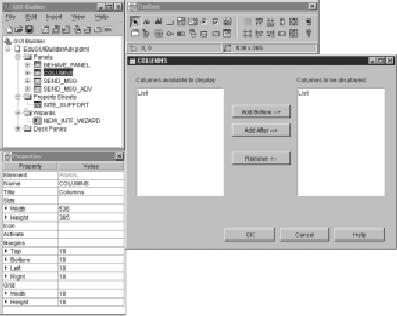
The GUI Builder (Figure 1) is a WYSIWYG graphical editor that creates PDML files by allowing the developer to edit and manipulate the panels in the GUI. In addition to the panel editing, the GUI Builder gives you a head-start on your Java development because of its capability to generate the data Beans and the help text for the panels.
When you work with the GUI Builder, you’ll be working with the following group of windows:
• The Main GUI Builder window is used to create new PDML files and manage existing PDML files.
• The Properties window shows the detailed properties of the currently selected item. Use this window to update information for the file or any component of the user interface.
• The Toolbox window contains all of the tools available to edit panels. Use this window to add controls to a panel, for control alignment, or to preview the panel.
• The Editor window allows you to update the Java window. Each Java window has a different editor.
The best way to learn the GUI Builder is to use it. (I include instructions for installing and using the GUI Builder and Resource Converter at the end of the article.) It’s an intuitive tool that is easy to learn, especially if you have previously used a graphical panel editor. Here are some tips to keep in mind while you are using the GUI Builder:
• Right-click on objects. Everything in the GUI Builder has a context menu that is specific to that object. The context menu appears when you right-click on an object.
• Double-click on objects as a fast path to editing them.
• Use the Preview functionality to verify that your panels look and feel as you would expect them to.
• Use F1 to bring up the GUI Builder help function. Coincidentally, his is the same help key that is used for your AS/400 green-screen help text.
Creating Java Windows Using the GUI Builder
Even though OS/400 V4R4 was the first release of the GUI Builder, this tool contains an extensive amount of functionality. It gives you the capability to build nearly any type of GUI window, from very simple dialogs and property sheets to wizards and multipane windows.
The most basic GUI window is a panel. A panel can be used as a standalone dialog or it can be used as a component of another GUI window. For example, a property sheet is simply a group of panels—one for each tab in the property sheet. Java windows are built using panels.
When you create a panel, you can add controls to the panel by simply clicking on the desired control in the Toolbox window and placing it on the panel. The GUI Builder supports all of the standard GUI controls, except a spinner control. (Look for a spinner control in a future release.) In addition to the standard GUI controls, you can create a custom control.
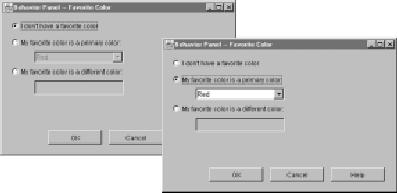
After you have added the controls to your panel, you can use the GUI Builder to set up some of the behaviors between controls. One such behavior is conditional display of controls. This is useful if your GUI panels have controls that are conditionally activated based on the selection of another control. For example, you may want to disable an edit box until its associated radio button is selected (Figure 2). Rather than specifying this behavior in your Java code, the behavior is specified and stored within the panel definition.
For keyboard access to your Java GUI, you can use the GUI Builder to specify the tab order of the panel (that is, the order of the cursor placement when the user presses the Tab key).
In addition to the Java windows, a GUI can contain error, warning, or status messages. To manage these types of messages, you can use the GUI Builder’s string table functionality.
Get a Head Start on Your Java Coding
The GUI Builder’s main function is to build the “on-the-glass” GUI. However, it can be used to do much more than just build the GUI—it can be used to generate the help functions and the data Beans for the GUI.
After you have built the GUI windows, you can enable and generate help functionality for these panels. Context-sensitive help (help for the specific controls) is automatically enabled for all panels. The control’s context-sensitive help is displayed when the user presses F1 and her cursor is positioned on that control. Dialog help (the help that appears when the user clicks on the Help button) must be enabled for standalone panels. To enable dialog help on panels, add a Help button to the panel and specify HELP as the
button’s action in the Properties. Dialog help is automatically enabled on property sheets and wizards.
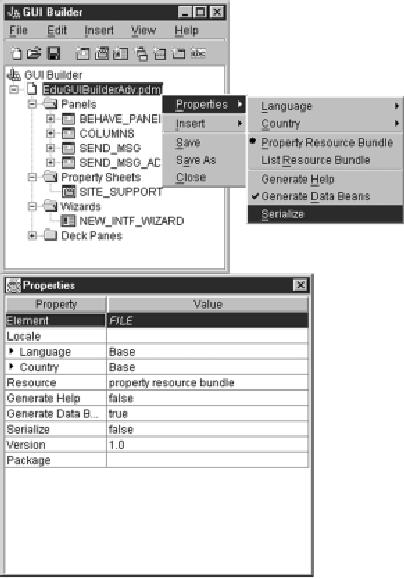
To generate the help files for your Java windows, you need to change the Generate Help property of the PDML file (accessed from the Properties context menu for the file, shown in Figure 3). When you save the PDML file, an HTML file will be generated for each panel, property sheet, or wizard in your PDML file. This HTML file will contain a help template that includes overview help for the panel plus the context-sensitive help links. Context-sensitive help will be generated for the following types of controls:
• radio buttons
• check boxes
• group boxes
• buttons
• labels that end with a colon To get a head start on your Java coding, you can use the GUI Builder to generate the data Beans for the controls on your Java panels. These data beans will be used by your Java application to send information to and receive information from individual controls on the panels. To enable data Bean generation, you must specify a data class and attribute for each control on the panel that requires a data Bean (edit boxes, drop-down lists, tables, etc.). After you have specified the data class and attribute for those controls, you can generate data beans by enabling the Generate Data Bean property of the PDML file (also shown on the context menu in Figure 3). When you save the PDML file, a .java and .class file will be generated for each data class that you specified. The data Bean will contain a framed file of Java code that includes the get and set methods for the attributes. Figure 4 displays an example of a data Bean that was generated for an edit box where Data Class = ExampleClass and Attribute = Name.
Another Tool—The Resource Ceonverter
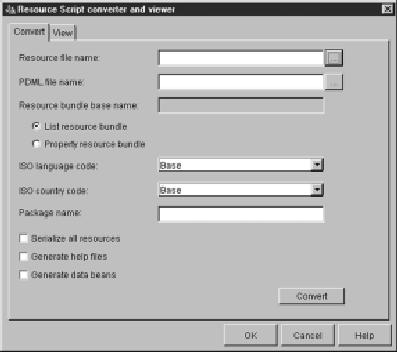
The Resource Converter (Figure 5) will convert a Microsoft resource file (.rc) into a PDML file. This tool is very useful if you have an existing GUI written in Microsoft Visual C++ or VisualAge for Windows C++ that you want to convert to Java. However, if you are creating a new Java GUI, it is recommended that you use the GUI Builder to build and manage the GUI panels.
Installing and Running the Tools
Both of the tools in the Graphical Toolbox are packaged with the AS/400 Toolbox for Java. The AS/400 Toolbox for Java is now available with AS/400 Client Access Express for Windows V4R4M0 (Express client). If you have the Express client installed, use Client Access Selective Setup to install the AS/400 Toolbox for Java. You can also install the AS/400 Toolbox for Java by downloading the trial version of the toolbox and its associated classes from the AS/400 Toolbox for Java Web site at www.as400.ibm.com/toolbox/downloads.htm.
Once you have installed (or downloaded) the AS/400 Toolbox for Java, you will need to install a Java Development Kit (JDK) version 1.1.7 and Swing 1.0.3. The JDK is available for download from www3.software.ibm.com/segdown?segment=AD&family=JV. Select IBM Developer Kit and Runtime Environment for Windows. (You’ll have to register with this Web site to download the JDK.) After installing the JDK, you can optionally add the path to the java.exe and javac.exe applications in your PATH environment variable. You will also need to set up your CLASSPATH environment variable to include the files in the AS/400 Toolbox for Java and swingall.jar from Swing 1.0.3. For example, if Client Access Express is installed in the following path: C:Program FilesIBMClient Access, then you will need to add the following paths to your CLASSPATH environment variable:
C:Program FilesIBM
 Client Accessjt400libdata400.jar
C:Program FilesIBMClient Accessjt400libjt400.zip
C:Program FilesIBM Client Accessjt400libjui400.jar
C:Program FilesIBM Client Accessjt400libuitools.jar
C:Program FilesIBM Client Accessjt400libutil400.jar
C:Program FilesIBMClient Accessjt400libx4j400.jar
C:Program FilesIBMClient Accessjrelib
C:Program FilesIBMClient Accessjrelibswingall.jar
To run the tools in the Graphical Toolbox, use the following statements in your run
command:
Resource Converter: java com.ibm.as400.ui.tools.PDMLViewer
GUI Builder: java com.ibm.as400.ui.tools.GUIBuilder
More Than the Latest Technology?
Java is the latest technology for GUI applications, including GUI applications for the AS/400. The Graphical Toolbox was built to help you get started and make it easier for you to build your AS/400 Java GUI. I encourage you to install the AS/400 Toolbox for Java and learn more about what the Graphical Toolbox has to offer for your Java application.
Related Materials
AS/400 Toolbox for Java Home Page: www.as400.ibm. com/toolbox/welcome.htm Building AS/400 Client/Server Applications with Java, Redbook (SG24-2152-
02)—Available at www.redbooks.ibm.com. AS/400 Client Access Express for Windows: Implementing V4R4M0, Redpiece (SG24-
5191)—Available at www.redbooks. ibm.com. AS/400 Information Starting Point Web Page: www.as400.ibm. com/infocenter Zappie! Home page: www.zappie.net (Contains detailed information on downloading and installing the JDK and Swing and using Java in an AS/400 environment.)

Figure 1: The GUI Builder is a WYSIWYG editor that generates PDML.
Figure 2: GUI Builder also lets you set up controls that are conditionally activated based on the selection of another control.


Figure 3: You can generate help or data Beans for your Java windows by changing the File properties.
import com.ibm.as400.ui.framework.java.*;
publicclass ExampleClass extends Object implements DataBean
{
private String m_sName;
public String getName()
{ return m_sName; }
public void setName(String s)
{ m_sName = s; }
public Capabilities getCapabilities()
{ return null; }
public void verifyChanges()
{ }
public void save()
{ }
public void load()
{ m_sName = ""; }
}
Figure 4: Here’s an example of a data Bean that was generated for an edit box where Data Class = ExampleClass and Attribute = Name.
Figure 5: The Resource Converter converts Microsoft resource files to PDML files.


LATEST COMMENTS
MC Press Online