Through the years I've spent in DP/MIS/IS/IT, I've compiled the most comprehensive and up-to-date mistake handbook in the industry. When a new mistake comes out, I'm the first to make it (which, I guess, is not a good thing). On the other hand, I seldom make the same mistake more than two or three times. Nevertheless, through it all, I've made no greater mistake than to give too little attention to the good folks up in accounting (the "Beans").
As a rule, the accounting department is afforded an inordinate degree of respect by upper management. Have you ever noticed accounting gets anything it wants? Have you ever wondered why? Me too. "Because." "Because why?" "Because." "Because why?" The best answer to this riddle I've received is "Because accounting deposits the checks, that's why. Now, go back to your desk."
So, to generate warm relations between IT people and those in accounting, you can make no better use of your talents than to apply them to the very real-world tasks of creating and modifying Excel and Word macros. The Beans will get to go home on time more frequently, and you'll be more valuable to your esteemed organization.
What's a Macro?
So, what is an Excel or Word macro? Excel and Word macros are merely a collection of instructions that tell Excel or Word what to do next. The instructions may be simple or complex, as fits the task. In reality, the macro language for MS Office is MS Visual Basic (natch). It's called VBA (Visual Basic for Applications) but for all Bean-centric intents and purposes, it's VB.
A macro lives inside a spreadsheet (Excel) or document (Word) or inside a corresponding template. Normally, you would create a spreadsheet or document for the sole purpose of storing macros. No data. Perhaps you'd even build a different spreadsheet or document for each group of macros. Alternatively, many macro-aware Office users conveniently keep their macros in the default templates (personal.xls for Excel, normal.dot for Word). This works well, as the macros are always available because the templates are automatically loaded when you start Excel or Word. It could get sticky, though, if you have a great many macros. (Note that you will have to "Unhide" a template spreadsheet or document to edit the macros therein.)
Create a Macro with the Macro Recorder
The best VBA teacher is free, and it's already on your PC. If you have Excel or Word installed on your PC (and I know you do), you also have a copy of VBA runtime support and the VBA integrated development environment (IDE) installed. With these, you can create and edit VBA code at your whim. Better yet, you can get Excel or Word to create the code for you by using the VBA macro recorder.
OK, here's what you do to get a look at VBA code. Start Excel. A new spreadsheet name, like Sheet1, will be offered. Go to the menu bar and choose Tools->Macro->Record Macro. Then, give your macro a meaningful name (like Macro1) and click the button to start the macro recorder. At this point, a small recorder control box will hover above the spreadsheet. Until it's stopped, the macro recorder will take note of your every move within Excel. The things you do (like changing fonts, summing columns, printing, saving, etc.) are being translated into VBA statements and grouped under the macro's name. Cool.
Next, click the File menu and open an inconsequential spreadsheet of your choice (the Beans will surely have an inconsequential spreadsheet if you don't). Click cell A1, type 123, and press Enter. Then, click the Stop button on the little hovering box to cease recording. Go into Tools->Macro->Macros and select your newly recorded macro. Click Edit to start the VBA IDE and ponder the captured instructions (Figure 1).
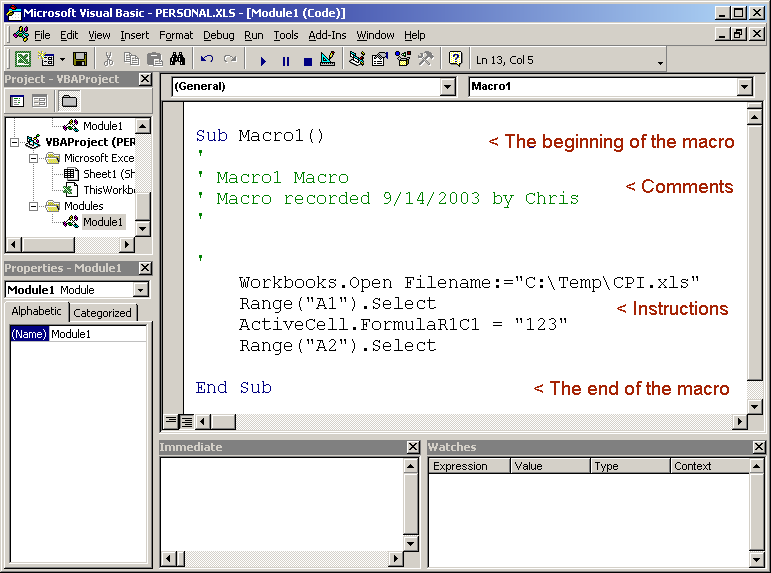
Figure 1: A simple Excel macro looks like this when displayed in the VBA IDE. (Click images to enlarge.)
This modest example consists of the beginning and ending bounds for the macro (the Sub and End Sub statements), the macro name (Macro1 following the Sub keyword), some comments, and most importantly, some VBA instructions to Excel.
Remember, the macro recorder was running when you opened a spreadsheet. This act of Bean-like behavior generated the following statement:
This instruction tells Excel to open an existing spreadsheet (in the example, C:TempCPI.xls was opened).
Next, you placed the cursor in cell A1. The macro recorder wrote this statement to indicate that the range of cells to be selected is A1 (in this case, the range consists of a single cell):
Once you selected the cell , you typed the value "123" into the cell, which produced the next statement (and this one's a bit obscure):
This statement instructs Excel to place the value "123" into the currently selected (a.k.a. "active") cell.
Then, you pressed Enter, which moved the currently selected cell down one row to cell A2:
Finally, when you clicked the Stop button on the hovering recorder control box, the recorder placed the End Sub statement into the VB macro code.
At first blush, a recorded VBA macro looks about as familiar as Chinese algebra, but you can get the hang of it. Notice that the first part of each statement (the part left of the dot) identifies a thing or a place within the spreadsheet. The part to the right of the dot specifies an action that is to be performed on the thing or place or a value that might be found or put there. For example, in the statement Range("A1").Select, Range("A1") is the place and Select is the action to be performed. In the statement ActiveCell.FormulaR1C1 = 123, ActiveCell is the place and FormulaR1C1 is the value that will be replaced by 123.
OK, let's take the macro for a test drive. In the VBA IDE, click the File menu and then click on Close and Return to Microsoft Excel. Close the spreadsheet you opened while recording (but not the one with the macro in it). Again, go to Tools->Macro->Macros and select your new macro name. Click the Run button to execute the macro instructions. You should see the inconsequential spreadsheet load again, the cell A1 get selected, and the value 123 be placed there.
Well, that was very sweet, but I don't think it's going to get the Beans home any sooner. Let's take a look at a more practical example consisting of text file data that must be imported into Excel, parsed into cells, formatted, and printed.
An Excel Macro for Parsing Text Data
Text data, like that which comes from iSeries report content, has no field boundaries. That is, each line of text is one large field without designations for field size or attributes. For example, consider the following text file example (Figure 2):
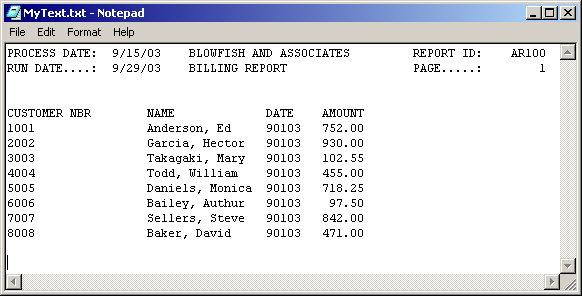
Figure 2: This simple text file needs to be parsed.
In this text file, which started life as an iSeries report, there are a few lines of heading and some line items. It would be a nice gesture to give the Beans a custom Excel macro that would put the line item data into properly formatted columnar cells while preserving the spacing of the heading text. Of course, the Beans are going to want a total for that column of dollar amounts, so you may as well anticipate their request and put that in, too.
As with the previous example, you can use the macro recorder to generate the basic code--this time for a text-parsing macro. The steps to start the recorder will be the same. Once the macro recorder is running, go to File->Open and change the Files of Type selection in the displayed dialog box to Text Files (*.txt, *.csv). Find a simple text file with which to experiment and click Open. You should next see Excel's Text-to-Columns Parsing Wizard (Figure 3).
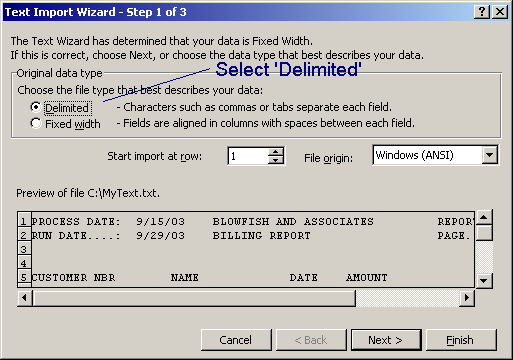
Figure 3: The first screen of Excel's Text-to-Columns Parsing Wizard offers a selection to suppress parsing.
The Parsing Wizard is a clever little utility that helps you specify how a text file, or "flat file," is to be broken into columns. You will make equally clever use of the Wizard in a moment--but not just yet.
To overcome the good intent of the Wizard, select the Delimited option as shown in Figure 3. Since the text file is not really delimited, choosing this option will effectively bypass the Wizard's influence and dump all of the data into column A (Figure 4).
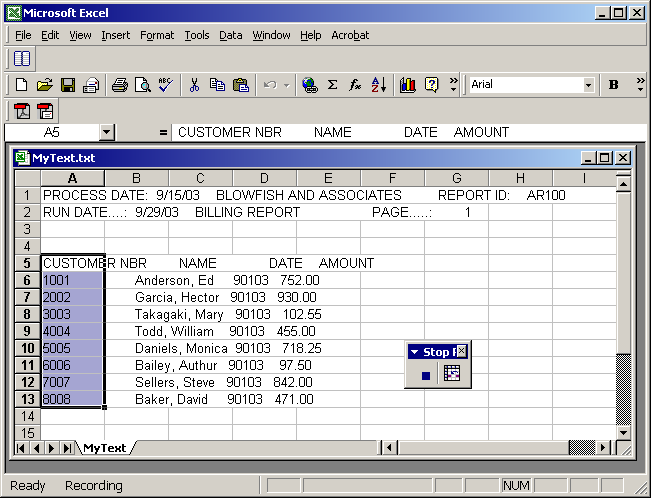
Figure 4: All the data is in column A.
Once the data is in column A, you can more selectively parse only the line-item rows and leave the heading rows alone.
Next, select the line-item rows in column A (5-13 in the example) as shown in Figure 4 (note the column heading row was selected as well). Go to the Data menu and select Text to Columns, which will again invoke the Parsing Wizard but this time only for the selected rows 5-13. Accept the suggested option of Fixed Width and proceed to the Parsing Wizard's next screen (Figure 5).
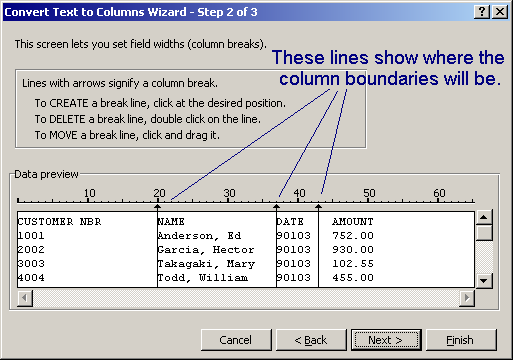
Figure 5: The Parsing Wizard provides a column identification screen.
The Parsing Wizard automatically detects the nature of the data and makes a good guess as to where the column boundaries should be placed. The black vertical lines designate the column boundaries. You may add, delete, or move lines as required. Click on Next to get to the screen where you set the formatting attributes for the columns (Figure 6).
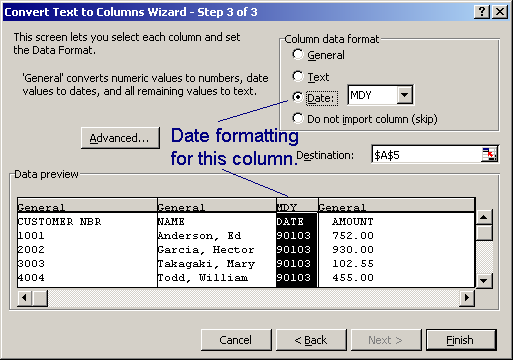
Figure 6: Set the formatting attributes for a column with the Wizard.
In the example text data, the third column contains dates, so I clicked this column to select it, and I set the Column Data Format to Date with the specific date type of MDY. The rest of the formatting is OK because Excel is pretty good with numbers even though the data attribute is set to General. Click Finish to complete the Wizard.
The rendered spreadsheet should look something like the one in Figure 7, now nicely parsed into columns and correctly formatted.
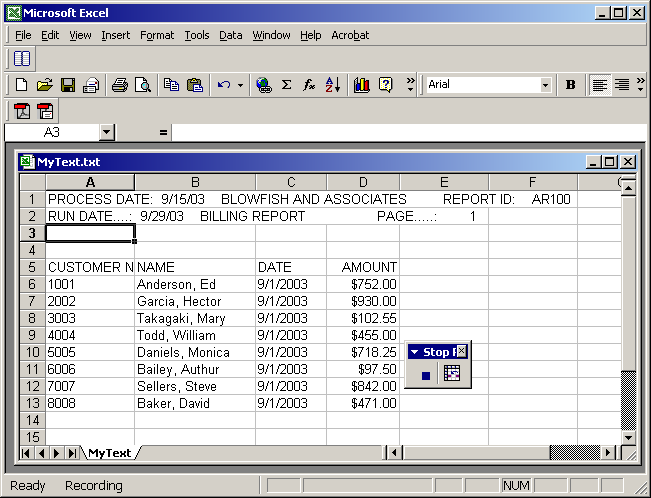
Figure 7: Your text data is parsed into columns and formatted.
Remember, through all these manipulations, the macro recorder is dutifully writing corresponding VBA statements.
For good measure, select the cell range D6-D14 (one cell beyond the range of dollar amounts) and click the AutoSum button (Figure 8) to create a money total in cell D14.
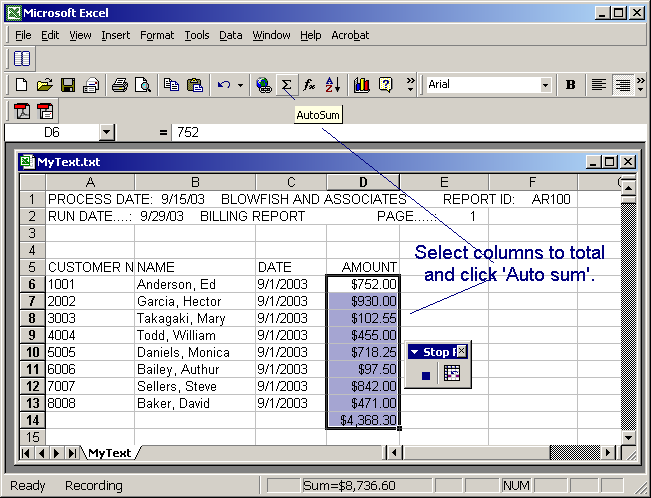
Figure 8: Use the AutoSum button to total a column of numbers.
Finally, print the spreadsheet to finish it off, and click the Stop button on the recorder control box. Go into the Tools->Macro->Macros menu, find your new macro, and click Edit. The generated code should look something like that in Figure 9. (Note: The underscore character means the statement is continued on the next line.)
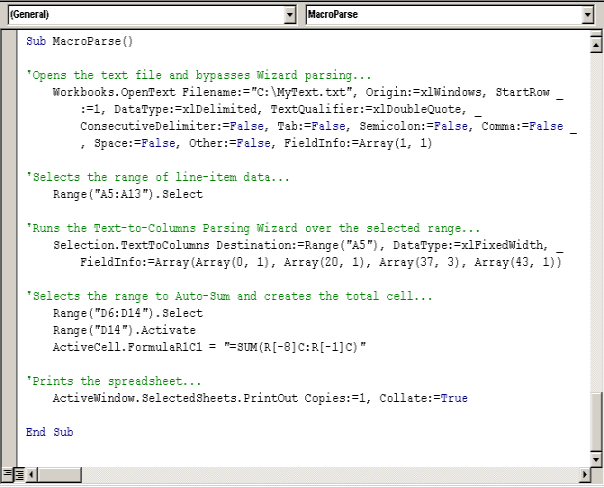
Figure 9: This VBA code parsed your text file into Excel columns.
There's some extra stuff in there because the recorded instructions are reiterating default values. It looks important, but it doesn't do anything if you haven't altered the defaults.
As you can see, there are five tasks performed by the macro in Figure 9: open a text file, select range A5-A13, parse the text data into columns, total a range of money cells, and print the sheet. If you look closely at the statements, you should recognize phrases that correspond to the selections you made while you were recording. For example, the phrase DataType:=xlDelimited corresponds to the option button selected on the Parsing Wizard's first screen.
VBA Constructs
Very often, you can't just record a gang of statements into a macro and call it a day. Things are infrequently that simple. For instance, suppose you were downloading report data from the iSeries to Word. Further suppose that this report can be a variable number of pages, with a heading on each page that's going to show up repeatedly in the middle of the Word document. Folks don't like report headings embedded randomly within their documents.
To crack this nut, you would take advantage of VBA's rich collection of programming constructs. Traditional programming capabilities like If statements, Do loops, and Case statements are available in VBA to execute conditional processing or to iterate through repetitive data.
For example, to deal with the aforementioned page-heading problem, a VBA macro for a Word doc would look something like that in Figure 10.
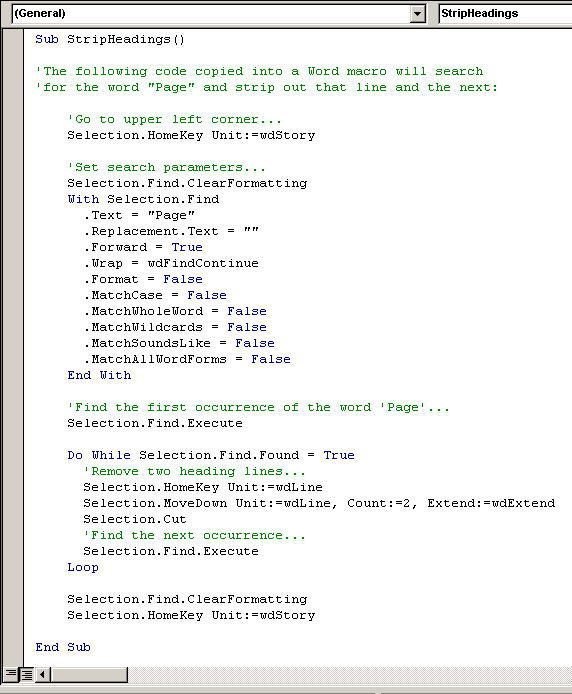
Figure 10: Write a Word macro that searches for page headings and removes them.
Notice the Do loop construct that will continue to search for the word "Page" until the end of the document is reached.
So, then, what are you going to do when you are trying to write a macro to perform a task for the Beans and you don't know what the proper VBA statement is? That's right! You're going to start the Excel or Word macro recorder, perform the task, and steal the code.
Invest a couple of hours and experiment. Poke around in the VBA help text. Put the cursor on a VBA keyword and press F1 to display context help. Become a Software Hero and help the Beans out. They're not so bad, really (especially if you've ever worked with engineers).
Chris Peters has 26 years of experience in the IBM midrange and PC platforms. Chris is president of Evergreen Interactive Systems, a software development firm and creators of the iSeries/400 Report Downloader. Chris is the author of The OS/400 and Microsoft Office 2000 Integration Handbook, The AS/400 TCP/IP Handbook, AS/400 Client/Server Programming with Visual Basic, and Peer Networking on the AS/400 (MC Press). He is also a nationally recognized seminar instructor. Chris can be reached at This email address is being protected from spambots. You need JavaScript enabled to view it..


LATEST COMMENTS
MC Press Online