In the era of the Internet, TCP/IP and its suite of associated protocols has become the de facto standard for networking heterogeneous computer systems. All major operating systems now support TCP/IP and it often serves as the bridge that allows otherwise incompatible systems to communicate and share information. FTP—one of the oldest members of the TCP/IP suite—is still the most useful member of that suite. Originally introduced in Request for Comment (RFC) 454 back in 1973 (and revised several times since then), FTP remains an elegant and simple way to transfer files between all types of computers. The current FTP RFC is 959, which was released in October 1985. It can be seen at http://info.internet.isi.edu/in-notes/rfc/files/rfc959.txt. Several other RFCs have also been added to the original protocol.
Many AS/400 shops have already discovered FTP as a way to move files between computers. FTP can be used to transfer database query result sets, relocate system logs, or back up files to a centralized system. Transfers can be scheduled to run overnight, often as part of nightly batch processing. (Editor’s note: For a list of AS/400 Network Expert articles that discuss FTP in an AS/400 environment, see the Related Materials section at the end of this article.)
However, since most AS/400 shops also have Windows NT installed, the question becomes, “How do we set up FTP on Windows NT 4.0?” NT 4.0 can act as an FTP client, copying files to and from an AS/400 FTP server. FTP scripts and the Windows NT scheduler service can be used to automate the process. Windows NT 4.0 can also act as an FTP server by installing Internet Information Server (IIS) on your NT Server or the Personal Web Server component on an NT Workstation. IIS and Personal Web Server also install other Internet services, however, and security becomes a concern once they are installed. To answer these questions, this article covers the right way to use Windows NT
4.0 as both an FTP client and server in your AS/400 network.
Windows NT As an FTP Client
If you have installed Windows NT 4.0 and the TCP/IP protocol, you already have an FTP client. Windows NT includes a command-line FTP client as part of its standard TCP/IP network installation. Simply type FTP on the Windows NT command line and it will bring up the FTP client. Assuming that the AS/400 has its FTP server installed and running, you can then open a connection from the client to the server and begin transferring files. If you prefer a graphical interface, there are many Windows NT freeware and shareware FTP
clients that are available on the Web, such as WS_FTP from Ipswitch (www.ipswitch.com/index.html). The command-line client will suffice for most transfers, however.
If you’re not familiar with the standard FTP client operation, typing help at the FTP> prompt will display a list of available commands. Because these commands are relatively self-explanatory even to someone who has not used FTP before, I will not go into all of them. However, several commands should be noted, as they are especially helpful when constructing FTP scripts. The standard commands of PUT and GET are used to transfer files to and from an FTP server. Be sure to use the BINARY or ASCII command to tell the client what kind of data you are transferring. When in doubt, set the data type to BINARY, as that performs a bit-by-bit transfer of files. ASCII mode changes the carriage returns/line feeds in a file depending upon the receiving platform, which could corrupt a non-ASCII file.
Also, if you use the PROMPT command followed by either the MPUT or MGET command, you will be able to use wildcards when transferring files, while the standard PUT and GET require a specific file name. Other commands (such as OPEN, CLOSE, CD, LCD) are used to open and close connections, change directories, and manipulate file names.
One particularly useful feature of the Microsoft FTP client is its ability to use scripts to automate common procedures. To use a script, create a text file that lists the FTP commands to be executed, and pass that file as an argument to the FTP client by using thes switch. For example, the following command will execute the ftpcmd.txt file:
C:> ftp -s:ftpcmd.txt
Figure 1 shows the listing of ftpcmd.txt. The FTP client will open a connection to ftp.myserver.com and sign in using the listed ID and password. Once connected, it will change to the appropriate directory on both the server and the client and change the transfer mode to binary. Then it will use the PROMPT and MPUT commands to upload the entire contents of the directory to the server. This will not upload the contents of any subdirectories, however. This whole process could be automated by incorporating the above command line into a batch file and using the Windows NT Scheduler service. For example, the following command will cause the Windows NT Scheduler to execute the c:ftmcmd.bat script at midnight on the first day of every month.
C:> at 00:00 /every:1 “c:ftpcmd.bat”
Here’s one final note on security: FTP transfers all user names and passwords over the network as clear text. Be careful using automated transfers over an insecure network as a hacker could capture the network packets and read the login information as well as the data from the file. If security is a concern, be sure to encrypt the data file before sending it over the network. User IDs and passwords are still vulnerable however, so it is best to use a custom ID that has no other rights on the network. A secure FTP was outlined in RFC 2228 in October 1997, but this has not been incorporated into the standard Microsoft client at this time.
Windows NT As an FTP Server
Windows NT 4.0 server does not come with an FTP server installed by default. In order to use NT as an FTP server, you must first obtain the Windows NT Option Pack. This addon is now included with new Windows NT purchases or you can download it for free from the Microsoft Web site at www.microsoft.com/ntserver/nts/downloads/recommended/NT4OptPk/default.asp. The Option Pack includes several utilities for Windows NT, including Microsoft IIS 4.0 and
Microsoft Transaction Server 2.0. On Windows NT Server, all of the features of the Option Pack can be used, including IIS with virtual site hosting. If you install the Option Pack on Windows NT Workstation, however, many of the more advanced IIS features are not available, such as IP address filtering and multiple site hosting. Microsoft has dubbed this more limited version Personal Web Server 4.0. For the purposes of setting up a simple FTP server, either platform will do. The CD-ROM version of the Option Pack also includes Windows NT Service Pack 3 and Internet Explorer 4.01, both of which must be installed before you can begin the Option Pack setup. Of course if you already have the latest versions of these products, such as Service Pack 4 and Internet Explorer 5, you are ready to begin.
Not only does the Option Pack include some extra features, but IIS also installs several services onto your Windows NT 4.0 server. Start installing the Option Pack by running the X:NTOPTPAKEnx86Winnt.SRVSetup.exe program where X: is equal to the drive letter of your CD-ROM drive. If you are just interested in the FTP service, you will want to do a Custom install after starting the setup program. From the list of available components, only select IIS, Microsoft Management Console, and the NT Option Pack Common Files. You should also limit the Internet services installed by clicking on IIS and using the Show Subcomponents button to prevent the installation of a Web server. By default, IIS will try to install a Web server along with the FTP server. In June 1999, a company made headlines by publishing a program on the Web that exploited a security hole in the IIS web server. Although Microsoft released a patch soon after, the best protection is to simply avoid installing the Web server if you’re not intending to use it. For basic FTP, only the FTP Server and Internet Service Manager need to be checked in the IIS subcomponents. IIS setup will now prompt you to create a directory for the default FTP site. The default is C:INETPUBFTPROOT. All files and directories destined for FTP should be placed under this directory.
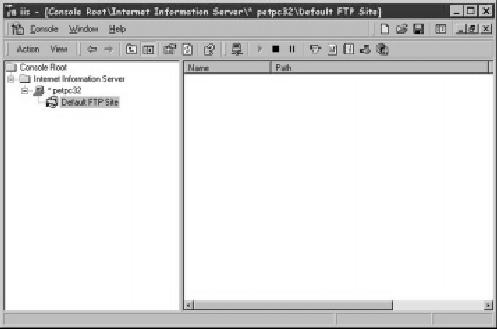
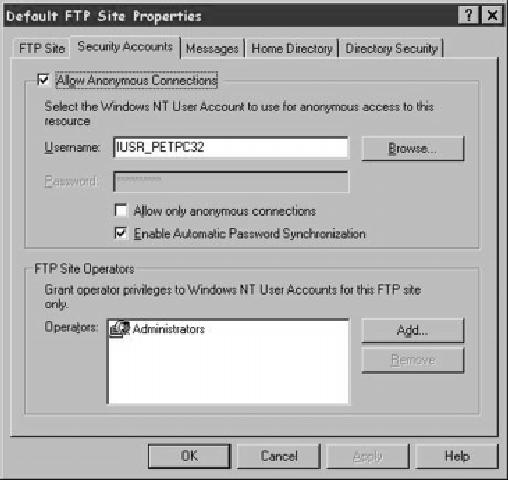
With the setup program completed, an icon will be created for the Internet Service Manager. (You can find this icon on the Start menu under Programs/Windows NT 4.0 Option Pack.) This administrative tool is really a snap-in for the Microsoft Management Console (MMC). With Windows 2000, the MMC will be used to control all functions on the server. IIS 4.0 was one of the first programs to use the Microsoft Management Console, so most of the same configuration options I’ll discuss will also apply on the Windows 2000 platform. Once the console is started, the Internet Information Server screen shown in Figure 2 will appear. Multiple virtual FTP sites can be created on the same server, as long as the proper Domain Name Server (DNS) entries exist for each entry. The FTP service can be controlled by using the play, pause, and stop buttons that appear on the toolbar. Right-clicking on a particular FTP site, followed by a left-click on the Properties menu item, will allow you to configure that site’s properties (Figure 3), including setting up security.
The FTP configuration settings have options that can be used to secure an FTP site. On the first tab of your FTP properties panel, FTP Site, an administrator can specify which TCP port is used to connect to the server. The default port of 21 is well known, but, for security purposes, you can select a higher port number so that only those people who know the correct port will be able to access the server. The users will have to reconfigure their FTP clients to connect using the new port number. Figure 3 shows the Security Accounts tab, which contains one of the most important security settings for IIS. By default, anonymous logins to the FTP server are allowed. Unless the server is to be used by the general public, this option should not be enabled. Clearing the check box means that only users with a valid Windows NT logon account will be able to access the server. If you do decide to allow anonymous connections, you will want to be sure to limit the rights of the IUSR_servername account (where servername is equal to the name of your Windows NT server, “IUSR_PETPC32” in my example). This account is created during the IIS install, and it is used to define the permissions that an anonymous FTP user will have to files on an NTFS partition, as well as to define system rights for that user. For security purposes, this
account should be configured so that it only has access to the directories you will be publishing.
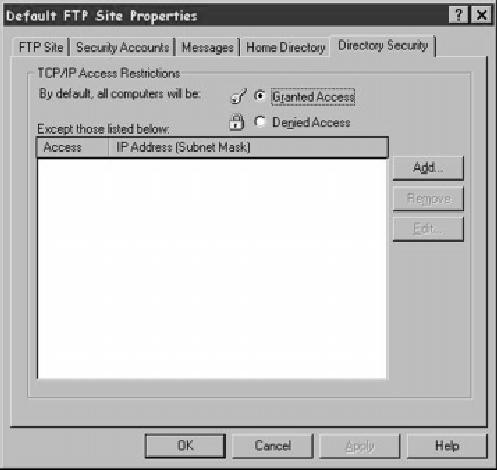
There is one other FTP security mechanism on your IIS that you need to control. Figure 4 shows the Directory Security tab, which allows an administrator to specify which IP addresses will be allowed to connect to this FTP server. Once again, the default setting allows anyone to access the FTP site. This tab also illustrates one of the differences between IIS and Personal Web Server: Personal Web Server on Windows NT Workstation is not able to implement IP address restrictions.
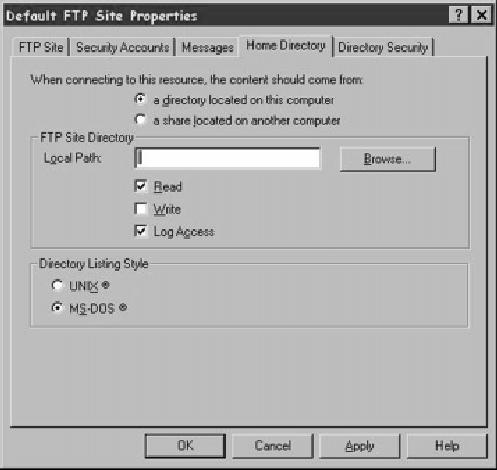
Once security is configured, the only remaining task is to define which directories are to be published by the FTP server. Figure 5 shows the Home Directory, which specifies the local directory that will act as the root for the FTP server. A network drive may also be used as the local directory by specifying the Universal Naming Convention (UNC) path instead of a local directory. Additional security can be implemented by making the directory read-only. With security configured and the directories published, the FTP site is now open for business.
The FTP Common Ground
While the FTP protocol lacks many of the finer features of proprietary file sharing systems, it remains the one of the easiest and most readily available ways to transfer files between computers. FTP can be used to solve numerous problems on any network, such as the nightly transport of a DB2 query set to a user’s desktop PC. Using FTP on Windows NT will provide yet another way for your AS/400s and desktop PCs to coexist peacefully
Related Materials
Internet Engineering Task Force Web Site: www.ietf.org (Contains links to RFC pages.) Microsoft Training and Certification Web page: www.microsoft.com/train_cert/Courses/936dfinal.htm (Contains information on Microsoft Official Curriculum Course 936: Creating and Managing a Web Server Using Microsoft Internet Information Server 4.0.) “Advice: Client Access Data Transfer vs. FTP: When to Use Each Technique,” Joe Hertvik, AS/400 Network Expert, July/August 1999 “How to Create Blazing FTP File Transfers,” Daniel Wood, AS/400 Network Expert, March/April 1999
open ftp.myserver.com
myuserid
mypassword
cd /pub/ftp-in/myfiles
lcd d:myfiles
binary
prompt
mput *
quit
Figure 1: This is a sample listing of a FTP scripting file that can be run under the Windows NT Scheduler service.

Figure 2: You can view and control your Windows NT FTP sites through the Internet Information Server screen.

Figure 3: Be sure to configure your anonymous connections correctly on the Security Accounts panel to lock down your Windows NT FTP server.
Figure 4: The Directory Security panel allows you to grant FTP access based on a client’s IP addresses. (This panel is not available for Personal Web Server users.)


Figure 5: The Home Directory panel specifies the local directory that acts as the root directory for your FTP server.


LATEST COMMENTS
MC Press Online