A friend of mine is the chief financial officer for a medical firm. We were chatting one day and out of the blue he said he had a problem: He had 50 employees and not one single standard type of calendaring software. By calendaring, I mean a way to keep track of appointments and meetings. He said that some people were using Lotus Notes, some Microsoft Outlook, and others resorted to chicken scratch on a pad of paper, but not everyone was using the same software for their calendaring needs. He said it made things difficult to figure out who was in what meetings and when. He also said that his budget dollars were all used up so he couldn’t purchase more software. My response was “don’t you have an AS/400?” He looked at me puzzled. “But,” he responded, “I want an application that runs on my PC, not a native green-screen application. It has a better feel to it.” I told him to give me a few weeks to throw something together for him. This is how the AS/400 Meeting Scheduler came to be.
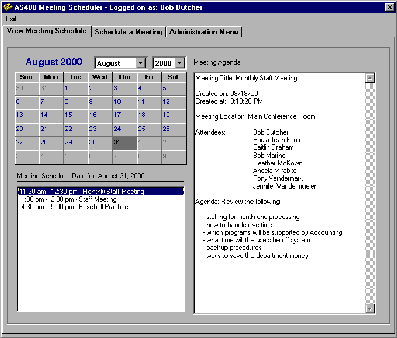
After a few weeks, I threw together the program shown in Figure 1. The program addressed his scheduling needs and didn’t cost him anything other than some time to sit down and learn new software. The AS/400 Meeting Scheduler’s main interface is written in Microsoft’s Visual Basic (VB) for that robust GUI. The main control in the VB program is Microsoft’s ActiveX Data Object (ADO). The back-end database resides on the AS/400. Client Access/400’s OLE DB driver was used as the pipeline to the data on the AS/400. Throw in some embedded SQL, stored procedures, and RPG programs on the AS/400, and you are good to go. No, it doesn’t have all of the bells and whistles of Microsoft Outlook or Lotus Notes, but I’m not Bill Gates either.
Calendarville Information Center
OK. Let’s see what this baby is made up of. There are three distinct areas to the AS/400 Meeting Scheduler that I want to review. (I’ll jump into further detail later.) The areas are as follows:
• Administrative menu—This allows the designated AS/400 Meeting Scheduler Administrator to add, delete, update logon IDs, and control all meetings scheduled on the AS/400. Please note that a logon ID in the AS/400 Meeting Scheduler Profile is not the same as a user profile on the AS/400.
• Schedule a meeting—This allows you to schedule a meeting. It checks for conflicts and allows you to enter meeting information.
• View meeting schedule—You can view today’s meetings or another date in the future. This shows you all of your meetings for the selected date, meeting location, meeting agenda, and all attendees for the meeting.
Before creating your first meeting, you need to make sure that everything is installed correctly on both the PC and AS/400. This program assumes a few things:
• You are running a PC in a Windows 95, 98, or NT environment.
• You are using AS/400 Client Access Express for Windows or a previous version of CA/400 that supports the OLE DB driver. CWBZZODB.DLL is the .DLL that contains the code for the driver and is available with CA/400 V3R1M3. This DLL should automatically be loaded onto your machine when Client Access is installed.
• You have the Microsoft Data Access Components (MDAC) installed. This is free and can be found at www.microsoft.com/data/ download.htm. Be warned that, while the initial download of the MDAC software development kit (SDK) is fast, the actual installation on your PC of the MDAC SDK comes from Microsoft’s Web site and over a dial-up connection. This installation can be a very long-running process.
To get the AS/400 objects and the PC setup program, go to www.midrangecomputing.com to download the objects related to this article. The readme.txt explains how to install the objects on the AS/400 and the PC.
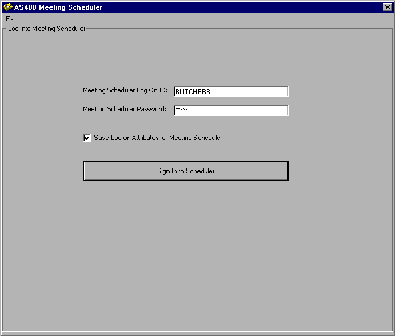
The first time you run the scheduler, you must do a few things. An input box will appear and ask you to enter the AS/400 system name. Enter the name of the AS/400 that the Scheduler Objects reside on. Next, the input box will ask you the library where the installed programs reside. The library name entered must be the name of the library the objects for this utility were restored into on the AS/400. It is very important that the objects for the AS/400 are restored to a library that is part of the AS/400 user profile, QUSER, library list. It is important so that the QUSER profile behind the scenes can locate the AS/400 objects necessary on the AS/400 end. If all has been entered correctly, you will be asked to log on. Figure 2 shows what the logon screen looks like.
The first time you log onto the scheduler, there is only one valid logon ID and password. The logon ID needs to be MC400. Also, enter MC400 for the password. Press the Sign In to Scheduler button to try to log onto the program. Because this logon ID has administrator rights, you are brought into the Administration Menu. If you have signed on correctly and checked the box titled Save Log on Attributes for Meeting Scheduler, the logon ID, password, system name, and library name are all saved to your PC’s registry. This will bypass typing in each of these parameters each time you log on.
Administration Menu Boulevard
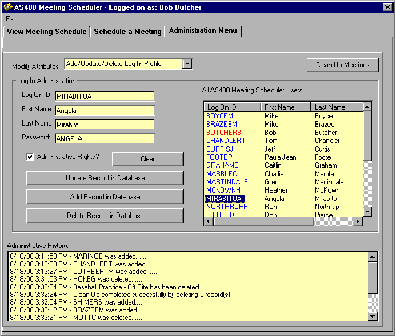
The Administration Menu will only be shown if the logon ID that has logged into scheduler has administrative rights. First, check out the Modify Attributes drop-down box. Select Add/Update/Delete Log In Profile. Figure 3 is what you should see on your screen.
Look under the heading All AS/400 Meeting Scheduler Users. This is where you add all of your scheduler IDs. The only logon ID currently out there should be MC400.
Now you can add a few new identifiers: In the login ID field, type in a Scheduler ID name. The scheduler name cannot be longer than 10 characters and is automatically converted to uppercase. This name will be used to log into the scheduler. Enter the logon person’s first name in the First Name field provided and the last name in the Last Name field. Next, enter the a password. This password will be what the person uses to log on to the AS/400. This, too, can only be up to 10 characters long and isn’t visible when entering in the password field. Check the Administrative Rights? box if you wish this person to be an administrator when he or she logs on the system. Click on the Add Record in Database button. Notice that the new ID was added to the right in the users list.
Notice that in the users list box there are horizontal and vertical scroll bars. The horizontal scroll bar hides the passwords for each person. Scrolling over will reveal the passwords. Scrolling down will show more people enrolled in the Scheduler. All of the entries are in alphabetical order. Click on an entry and it automatically fills in the login ID, first name, last name, password, and administrative right fields. You can change any fields other than the login ID field, and click Update Record in Database to make an update. Clicking the Delete Record in Database button will delete the current record selected. The Clear button clears all of the fields so you can start entering data again.
Notice the colors in the users list box. All of the entries in red indicate that these people have administrative rights. Remember that administrative rights give you access to the Administration Menu tab. All other users will show up in blue. Maintaining users is critical to the success of this program. All of the users that are in your database will show up as valid people who can be selected for meetings. Notice that all changes that you make will show up under the Administrative History list box. You may want to remove the MC400 logon ID and add or change a different ID to be the new administrator. Right-click in the Administrative History area to delete the entries in history. Go back up to Modify Attributes and select Delete Meetings. The meeting administration is now on your screen.
The first time in this screen you’ll see all of the meetings in your scheduler under the heading All Meetings in Scheduler. If you click on a specific meeting, the attendees for that meeting are shown in the Attendees list. Click on the drop-down box for Select Login ID. This will contain all of the IDs that are currently set up in the scheduler. By clicking on a profile, you’ll be shown all of the meetings that this person is scheduled in.
Select a meeting by clicking on it. Right-click on it and a message box will appear allowing you to delete the entry. Press the Yes button for the deletion to occur. Pressing the Clean Up Meetings will delete all meetings in the scheduler that are older than the current date. It is recommended that you do this from time to time. All deletions are recorded in the Administration History list. Go back and enter some valid profiles in your workplace and create a meeting by clicking on the Schedule a Meeting tab.
Schedule a Meeting Street
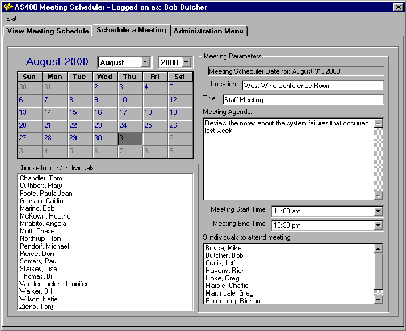
This screen looks pretty boring. The screen was designed to have the user follow a specific order when entering meeting information. Follow these steps to add a meeting:
1. Fill in a meeting location—The default here is your signature and it is in your in your office. This can be modified.
2. Fill in a meeting title—What could your meeting be called?
3. Enter data for an agenda—Why was the meeting called? What will be discussed in the meeting? Remember, when you enter an agenda, everyone that is scheduled will be able to see what you’ve entered, so be descriptive.
4. Select meeting participants—Choose from the list of possible people on the lower left side of the screen. Double-click on a name to move it into an attendee of the meeting. Select
all of the people you wish to add for your meeting. To remove a person that you’ve selected, click on his name, and it will return back to the original list.
5. Select the date—Choose the date you wish to have the meeting. You cannot select a date that has previously expired.
6. Select the start time—Enter a time from the drop-down box. The meeting can be as early as 7:00 a.m.
7. Select the end time—Based on the start time, entries are automatically provided for you.
Once the end time has been selected, you will either get a confirmation to add a meeting or a conflict message box. The screen will look like Figure 4. A conflict means that one or more of the people that you’ve selected to attend the meeting has already been scheduled during that time frame. The conflict message box looks like Figure 5. The confirmation box, if you decide to add the meeting, will enter all of the data to the scheduler. It is now available for everyone to view. That’s all there is to it. Now view your meetings.
View Meeting Schedule Plaza
This is the easiest part of the entire program. When you first log onto the scheduler, if you do not have administrative rights, you will see Figure 1. The default date is the current date. You will see what meetings you have scheduled for that day. A list on the left-hand side shows what meetings you have scheduled, the start time and end time for the meeting, and the title of the meeting. Click on a specific meeting and the meeting information will appear under Meeting Agenda on the right side. Click on any other date to view what has been scheduled for you as well. If you are an attendee of the meeting, you have been given rights to delete the meeting too. Right-click on a meeting to delete it. This will remove the meeting details and attendee list from the scheduler. It’s that simple.
Final Directions
Hopefully, more people will find some use for the AS/400 Meeting Scheduler in the workplace. This is just a small example of how powerful the AS/400 can be in client/server applications. I remember programming with the Client Access API and having to be a rocket scientist to do it. Client Access came out with its own OLE DB provider, and it made applications very easy to code. This entire application uses regular calls to stored procedures and RPG programs. I chose to use stored procedures and RPG programs because, in the future, someone could also get at this data from a Web browser as well as your everyday native green-screen programs without reinventing the wheel. Thank you for visiting Calendarville. Come back again soon.
REFERENCES AND RELATED MATERIALS
• SQL/400 by Example. James Coolbaugh. Loveland, Colorado: 29th Street Press, 1999

Figure 1: The AS/400 Meeting Scheduler on the View Meeting Scheduler tab shows you detailed information about a day’s meeting.
Figure 2: The logon screen for the AS/400 Meeting Scheduler allows only authorized users access.


Figure 3: This shows the Administration Menu on with the login administration screen shown.
Figure 4: The Schedule a Meeting screen allows you to simply coordinate a meeting.


Figure 5: Conflicts have been found for this scheduled meeting.


LATEST COMMENTS
MC Press Online