ODBC, or Open Database Connectivity, is an API that uses a set of drivers and a driver manager to allow applications to access data using SQL. It is commonly used by most of the visual languages, e.g., Visual Basic and Delphi, as well as by Microsoft Access and MS Query to retrieve data from local or remote systems. Since it uses SQL as its search engine, it is heterogeneous and can retrieve data from such varied sources as PCs, the AS/400 and other midrange systems, and mainframes. Newer technologies such as ActiveX Data Objects (ADO) from Microsoft and OLE DB, which is the power behind IBM’s Project Lightning, have begun to look like the wave of the future, but ODBC is a proven workhorse used in thousands of applications. Because of that fact alone, it’s extremely likely that ODBC will be around for many years to come. This article is the first part of a two-part series on configuring 32-bit Client Access/400 ODBC. Part one will take a brief look at what ODBC is, and continue on with a more detailed explanation that takes you from locating the ODBC Administrator Configuration panel through ODBC packages and how to configure them. The second article in the series will pick up with ODBC performance and walk you through the rest of the ODBC configuration process. Finally, I’ll close out the series by taking a look at a few of the things you will need to configure on your AS/400 to take advantage of ODBC.
What It Is
As I said, ODBC uses drivers and a driver manager to access remote data. In order for this to work, every database management system (DBMS) must have its own unique driver to retrieve data using the rules defined for that DBMS. This keeps the data-retrieval process generic at the application level, allowing software developers to concentrate on writing their applications without having to worry about maintaining the various unique links to all the DBMSs available. These drivers are really just Dynamic Link Libraries (DLLs) that a particular application, such as Client Access/400, uses to access a remote data source. The driver manager is merely another DLL that provides the link to the ODBC
driver’s DLL. When an application needs to retrieve data from a remote data source, it will make calls to the ODBC manager. The drivers defined for that DBMS will then perform the SQL commands required to access the remote data.
In most cases, your DBMS will come with the ODBC DLLs that applications will need to exchange data with the database. Generally, these drivers are provided free of charge, as is the case with the Client Access/400 ODBC drivers. You can also find many ODBC drivers on the Web. For example, the Microsoft Windows 32-bit ODBC drivers can be found on Microsoft’s ODBC home page at http://www.microsoft.com/data/.
That’s a fairly high-level look at what ODBC is. If you would like a more in-depth look at the theory behind ODBC, check out “ODBC Concepts and the Future,” Midrange Computing, October 1996.
Getting There
Now let’s take a look at how to configure ODBC on your PC. Unless otherwise indicated, this article will use the Client Access/400 32-bit ODBC driver and V3R1M3 of Client Access/400.
In order to configure ODBC, you need to open the ODBC Data Source Administrator. You can find the Data Source Administrator icon in a couple of places. From Control Panel, double-click on the icon labeled 32bit ODBC (see Figure 1) and you’ll be presented with the ODBC Data Source Administrator panel (see Figure 2). You can also select ODBC Administration from the IBM AS/400 Client Access submenu on your Windows 95/NT Programs menu. From here, you select the data source to be used by your application and configure it. What’s a data source? A data source is made up of both the data the user wants to get to and the instructions or rules required for accessing that data. An example of a data source would be your AS/400’s DB2/400 database, the AS/400 itself, and the network used to get to the AS/400.
For my example, I’m going to show you how to configure the Client Access ODBC 32-bit driver. To create a new data source, click on the Add button. You’ll see the Add Data Source panel (Figure 3). From here, click on Client Access ODBC Driver (32-bit) and then click Finish. You’ll be presented with the Client Access ODBC Setup (32-bit) panel (see Figure 4).
On this panel, you will enter a name for your data source; I’ll call the example data source AS/400 Data Source. This is the data source name you will refer to in the applications that need to access the AS/400’s DBMS through ODBC. You’ll see that the Client Access ODBC driver’s description has already been filled in here. You can change this if you want to, but there’s probably not much point in it. You’re not going to directly refer to this description anywhere else. You also need to enter the name of the AS/400 you want to access, as well as a valid user ID on that AS/400.
Libraries
After you’ve identified the data source and the system you want to connect to, click on the Server tab in the Client Access ODBC Setup window. From here (see Figure 5), you enter the default libraries you want the ODBC-enabled application to access, as well as the Commit mode. The library information you enter here is one of the most important pieces of information in the entire setup process, so let’s explore this a little deeper.
The libraries you enter here are the ones used by the ODBC application during the connection and query process. This means that the files in the libraries you specify here are the only ones that will appear during an SQL transaction. If you forget to include one of your data file libraries in this list, the files in it will not be immediately available to your application. That doesn’t mean you can’t get to those files at all. It just means that to do so will require you to code an explicit SQL declaration that qualifies the file and library you want to access.
When you define the libraries for this data source, you have a couple of options. You can add to the user’s existing library list or you can replace the library list entirely. To add to the existing library list, enter the special value *USRLIBL, followed by the libraries
you want to add. This will add the additional libraries after the user’s library list. If you enter the additional libraries before the *USRLIBL special value, those libraries will be added in front of the user’s library list. You can even put some before the user library list and some after it if you prefer. Note that the library QIWS will always be added to the end of the library list, even if you forget to include it. This library is added so that the ODBC server code on the AS/400 will be in the library path. Without it, you wouldn’t be able to run the SQL command on the AS/400.
What should you enter then on the library list parameter? Consider one thing before you answer: Entering a large list of libraries will decrease the performance of the ODBC driver, because each SQL request will have to search the entire list of libraries you entered. On the other hand, if you don’t enter the library where the data is stored in this parameter, you will have to explicitly name it on each SQL request that needs to get to it. You’re going to have to think about how your application will use the data source and before you make your decision.
The commit parameter is used to specify the commitment control level available to your application when using ODBC. If you don’t specify anything here, COMMIT (*NONE) will be used. This means that ROLLBACK and COMMIT statements will not be allowed in the defined SQL code. There are other commitment levels you can specify here, but they are outside the scope of this article.
Figure 6 shows you the Package(s) tab. Packages are a type of object on the AS/400 that are used to store the control structures and access plans necessary to process an SQL request on the AS/400. With a properly configured data source, the first time an ODBC SQL request is run from your application, a package will be created on the AS/400, and the access plan and control structure information will be stored in it. The next time the same SQL request runs, the package will be used. This will improve performance, because a significant portion of the request will already be in place and can be reused, saving the time of recreating it. In order for your ODBC application to store this information on the AS/400, you must ensure that the Enable Extended Dynamic (package) Support box is checked.
The Default package library para-meter specifies the library on the AS/400 where the package will be created. This value can be overridden by entering an application name in the Application name parameter and a library name in the Package Library parameter.
If you enter a value in the Application name parameter, the Package Library and Package name parameters will be enabled. Enter a specific name in the Package name parameter to have the first SQL request create the package under this name. The name you choose here can be a maximum of seven characters long. This limitation is in effect because ODBC will append a three-character suffix for internal identification.
As additional SQL requests are made, their control information and access plans will be added to the named package. When the package becomes full, it becomes read-only and your application will not be able to add new requests. To avoid this, check the Clear package if full box on this panel. Check the Cache package locally radio button if you want to keep a copy of the package on the PC. This can boost performance of the SQL request with some applications.
Select the desired radio button under Package usage if you want to enable this feature. This option is enabled if you enter an application name. Disable tells ODBC not to use the SQL package. Use says to use the package in a read-only mode, i.e., don’t add new information to the package. Use/add tells ODBC to use this package if it exists, create a new one if it doesn’t, and to add statements to the package as required.
The Unusable package section is used to control what happens when the package becomes unusable. This option is enabled when you put a value in the Application name field. You have three options here, so check the desired radio button for the function you
Commit
Packages
want. Selecting Error will return an error to the user if the ODBC package becomes unusable. Warning will return a warning only if the package becomes unusable, and Ignore will ignore any errors. You should at least return a warning to the user, otherwise an unusable package can go undetected. Left unattended, an unusable or damaged package can cause your SQL performance to be seriously degraded.
There’s More to Come
So far I’ve taken a look at what ODBC is, how to locate the ODBC Administration Configuration panel, and how to partially configure a data source. In the November/ December issue, I’ll look at how to complete the configuration of your ODBC data source and what you’ll need to do on your AS/400 in order to use ODBC. While you’re waiting for the next issue of Client Access/400 Expert, I encourage you to explore the ODBC configuration yourself. Although expert advice such as that found in Client Access/400 Expert is always welcome, nothing can beat the knowledge that can be gained from hands- on experience.
Figure 1: In the Control Panel, double-click on the icon labeled 32bit ODBC to start the ODBC Administrator.
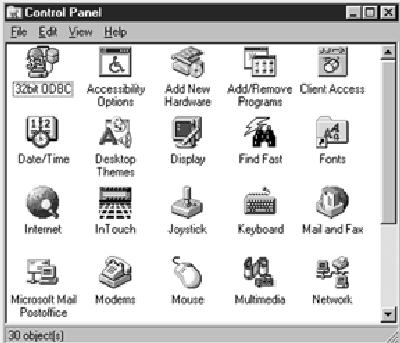
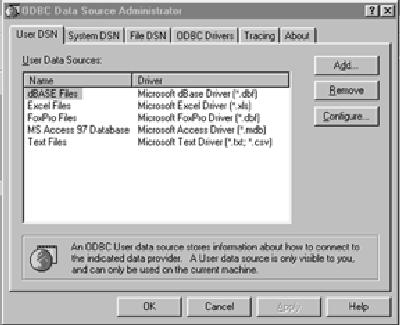
Figure 2: You use the ODBC Data Source Administrator panel to select the data source to be used by your application and configure it Figure 3: From this panel, select the data source driver you want to add.
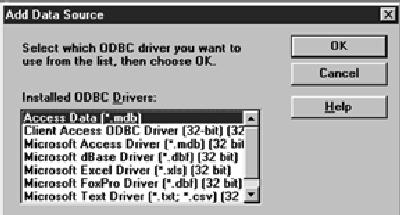
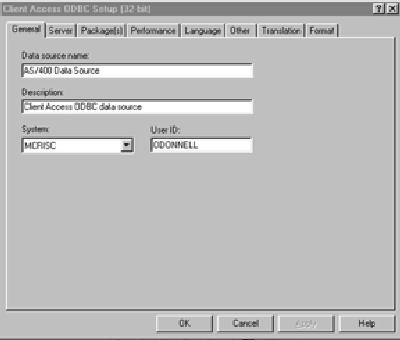
Figure 4: You will use the ODBC Setup panel to finish your data source creation.
Figure 5: From the Server tab, you can configure library lists and commitment control levels.
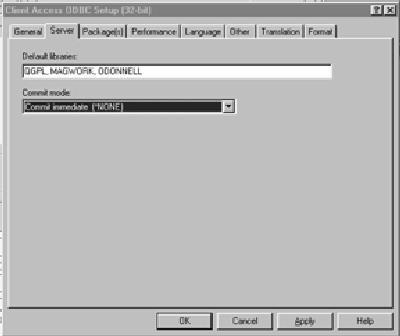
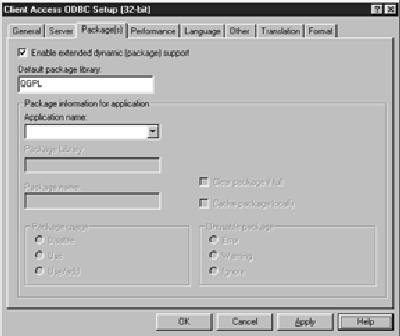
Figure 6: The Package(s) tab allows you to control whether and how packages are stored on your AS/400.


LATEST COMMENTS
MC Press Online