Create charts and graphs using RPG, XML, and Shockwave Flash.
By Jan Jorgensen
Over the last few months, I have worked on a PHP project in which I created graphs and charts to show on a customer's Web server. For that job, I used the free and excellent software from maani.us called XML/SWF Charts.
This software uses Shockwave Flash or just Flash to present the data. You just define your graphs and feed some XML data to the software, and you're done! Very simple.
The software is compatible with PERL, PHP, ASP, and now RPG, so it doesn't really matter what flavor you want to write your interface in; it can be done.
I developed my own standard, which I find flexible and very easy to use, debug, and modify, but of course, this can be done in many different ways, so consider this tip a "starter." Along the way, you might find more clever ways to do it than I did.
First, a little background about the software. It's free, but you can also buy a single domain license that expands the product even more. However, you can get very far with the free version. It lets you create more than 20 different charts and graphs and offers all kinds of nice features, so the possibilities are endless. Look at some of the examples from the Web site to get an idea of what you can do.
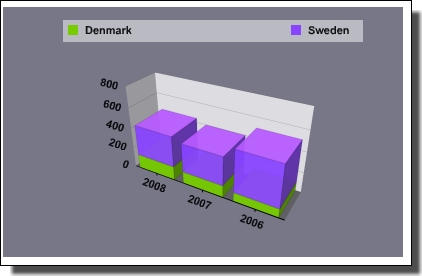
Below is a very basic example of the XML used to create a chart:
<chart>
<chart_data>
<row>
<null/>
<string>2008</string>
<string>2007</string>
<string>2006</string>
</row>
<row>
<string>Denmark</string>
<number>140</number>
<number>120</number>
<number>90</number>
</row>
<row>
<string>Sweden</string>
<number>300</number>
<number>280</number>
<number>410</number>
</row>
</chart_data>
<chart_type>stacked 3d column</chart_type>
</chart>
Figure 1: I made this sample chart with simple XML data.
Let's Mix the RPG Flour and Bake Some Pies
It's very important that you understand the way I created my example, so read the next few lines carefully and fear not if you get confused; it will come to you later as we move on.
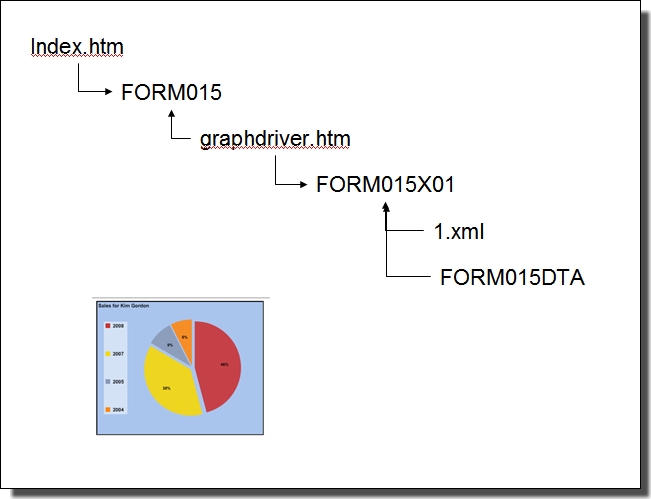
My solution involves two RPG-CGI programs. The first one, FORM015, is used as the "graph-driver." It reads an HTML file and modifies a JavaScript. Then, the second RPG-CGI program, FORM015X01, is called. This program reads a simple data file, pulls in an XML file from the IFS, merges the i5 data into the XML file, and writes it out on the screen with the QtmhWrStout API. Voila! You're done.
If you have read any of my previous tips about RPG-CGI programs, you will see that these programs are built over the same skeleton I always use. Because of the lack of space here, I will not go into details. It's much more interesting to show you a diagram of how this works; that way, you will be able to create your own graphs.
Figure 2: This is the flow for creating a graph.
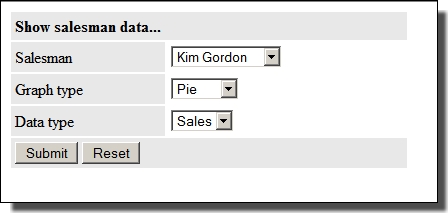
As you can see, first the Index.htm file is called. From there, you can select a salesperson, the type of graph you want, and the data type. In my example, I only have one data type. You can very easily expand it and create your own. The form looks like the one in Figure 3.
Figure 3: Select what to see in the graph.
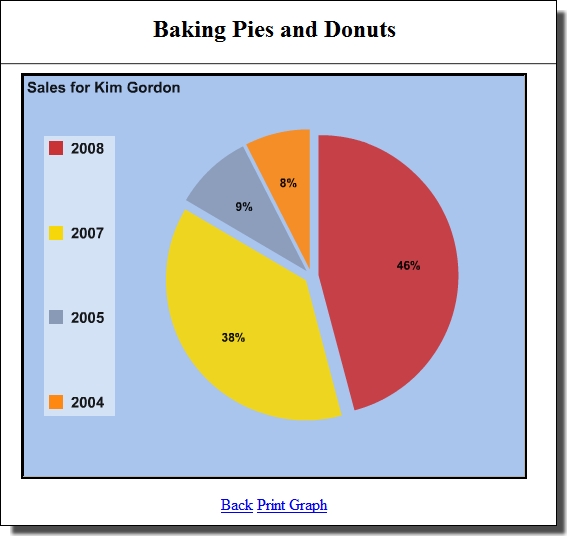
Just press the Submit button, and the graph in Figure 4 will be shown.
Figure 4: You've created a pie chart with an RPG-CGI program.
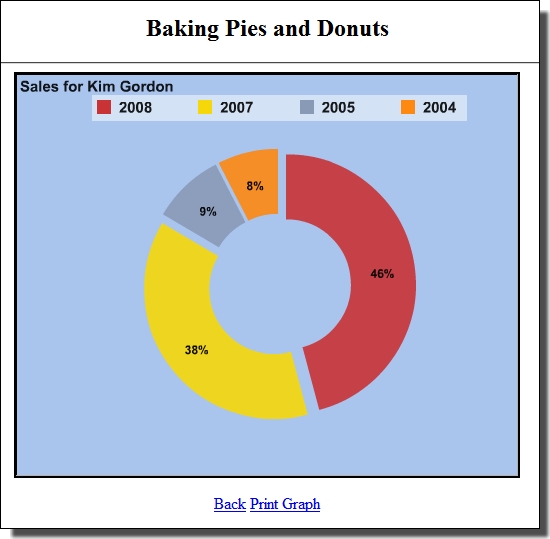
If you press Back, select graph type Donut, and hit Submit, Figure 5 will be shown.
Figure 5: And now you have a donut graph.
The biggest pitfall when creating the graphs is that you cannot output anything in the XML data stream that is to be displayed "outside" the XML. If you do that, nothing will be shown.
To modify my example, just call the FORM015X01 program with the correct set of parameters and then display the source. You will see all the XML that is used to build the graph. The above example will generate the XML below:
<chart> <draw> <text shadow='high' transition='dissolve' delay='0' duration='0.5' alpha='90' color='000000' size='15' x='1' y='1' width='200' height='10' h_align='left' v_align='top'>Sales for Kim Gordon</text> </draw> <chart_data> <row> <null/> <string>2008</string> <string>2007</string> <string>2005</string> <string>2004</string> </row> <row> <string>Sale</string> <number>610</number> <number>500</number> <number>120</number> <number>100</number> </row> </chart_data> <chart_label shadow='low' color='000000' alpha='95' size='12' position='inside_cursor' as_percentage='true' /> <chart_pref select='true' /> <chart_transition type='scale' delay='0.5' duration='0.2' order='category' /> <chart_type>donut</chart_type> <series_color> <color>CA3335</color> <color>F6D70A</color> <color>899AB7</color> <color>ff8811</color> </series_color> <series_explode> <number>5</number> <number>5</number> <number>5</number> <number>5</number> </series_explode> <series transfer='true' /> </chart> Downloading and Installing
Before you start downloading and installing the programs, I urge you to look at the maani.us Web site and read the Tutorial and the Reference just to get an idea of what a powerful tool you have in front of you.
- Create a directory in your root dir called /root/mcpressonline by entering this command:
md '/rootdir/mcpressonline/'
- Create a directory called pies_and_donuts inside mcpressonline. Enter the following:
md '/rootdir/mcpressonline/pies_and_donuts'
- Download the pies_and_donuts.zip file, unzip it, and upload everything to the directory you just created. You can also download a fresh chart from maani and combine it with my source code. When you're done, the structure should look like this:
/rootdir/mcpressonline/pies_and_donuts
*DIR charts_library/
*STMF 1.xml
*STMF AC_RunActiveContent.js
*STMF charts.swf
*STMF graphdriver.htm
*STMF index.htm
The charts_library directory must contain 23 objects, which are the Flash files used to create the various charts and graphs.
- Save BUFIO_H to your CGI library.
- Download PF source FORM015DTA, save it, and compile it.
- Download and save source FORM015, FORM015X01, and FORM015CRT to your CGI library and compile them all.
- If you do not already have it, download CGIPARSEZ, save it to your CGI library, and compile it.
Before compiling, remember to change "your-root-dir" in constant IFSpath to your actual root directory.
When you have installed everything and compiled the RPG-CGI programs (compile instructions can be found in the header description), you are ready to test the program, FORM015CRT is used to generate some test data and must be called like this:
Call FORM015CRT
Then call the request form by entering the following URL:
http://your-server/mcpressonline/pies_and_donuts/index.htm
If you decide to install somewhere other than the dir structure that I have used, you must change the following field paths:
- FORM015--IFSpath
- FORM015X01--IFSpath
- graphdriver.htm--movie, src, FlasVars, and also the <script> tag for AC_RunActiveContent.js
Start Baking Right Now
I hope this tip will shed some light on how you can present your i5 data in a fresh and modern-looking way.
I know that you have to do a little tweaking in my RPG-CGI programs to make them more flexible, but I really think it is worth your while. Until next time, start baking and don't be afraid to take some really big bites.


LATEST COMMENTS
MC Press Online