Use Git on IBM i and push it to a central repository on Bitbucket.
In the TechTip "Installing Git on IBM i," we learned how to obtain and install the open-source (and free) Git source-change management (SCM) tool. In this TechTip, we will take a step further by introducing how to maintain a Git project and push it up to a central repository on Bitbucket.org.
First things first. Head over to Bitbucket.org and sign up for a free account. Once you've logged into your new account, go ahead and create a new repository (as shown in Figure 1).
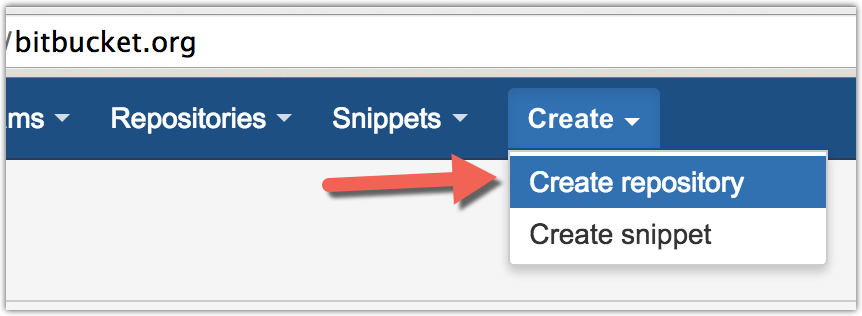
Figure 1: Create a repository from the Bitbucket menu.
Figure 2 shows the form fields for the new repository. The "Owner" can be either your individual account or a team account. Team accounts are great for giving other people access to a given repository, which can be either inside or outside your organization. Note I left this as a private repository as I don't want to share it with the world. Select the "Create repository" button and proceed to the next step.
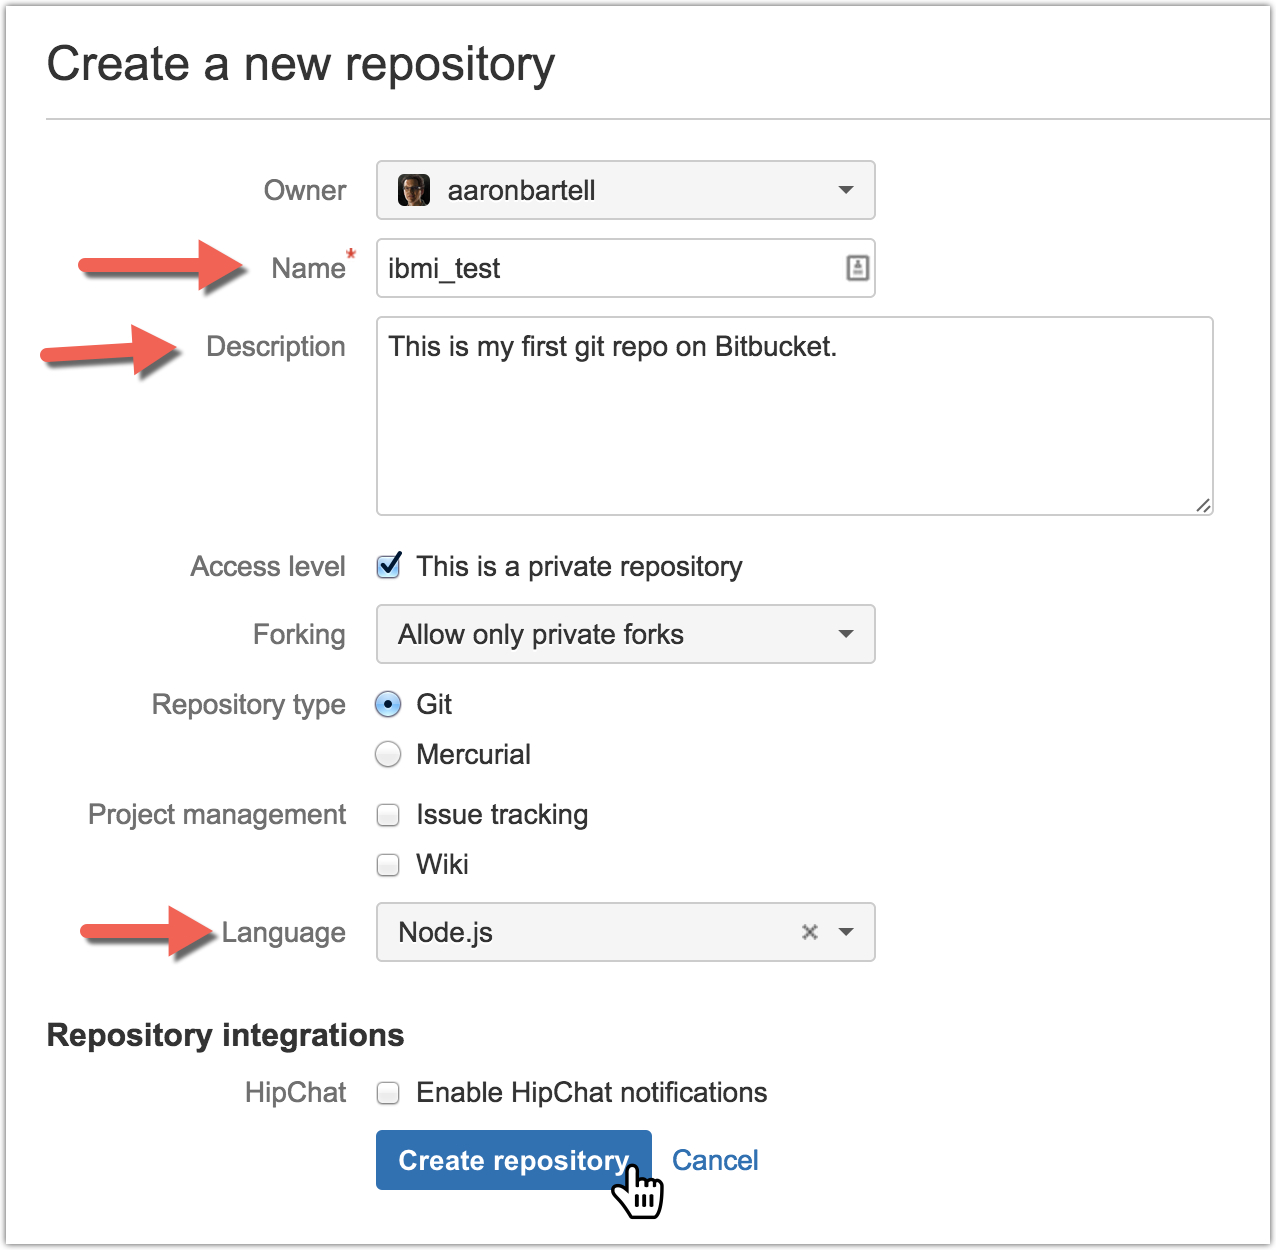
Figure 2: Create your repository on this form.
Figure 3 conveys that your repository was successfully created, and the "I'm starting from scratch" section is expanded. Here, we find subsequent details regarding the commands we need to run in a shell session on our IBM i to finish the configuration.
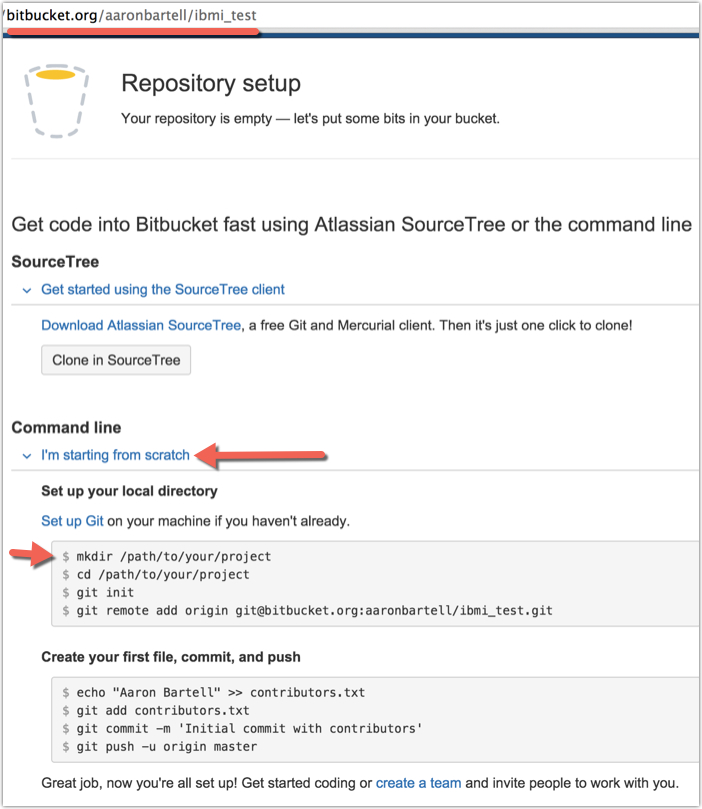
Figure 3: The repository has been successfully created. Review further setup instructions.
Now open a shell (using ssh or CALL QP2TERM) and follow the instructions from Bitbucket. First, create a new directory using commands mkdir and cd (change directory). Then run the git init command to have this directory tracked by Git. This will create a .git directory within your ibmi_test directory that stores all future revisions. Lastly, run the git remote add command. This is declaring to the local Git project the name (origin) and location (This email address is being protected from spambots. You need JavaScript enabled to view it.:aaronbartell/ibmi_test.git). Note you could call it "dogbreath" if you wanted, but origin is a common name to use.
$ pwd
/home/AARON
$ mkdir ibmi_test
$ cd ibmi_test
$ git init
Initialized empty Git repository in /home/aaron/ibmi_test/.git/
$ git remote add origin This email address is being protected from spambots. You need JavaScript enabled to view it.:aaronbartell/ibmi_test.git
$ git remote -v
origin This email address is being protected from spambots. You need JavaScript enabled to view it.:aaronbartell/ibmi_test.git (fetch)
origin This email address is being protected from spambots. You need JavaScript enabled to view it.:aaronbartell/ibmi_test.git (push)
Now, we need to add a new file with content to our ibmi_test directory so Git has something to change manage. Below, the echo command will route the content in double quotes to file contributors.txt. Next, use the git add command to declare what files we want to add to the subsequent commit. This is useful when you might be working on multiple things and want them to be grouped separately. And finally use the git commit command to mark this group of changes in history. Git now has memory of what every single file in this directory looked like at this point in time. Note that no communication to Bitbucket has occurred at this point.
$ echo "Aaron Bartell" >> contributors.txt
$ git add contributors.txt
$ git commit -m 'Initial commit with contributors'
[master (root-commit) 09c1fe9] Initial commit with contributors
1 file changed, 1 insertion(+)
create mode 100644 contributors.txt
Before going further, we are going to set up SSH key-based authentication between the IBM i and your newly created Bitbucket account. SSH keys are a way to authenticate without the need for passwords. This can speed up software development without sacrificing security. To generate an SSH key, you need the no-charge licensed program 5733SC1 IBM Portable Utilities for i5/OS *BASE & Option 1. 5733SC1 includes the ssh-keygen command, which needs to be run from a shell session (as shown below). You can take the default for the file name (id_rsa) and choose whether you want to use a passphrase on that file.
$ ssh-keygen
Generating public/private rsa key pair.
Enter file in which to save the key (/home/AARON/.ssh/id_rsa): /home/aaron/.ssh/id_rsa
Enter passphrase (empty for no passphrase):
Enter same passphrase again:
Your identification has been saved in /home/aaron/.ssh/id_rsa.
Your public key has been saved in /home/aaron/.ssh/id_rsa.pub.
The key fingerprint is:
ac:99:a4:99:a6:99:6e:99:70:99:a2:99:99:99:fa:99 aaron@ibmi_name.COM
The .ssh directory will be created in your profile's /home directory if it didn't yet exist. Two files, id_rsa and id_rsa.pub, will also be created as shown below with the ls (list) command.
-bash-4.2$ ls -a /home/aaron/.ssh
id_rsa id_rsa.pub
The id_rsa.pub file's contents are what we need to copy and paste into the newly created Bitbucket account. Use the cat command to display the contents to the screen. Or open the file with the editor of your choice. I masked the below with x's so I don't expose my key to the world.
$ cat /home/aaron/.ssh/id_rsa.pub
ssh-rsa
JuXZgxxxxxxxxxxxxxxxxxxxxxxxxxxxxxxxxxxxxxxxxxxxxxxxxxxxxxxH8y/vc09XUXXx+Y
AAAABxxxxxxxxxxxxxxxxxxxxxxxxxxxxxxxxxxxxxxxxxxxxxxxxxxxxxx7/GFrYolIvf
2GxdtxxxxxxxxxxxxxxxxxxxxxxxxxxxxxxxxxxxxxxxxxxxxxxxxxxxxxxkItjoo3POIG2slEOLc
UAFOoAFiYdxxxxxxxxxxd/7uC4lYYVwxxNwk1Lc8W6qcOlSK/et9cDxxxxxxxx...
...xxxxxxiz//ffQkfbgI77HboKSAaLtxzu31rT/CIpFlgRU4bCQ== aaron@ibmi_name.COM
Now go to your Bitbucket account and click the profile icon and "Manage account" so we can add the SSH key generated in the previous step (as shown in Figure 4).
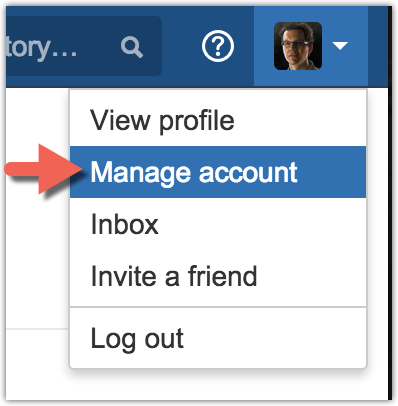
Figure 4: Manage your Bitbucket account.
Locate the "SSH keys" link in the lower left and select the "Add key" button (as shown in Figure 5).
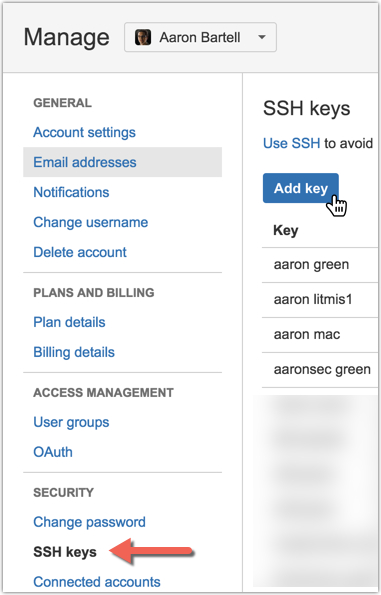
Figure 5: Add a new SSH key button.
Paste the SSH key into the "Key" text area (as shown in Figure 6).
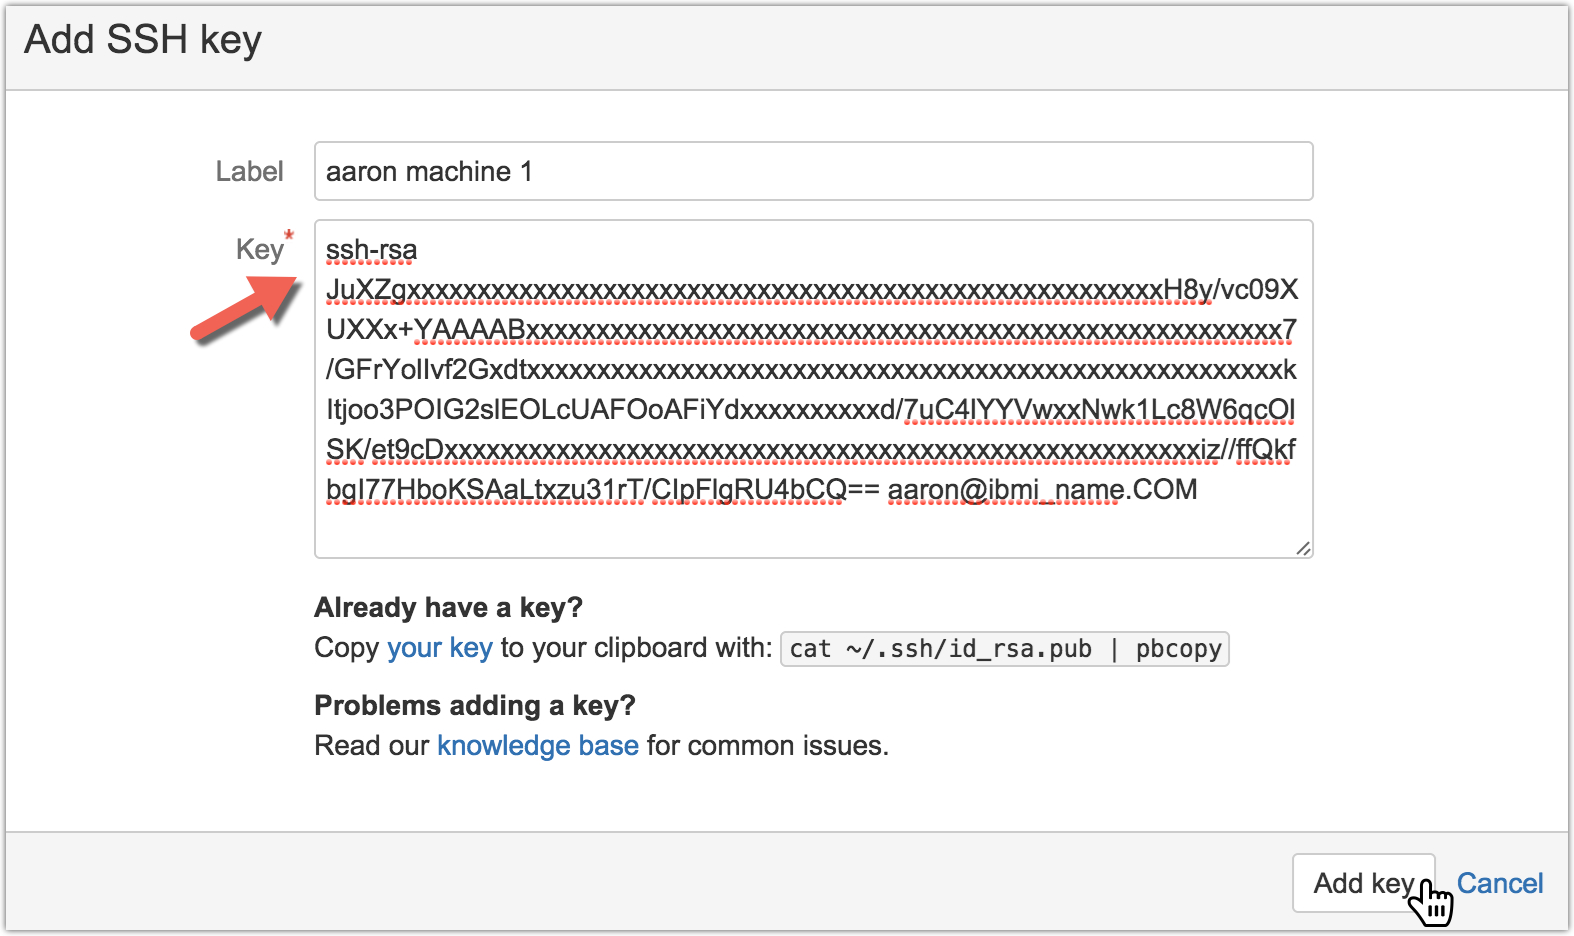
Figure 6: Paste the SSH key from IBM i into Bitbucket.
Now your IBM i is ready to communicate with Bitbucket. Using the git push command, we can send our local commit(s) up to Bitbucket. Remember, origin is the location name we supplied earlier and master is the name of the primary and default branch in Git repositories. (I’ll cover more on branches in a future article).
$ git push -u origin master
Counting objects: 3, done.
Writing objects: 100% (3/3), 246 bytes | 0 bytes/s, done.
Total 3 (delta 0), reused 0 (delta 0)
To This email address is being protected from spambots. You need JavaScript enabled to view it.:aaronbartell/ibmi_test.git
* [new branch] master -> master
Branch master set up to track remote branch master from origin.
Point your browser back at Bitbucket and click on the "Commits" icon on the far left to see your recent push (as shown in Figure 7).
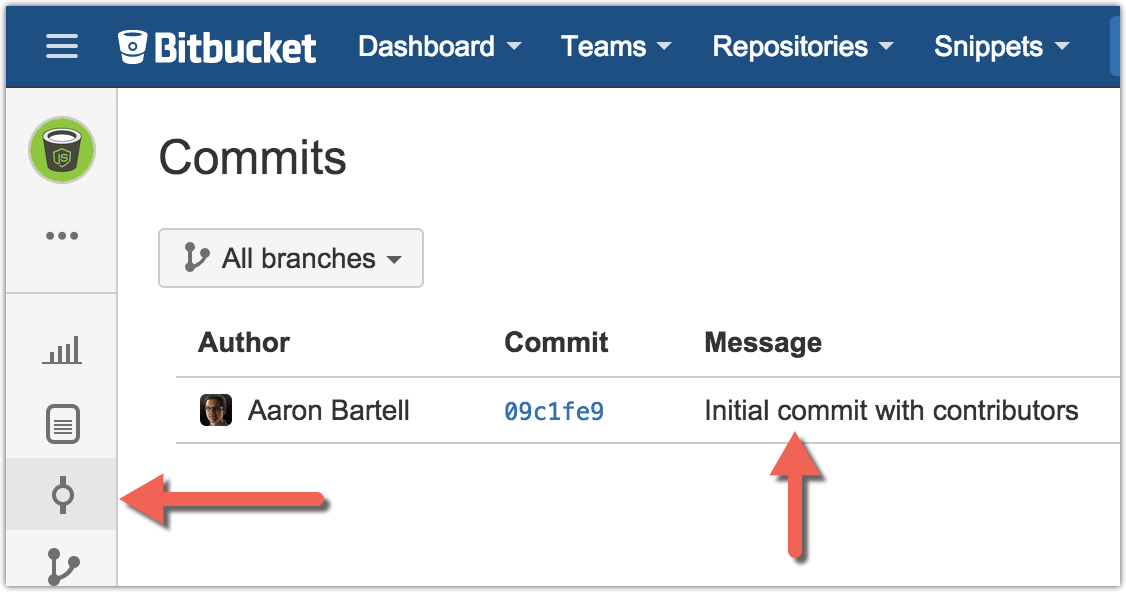
Figure 7: Bitbucket shows your commit listing.
Clicking on the commit link (09c1fe9 in this scenario) will show you everything that was changed in this commit (as shown in Figure 8). Not much to see in this case, but when more changes are made, then this view becomes priceless to learn what another developer has changed. Or, if you're like me and walk into a room only to forget why you're there, then this view is great for learning what you coded before lunch.
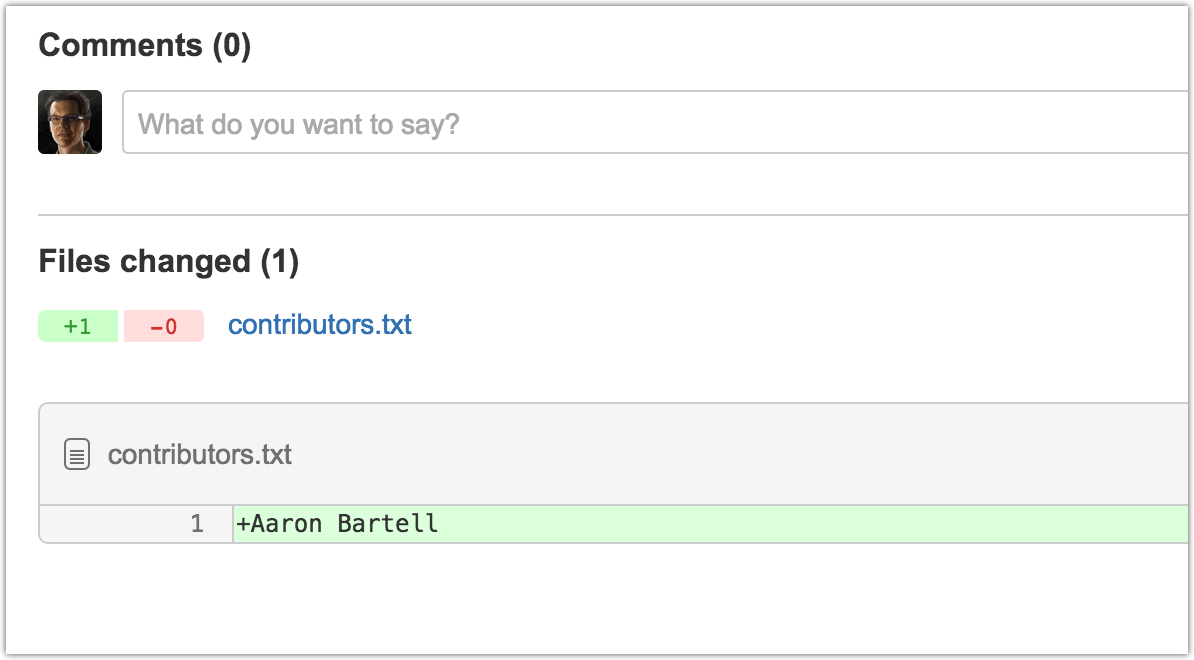
Figure 8: Display the commit details.
Side note: Sometimes I will run git init on a directory just to gain short-term benefits of learning what's changed after a process has run. If I don't like the changes made, then I can easily revert the changes.
It's worth noting that you don't have to create a repository on Bitbucket (or other service) to store your source. You can keep it entirely on IBM i. Or you could create a local repository on IBM i and far into the future put it on Bitbucket. My point: there is plenty of flexibility. The Bitbucket repository doesn't need to be created before the IBM i one or vice versa.
That concludes this article. If you create a public repository that was created on your IBM I, then please ping @litmisteam on Twitter so we can tell the world. It doesn't need to be anything more than the simple example we just went through. We just want to celebrate with you! It's a community thing.
On a final note, this article was written while listening to, and being inspired by, this guy. "Listener" is a poet and has facial expressions that bring me much laughter. Who is in your player these days?


LATEST COMMENTS
MC Press Online