Editor's note: This article is an excerpt from Mastering IBM i, published by MC Press.
Views
SQL's version of a logical file is a view. Although a view is conceptually similar to a logical file, SQL's greater flexibility and ability to use functions and expressions make views far more powerful than logical files. For example, in a logical file there is no way to select group summary records based on the value returned by a column function, as we did in the final example of the previous article. Nevertheless, in SQL, creating such a view is easy; in fact, we already have most of the code for it. The only thing we need to do is prefix our earlier Select statement with a Create View statement and then name the virtual column created by the Min function. Here is the statement to create the view of department elders:
Create View CIS001.DEPTELDER As
Select DEPT, Min(BIRTHDATE) As ELDERBDAY
From EMPPF
Group By DEPT
Having Min(BIRTHDATE) + 50 Years <= Current_Date
We use the SQL Create statement to build base tables (physical files), views (logical files), indexes (access paths), and other SQL objects. The system object created by the Create View statement above will be a *FILE type object in library CIS001. It will be an externally described logical file, attribute LF, SQL type VIEW. We will include the Select statement used to define the record format, and to select the population of the view, in its file description; so we will have a permanent record of the criteria used in creating the view.
You can use the SQL Create command instead of the native CL commands CRTPF (Create Physical File) and CRTLF (Create Logical File) to build entire databases, but that is a topic for another day. Our purpose here is limited to showing how you can use a view to access certain data already stored in a physical file. In Figure 13.30, we have expanded databases, navigated to the student library CIS001, and then clicked the Views subtask (note the arrow). This figure shows a number of views (logical) that we created during the process of writing the Mastering IBM i book.
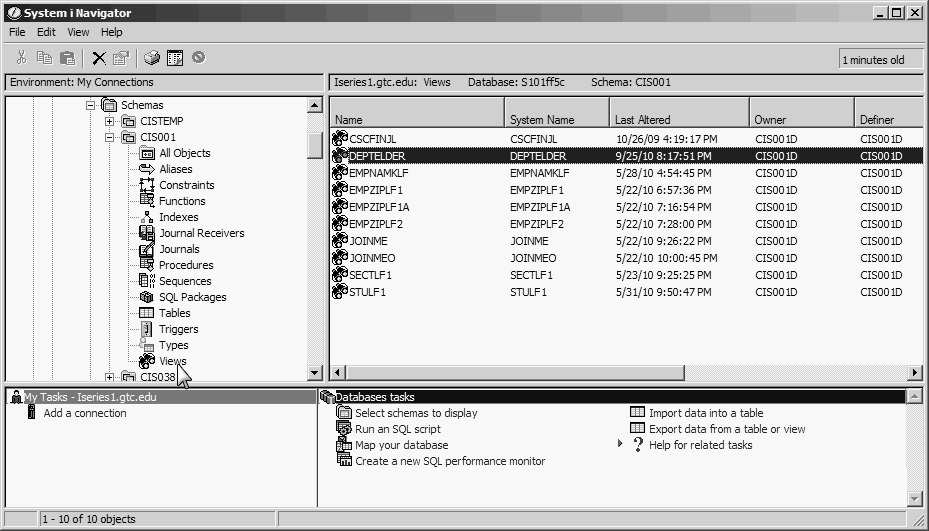
Figure 13.30: Using Navigator to Display Views
Now that we have created a view of departments and elder employees' birth dates, we can complete the original task by getting the employee-name data matched up with each row of the view. We can accomplish this by joining the view to its based-on physical file EMPPF using both department and birth date as join-relationship-supporting fields. By doing this, we can retrieve multiple same-age elders in the same department, if such a condition exists. Figure 13.31 shows the display output of the following statement:
Select DE.DEPT, FIRSTNAME, LASTNAME, ELDERBDAY
From DEPTELDER DE Inner Join EMPPF E
On DE.DEPT = E.DEPT
And ELDERBDAY = BIRTHDATE

Figure 13.31: The Oldest Members of Each Department
Notice that the output includes the two oldest employees of MIS who have the same birth date, May 11, 1947.
If there were other reasons to keep the department elders view on hand, the preceding method of joining EMPPF to the view would be fine. However, a view is a persistent object, and if its only purpose is to provide the information in Figure 13.31, we can use another method, called a correlated subquery. This method requires neither the view nor the use of Group By and Having.
An integer reference implies running an inner select on a group of records that share a column value with (correlated to) the current row of the outer select. Because both the inner and outer selects reference the same file, we must, in effect, tell SQL to use separate copies of the file so that running the inner select doesn't change the current record pointer of the outer select. We specify the match condition using correlation names to qualify the fields. The code to create exactly the same output as you see in Figure 13.31 would look like this:
Select DEPT, LASTNAME, FIRSTNAME, BIRTHDATE
From EMPPF A
Where BIRTHDATE <= Current_Date – 50 years
and BIRTHDATE = (Select Min(BIRTHDATE)
From EMPPF B
Where A.DEPT = B.DEPT)
Order by DEPT
The outer select names an A copy of EMPPF, which will be read one record at a time in arrival sequence. As each record is read, it is examined to see whether its birth date is at least 50 years old. If so, the inner select is run to obtain the minimum birth date of the EMPPF B file records in the same department as the outer select's currently positioned record (Where A.DEPT = B.DEPT). When a match is made, the outer select record is placed in the result table. To agree with the grouped output of Figure 13.38, the result table is then ordered (sorted) by department. The power of a correlated subquery is its ability to compare column values from the inner (B) file against a column value of the current row of the outer (A) file. Note that the reference to DEPT in the outer select is unambiguously the A file, so there is no need for qualification.
File Maintenance Using SQL
We will now take a brief look at updating a database using SQL Insert, Update, and Delete statements. The SQL Insert statement lets you add individual rows to a table. The Update and Delete statements also work on individual rows, but they have the added capability to perform the operation on a set of rows. A row of the base table becomes a member of the set by testing True for a Where condition.
Each statement identifies a single file, which may be a physical file (base table) or an updatable logical file (updatable view). Some rules govern whether a view or logical file is updatable. It must not
- Identify more than one file in its From clause (no join logical files or views)
- Use the Distinct expression in its Select statement
- Use either the Group By or the Having clause in its outer Select statement
- Use a column function in its outer Select statement
- Use a correlated subquery on the same table identified in its From clause
The Insert Statement
The SQL Insert statement lets you add individual rows to a table. Insert can act directly on the base table or indirectly by inserting through a view or logical file within the limitations described above. The syntax of the SQL Insert statement is
Insert Into file-name
(field-list)
Values (value-list)
Here is an example using file ZIPPF:
Insert Into ZIPPF
(ZIP, CITY, STATE)
Values (531421444, 'Kenosha', 'WI')
In this Insert statement, because values were provided for all fields and in the same order as the record-format field order, the field list itself is optional. Therefore, the statement
Insert Into ZIPPF
Values (531421444, 'Kenosha', 'WI')
works just as well. The field list is required when you are not assigning values to all fields or when the values are not in the same order as the fields in the record format.
In either case, we must specify which field a certain value is assigned to by putting it in the same relative position in the value list as its corresponding field name in the field list (e.g., the first named field takes the first value). Any field not listed is not assigned a value in the newly inserted record and takes the default value (zeros or spaces, unless a different default value was assigned in the physical-file or base-table definition).
Numeric values may have a leading minus sign and a decimal point if the field allows for decimal precision. Alphanumeric values and date and time values must be enclosed in apostrophes. The Insert statement must not attempt to use values that are longer than the receiving field because doing so would cause significant digit truncation.
For example, the following statement would not work:
Insert Into ZIPPF
Values (531421444, 'WI', 'Kenosha')
SQL would return the error message "Value for Column STATE too long." Given the actual order of fields in the record—ZIP, CITY, STATE—this error message indicates that SQL could insert WI into the CITY field, but assuming the third value, Kenosha, should be assigned to the third field, STATE, it refused to do so because only the Ke part of the value would fit in this two-character field.
To add a new record to file PRJMBRPF, you could use the following Insert statement:
Insert Into PRJMBRPF
(EMPNO, ASDDAT, PRJCD)
Values (111110012, '2010-08-01', 'NPADV')
Proper values are assigned to each listed field even though the fields are not in the same order as in the record format. The values correspond positionally with the fields in the field list. The date field is in *ISO format and enclosed in apostrophes. The hours-to-date field, HRSTD, is not listed and will be assigned the default value of zero in the new record.
The command-line Insert statement is a convenient way to add a record or two to a database file when you are working in an SQL session. But it is a slow and error-prone method of data-entry, and a custom program normally is used instead.
The Update Statement
SQL's Update statement lets you change records within a file, using constants and expressions to modify the values of named fields. The syntax for a searched Update with a Where clause is
Update file-name
Set field-name = expression
Where conditional-expression
It is important to remember that the Update statement can work on sets of records, not just single records. Whenever more than one record in the file tests True for the Where condition, all records testing True are updated according to the Set clause specification. For example, the statement
Update CIS001.PRJMBRPF
Set HRSTD = HRSTD + 5
Where PRJCD = 'NPADV'
And EMPNO = 111110012
updates a single record in PRJMBRPF, incrementing the hours-to-date field by 5. How do we know only one record is updated? Because the Where condition tests for specific values of the two fields that together constitute the composite primary key for this file. When primary-key values are given to identify a record for update, only one record is updated. When the update is performed successfully, SQL displays the message "1 rows were affected by the statement," as in Figure 13.32.
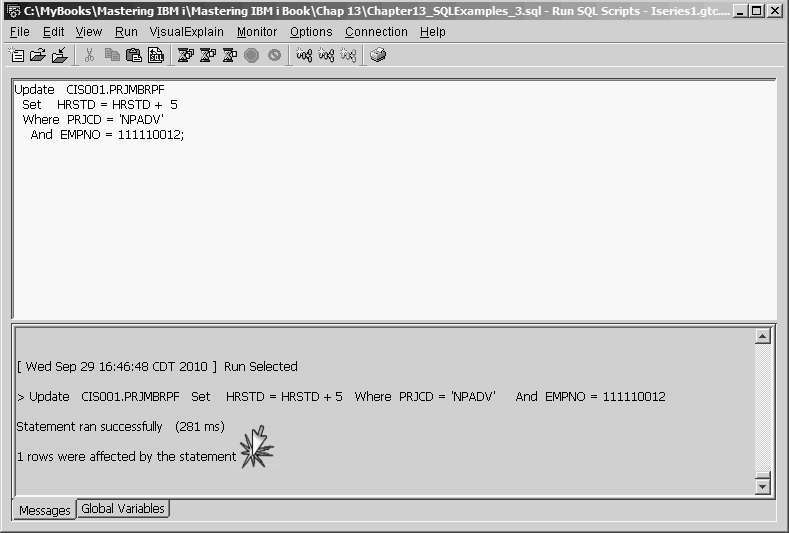
Figure 13.32: Result of Update Statement
The real power of the Update statement is its ability to change a set of records by executing one statement and selecting the set to be updated by evaluating the Where condition. The Where condition tests all records in the table or view, and all those testing True will be updated. For example, if you wanted to give a 6.5 percent raise to all MIS employees, you could do so easily by executing the following statement:
Update EMPPF
Set SALARY = SALARY * 1.065
Where DEPT = 'MIS'
This statement tests each record in the employee file for the condition DEPT = 'MIS' and applies the salary increase to all records that test True.
The Update statement's Set expression must reference only field names of the update table or view. It cannot identify an alias field derived from a scalar function, expression, or constant.
In an Update statement's Where clause, all listed column names must belong to the table or view being updated, unless a subquery is used to create a value or list of values used as a comparison operand. Thus, an attempt to give a 2 percent raise to the employees assigned to the New Products Advertising project (project code NPADV) with the following code would fail:
Update EMPPF
Set SALARY = SALARY * 1.02
Where EMPPF.EMPNO = PRJMBRPF.EMPNO
And PRJMBRPF.PRJCD = 'NPADV'
The Where expression references non-EMPPF field names, so the Update statement would fail, as Figure 13.33 shows. Notice that PRJMBRPF.EMPNO is highlighted, which shows the reference to the PRJMBRPF table.
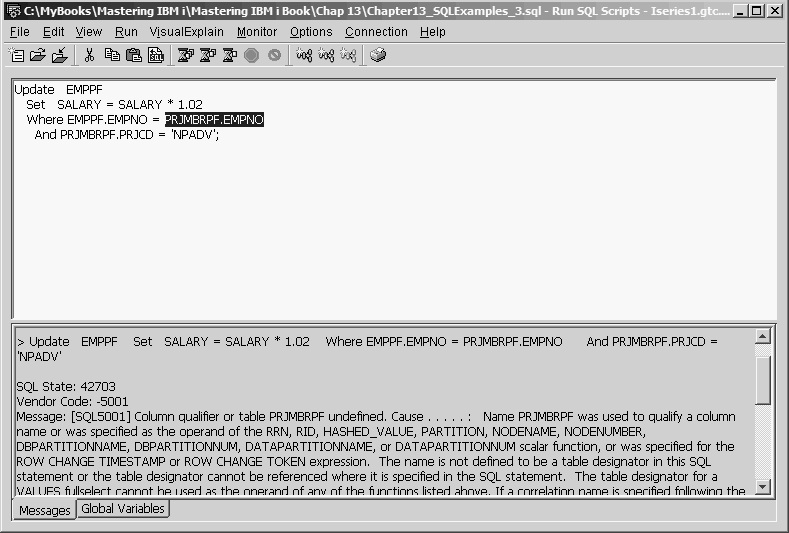
Figure 13.33: Update Statement Failure
We can accomplish the desired update, however, by using a subquery to create a list of employee numbers assigned to project NPADV. The modified Update statement would be
Update EMPPF
Set SALARY = SALARY * 1.02
Where EMPNO In
(Select EMPNO From PRJMBRPF
Where PRJCD = 'NPADV')
This statement has no ambiguous column references and violates no update rules. Therefore, it updated five records in the EMPPF table. The messages pane in the Run SQL Scripts window verifies this, as you can see in Figure 13.34.
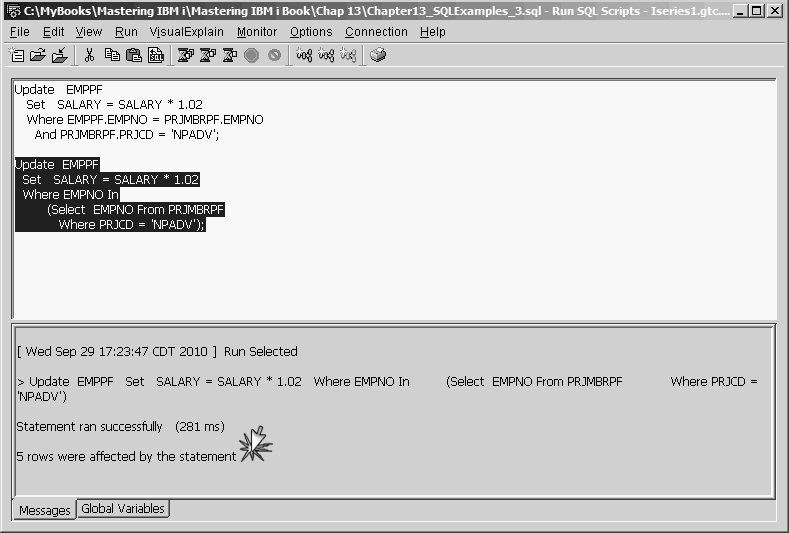
Figure 13.34: Update Statement Success
When the same update rule can be applied to multiple records in a file, SQL offers a convenient way to get the job done using a single statement. However, for updating one record at a time, it is not as easy to use as a custom-written file-maintenance application. For programmers, SQL can provide a quick way to change test data, but it is not a safe or efficient tool for nontechnical users.
The Delete Statement
The SQL Delete statement removes one or more records from a file, either directly from the base table (physical file) or through an updatable view. The syntax of the Delete statement is similar to that of the Update statement, but the Delete statement lacks a Set clause:
Delete
From file-name
Where conditional expression
As with the Update statement, multiple rows (or all rows) in a Delete statement can be deleted with a single statement. For example, the statement
Delete
From EMPPF
clears all records from the physical file. If you are using the 5250 STRSQL command line, SQL displays the message "You are about to alter (Delete or Update) all of the records in your file(s)" and gives you a chance to change your mind. However, if you are using the Run SQL Scripts interface, you will not be warned. Figure 13.35 illustrates this point.
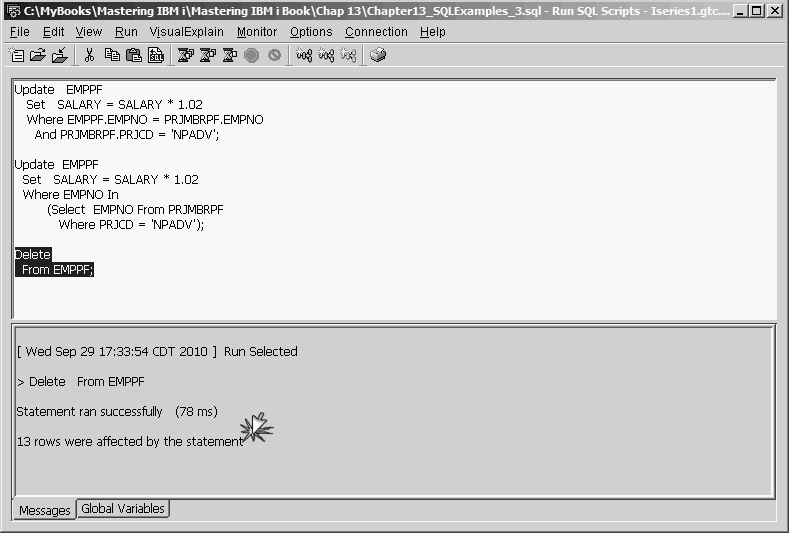
Figure 13.35: Delete Statement Results
The preceding Delete statement would have the same effect as the following CLRPFM (Clear Physical File Member) command.
CLRPFM EMPPF
This command removes all records from the member but does not actually delete the file. The SQL counterpart to the DLTF (Delete File) CL command is the SQL Drop statement.
The rules for forming the Where clause of a Delete statement are basically the same as those for an Update statement—any referenced field names must belong to the file named in the Delete From statement, with the exception of a field named in a subquery. For example, if you wanted to delete all employees who are older than 40 from the EMPPF file, you could do that using a labeled duration with the following statement:
Delete
From EMPPF
Where Current_Date > BIRTHDATE + 40 years
Figure 13.36 shows the result of this Delete statement. Like the Update statement, the SQL Delete statement is useful when you need to delete a set of records having some common characteristic.
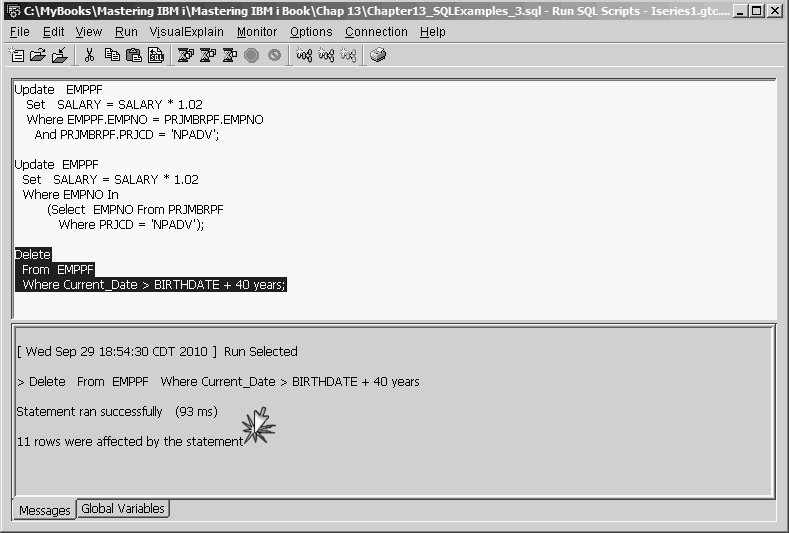
Figure 13.36: Delete Statement Results with Labeled Duration
In the final article of this series, we will look at SQL Assist, a useful feature of the Run SQL Scripts interface that enables users to create fairly sophisticated SQL statements with little or no knowledge of SQL.


LATEST COMMENTS
MC Press Online