Not familiar with SQL CREATE TABLE syntax? No problem! There's a really easy way to create SQL DDL (Data Definition Language) statements.
IBM i developers are becoming more comfortable exploiting the power of SQL to retrieve and manipulate data. We regularly use the workhorse SELECT, UPDATE, and DELETE statements and can bang them out quickly with minimal syntax errors. Defining tables, indexes, constraints, and the like occurs less frequently, and consequently we are much less accomplished in the syntax.
That's where the prompted DDL feature in the iSeries Navigator interface is so useful. In this article, I will walk you through the creation of an SQL table without your having to know that the CREATE TABLE statement even exists.
Background
Files on the IBM i have traditionally been created using Data Description Specifications (DDS). Files created this way can be accessed using SQL, but IBM is now making most data access and management improvements on the SQL side of the house. There are advantages to defining files ("tables" in SQL parlance) using SQL DDL's CREATE TABLE statement.
Figure 1, below, is the definition of a stripped-down IBM i file ORDLINES, showing traditional DDS capabilities. I will show how to create this same file using SQL DDL in iSeries Navigator without any knowledge of the CREATE TABLE syntax.
A UNIQUE
A R ORDLNF
A ORDNUM 7P 0 TEXT('Order Number')
A COLHDG('Order' 'Number')
A LINE 3P 0 TEXT('Order Line Number')
A COLHDG('Ord' 'Lin#')
A SKU 5P 0 TEXT('Our SKU')
A COLHDG('SKU')
A ORDDUE L TEXT('Order Due Date')
A COLHDG('Order' 'Due')
A QTY 3P 0 TEXT('Ordered Quantity')
A COLHDG('Order' 'Qty')
A PARTIAL 1A TEXT('Part Ship OK, Y/N')
A COLHDG('Part' 'Ship' 'OK')
A VALUES('Y' 'N')
A K ORDNUM
A K LINE
Figure 1: Here's the traditional DDS file definition.
Query/400 run over the data might show data as in Figure 2.
Order Ord SKU Order Order Part
Number Lin# Due Qty Ship
OK
12,345 1 71,117 2009-12-27 179 Y
12,345 2 60,210 2009-12-27 24 N
12,345 3 52,297 2009-12-27 603 ?
Figure 2: This is an example of the possible data in the DDS defined file.
iSeries Navigator: Adding a table
(Hint: There is a lot of functionality in iSeries Navigator, but some of the capabilities are not obvious. Right-clicking sometimes shows up hidden gems.)
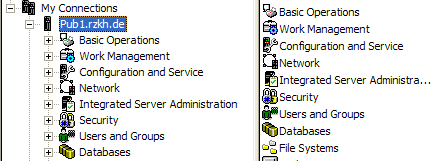
Start iSeries Navigator and make sure My Connections is expanded. Click on your machine (in my case, it is Pub1.rzhk.de), and then expand the connection to your machine by clicking the plus sign (+) on the left. You should see results similar to Figure 3.
Figure 3: iSeries Navigator has opened a connection. (Click images to enlarge.)
Now start navigating in the left pane.
Expand databases. Go to your database, which will generally be your machine name. In my case, it is Pub1.
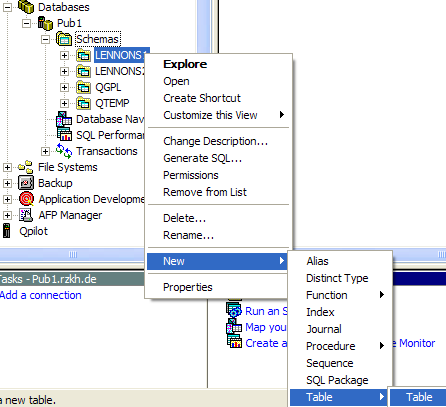
Expand schemas. (A schema is generally equivalent to a library. You can add additional libraries by right-clicking on Schemas and then clicking on Select Schemas to Display.) Right-click on the schema (library) where you want to create the table. (In Figure 4 below, I am going to create the table in library LENNONS1.)
In the resultant pop-up menu, click on New, then on Table, and then Table again.
Figure 4: Navigate to the Create Table menu option.
This will open up the New Table dialog, as in Figure 5.
Figure 5: The New Table dialog has multiple tabs.
This is a multi-tabbed dialog, and the Table tab should be active. In the Table tab, you enter the table name (the file name) and text that describes the table. The text is the equivalent of what you would enter using the TEXT keyword of the CRTPF command.
Enter ORDLINES for the table name and Order Lines for the text. Do not click the OK button.
Adding Columns (Fields)
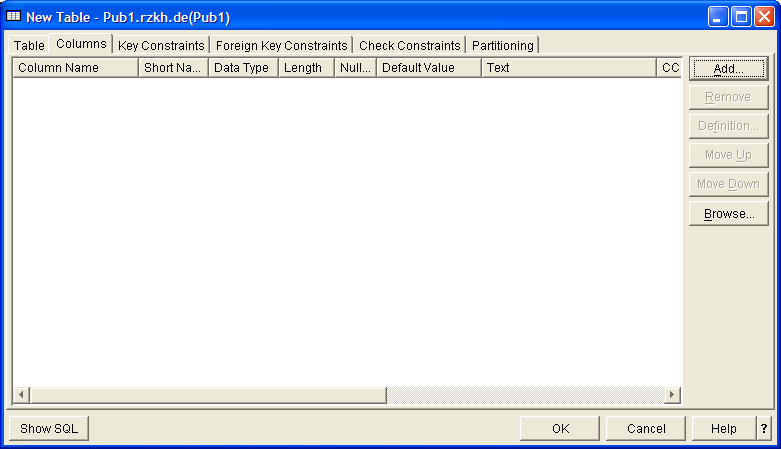
Now click the Columns tab. (A column is the equivalent of a field in a record.) You get a new dialog, as in Figure 6, showing you the columns in the table. Since this is a new table, the display is empty.
Figure 6: The New Table Columns display is currently empty.
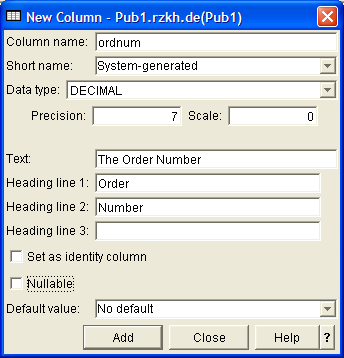
Click the Add button at the top right, and you are prompted to enter the information for the first column. Enter data as shown in Figure 7. In Data type, Decimal is packed decimal and Numeric is zoned decimal. Note that I unchecked Nullable.
Figure 7: Enter the first column.
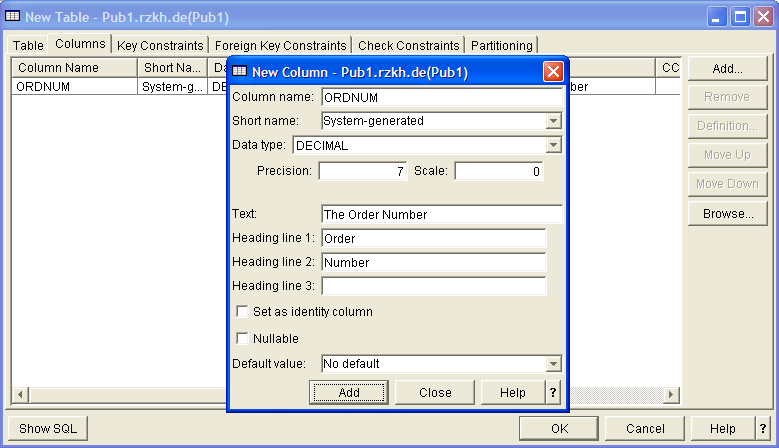
Now click the Add button at the bottom left. The ORDNUM column will be added to the underlying Columns dialog, and the New Column prompt stays on the screen. See Figure 8.
Figure 8: The first column has been added.
Go ahead and enter the rest of the columns using the definitions in the DDS in Figure 1. It is pretty straightforward. Note that when you get to the order due date and change the Data Type dropdown to Date, the precision and scale fields disappear, because a date field has a standard length,
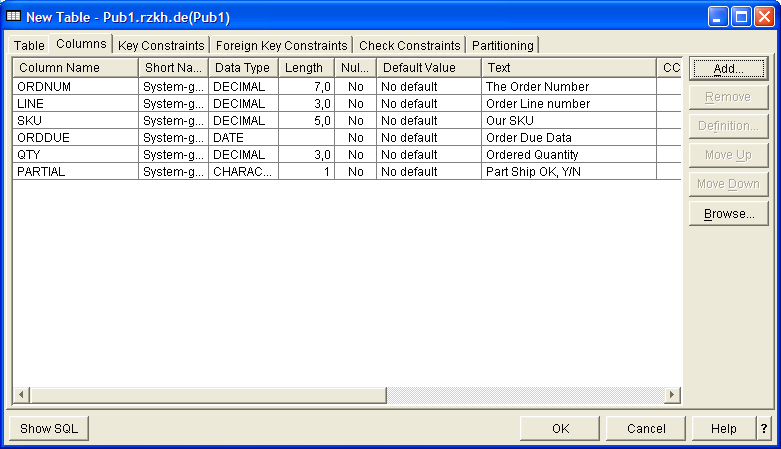
When you have entered all the fields, click the Close button on the New Column dialog. You should now see something like Figure 9. You may have to scroll to the right to see all the column headings.
Figure 9: A new table and all its columns have been added.
If you want to at this point, you can click on the Show SQL button at the bottom left, and a new window will open up showing the SQL DDL generated so far. Close this new window when you are finished examining the SQL.
Adding Keys
Now click on the Key Constraints tab. This is where you identify unique keys and any other keys. Since this is a new table, you get an empty list with an Add button at the top right.
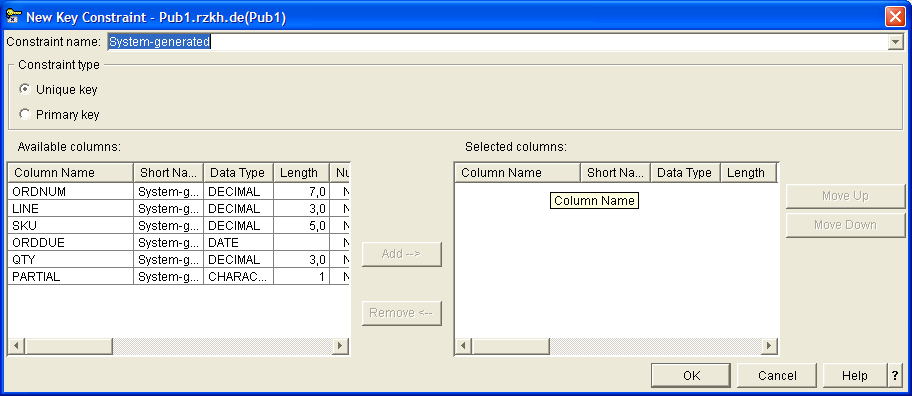
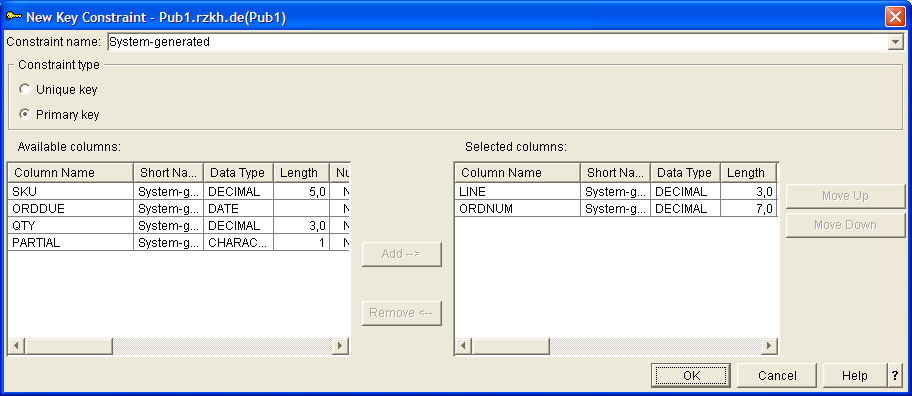
Click the Add button and you get a dialog to enter New Key Constraints. It lists the columns already defined in the table so you can conveniently pick the ones that make up the key. See Figure 10.
Figure 10: Here's the New Key Constraints prompt.
Our original DDS has a unique key on ORDNUM and LINE. This would be a primary key, so click the Primary key radio button. Then highlight column ORDNUM. The Add button in the middle of the screen is now enabled. Click it. ORDNUM now appears in the Selected columns list. Repeat for column LINE. You should end up with a display like Figure 11.
Figure 11: The primary key is defined.
Click OK on the New Key Constraints dialog, and you are back at the New Table dialog.
Adding Validation
There is one more thing in the original DDS that we have to add: The VALUES('Y' 'N') on field PARTIAL.
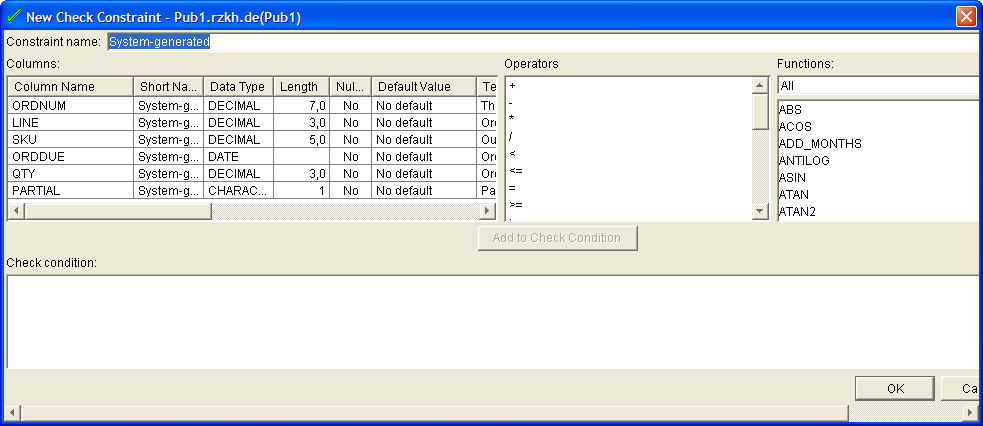
SQL calls this a Check Constraint, and it is much more powerful than VALUES in DDS. Click on the Check Constraints tab, and you get an empty display, again with the Add button at the top right. Click Add and you get the New Check Constraint dialog as in Figure 12.
Figure 12: The New Check Constraint dialog looks like this.
For our check constraint, we want to generate SQL that says PARTIAL IN ('Y','N'). Click PARTIAL and then click the Add to Check Condition button that is now enabled in the middle of the screen. In the Operators column, scroll down and click IN and click the Add to Check Condition button. You will see the statement being built in the Check Condition field at the bottom. Go to that field and add ('Y', 'N'). You should end up with Figure 13.
Figure 13: The Check Constraint Dialog is completed.
Click the OK button on the New Check Constraint dialog and you are back at the New Table dialog.
Create the Table
We're finished. You can click the SQL button to see the generated SQL in a new window. Close that window when you are finished and go back to the New Table dialog.
Click OK to generate the table.
Now, on a green-screen, do DSPFFD FILE(ORDLINES) to convince yourself that the table (file) is created.
Success! And you didn't have to know anything about the CREATE TABLE syntax. Really easy.
Improved Data Integrity
Here's a short SQL script that you can run using the RUNSQLSTM command to insert three records into ORDLINES:
SET SCHEMA LENNONS1; -- CHANGE TO YOUR LIBRARY
INSERT INTO ORDLINES
VALUES(12345,1,71117,'2009-12-27',179,'Y');
INSERT INTO ORDLINES
VALUES(12345,2,60210,'2009-12-27',24,'N');
INSERT INTO ORDLINES
VALUES(12345,3,52297,'2009-12-27',603,'?');
If you run it against a version of ORDLINES created with DDS, all three records will be inserted, even though we have specified VALUES('Y' 'N') on field PARTIAL. VALUES in DDS will protect against bad data on a display screen, but it does not always protect against bad data in a file.
If you run the script against the version of order lines created with SQL DDL, record 3 will not be added. With an SQL Check Constraint, it doesn't matter what tool you use to add the data—SQL, RPG, Java, .NET, PHP, DFU, or your favorite file editor. You won't be able to put in bad data. This is a powerful way to ensure data validity at the database level.
Where's the Source?
Maybe your shop standards require source for all objects. You can easily generate the SQL for a table (file). Right click on a file and then click Generate SQL, as in Figure 14.
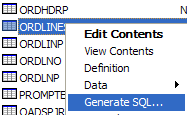
Figure 14: Generate the SQL for an existing table.
Click Generate in the resulting dialog, and you can then cut and paste the SQL DDL into your favorite editor. WDSc or RDP works best, but you can struggle by with SEU.
What Else Can I Prompt?
Space does not permit coverage in detail here, but there are many other objects that can be prompted.
Right-click on a schema and then click New, and you see 10 or 11 SQL objects you can prompt. Index and View are probably the most common ones you would want to create.
Right-click on a table and then click Definition, and you get a dialog much like the New Table dialog, but with all the information filled in. You can click on any of the tabs and add or remove items. After making changes, an ALTER TABLE statement is generated and executed when you click OK. You can see the statement by clicking the Show SQL button.
Experiment!
Notes
I used iSeries Navigator Version 5 Release 4 Mod 0, a fairly old version, for this article. I was running against OS/400 V5R3 Mod 0 on the free AS/400 server at www.rzkh.de. This demonstrates that this tooling has been around for quite a while. If you are on a more recent version, you may see additional capabilities.




LATEST COMMENTS
MC Press Online