It’s the little things that drive people crazy. Take the standard keyboard mapping that comes with IBM’s Personal Communications/400 (PC/400) program. When you use PC/400 to emulate an AS/400 terminal, the default keyboard mapping maps the Enter function to your PC keyboard’s right Control (Ctrl) key while the field exit function is mapped to your keyboard’s Enter key. For PC users, this can be very confusing, as they need to remember that—for PC/400 alone—the Enter key is in a different spot than it is in all their other standard PC applications.
Fortunately, there is a solution. PC/400 has a keyboard mapping function that allows you to create customized keyboard files that remap AS/400 functions to PC keys that are more familiar to your users. In addition, you can use keyboard mapping to assign macros to certain keystroke combinations, copy key definitions from one key to another, and to locate what keys have specific key definitions assigned to them.
In this article, I’ll explain how to create customized keyboard mapping files in PC/400 and assign them to your AS/400 sessions. I show you how to create a keyboard file, assign different values to the keys on your PC keyboard, how to tell PC/400 to use a customized keyboard file instead of IBM’s terminal-style keyboard, and how to export keyboard files to different PCs running PC/400. In the sidebar article, “A Few More Things You Can Do with PC/400’s Mapping Function,” I review some other functions of this valuable feature.
The Keyboard Setup Function
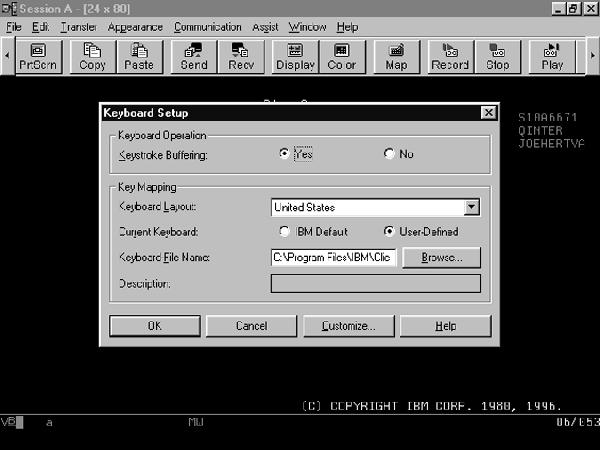
To create a customized keyboard file, go to the keyboard setup function by selecting Assist from PC/400’s menu bar and then selecting Keyboard Setup from the dropdown menu. This displays the Keyboard Setup window shown in Figure 1. By default, your
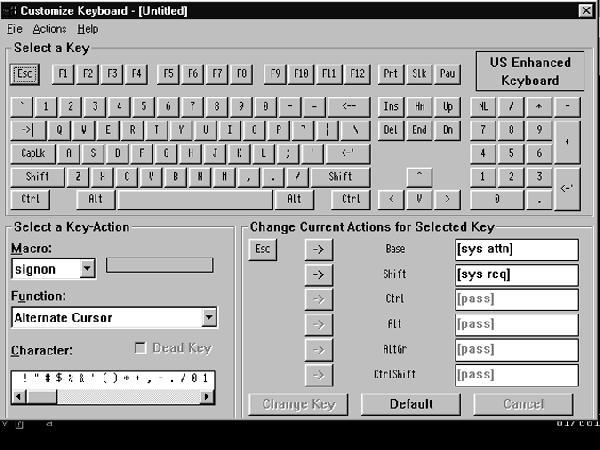
current keyboard file is set to a standard IBM terminal layout using a 5250- or 3270-style keyboard. To create a different keyboard file that PC/400 can use for keyboard mapping, click on the Customize button. This brings you to the default Customize Keyboard window shown in Figure 2. You’ll notice that this window in divided into three different sections: the Select a Key area that displays a standard 101-key keyboard layout; the Select a Key Action area that allows you to assign macros, standard AS/400 key options, or text characters to specific keys; and the Change Current Actions for Selected Key area that allows you to actually change one of the six mappings that are automatically assigned to a key. You can use one or all three of these options in sequence to change keystroke mappings for any particular key.
One of the things you will notice about the keyboard layout is that this is a standard 101-102 keyboard. There are no special keys for Windows 95 functions, so you cannot remap any of those keys. In addition, there are certain keys and key combinations that you will not be able to remap. For example, you cannot remap the Shift, Caps Lock, and Alt keys. In addition, you cannot remap special keystroke combinations that are either impossible (such as pressing Ctrl-Ctrl) or those combinations used by Windows 95 (such as Alt-Tab).
Mapping a Specific Key
To illustrate how to change a key assignment, let’s change the PC Enter key to actually use the Enter function instead of the default Field Exit assignment PC/400 assigns to it. Using the three areas in sequence, we can change the definition by doing the following.
On the keyboard layout in the Select a Key area, click on the picture of the Enter key. As you do this, you will notice that this updates the Change Current Actions for Selected Key section to display all the current keyboard mapping for the Enter key. For every key in the layout, there are six possible mappings that can be defined. These mappings tell you what function, macro, or text character will be passed to the AS/400 when that key is pressed. The six possible mappings and their meanings are as follows:
• Base—designates what keystrokes are passed when the key is pressed without any other keys being pressed in conjunction with it
• Shift—designates the keystrokes passed when the key is pressed in conjunction with the Shift key
• Ctrl—designates the keystrokes passed when the key is pressed in conjunction with one of the Ctrl keys
• Alt—designates what is passed when pressing the base key in conjunction with one of the Alt keys
• AltGr—what is passed when the Alt, Ctrl (the Ctrl key is labeled “Gr” on Norwegian keyboards), and base key are pressed in conjunction with one another
• CtrlShift—designates what is passed when the Ctrl, Shift, and base key are pressed together
For our purposes, we are only interested in changing the Base setting for this key. Since we are changing it to a specific AS/400 function, we can select and assign the Enter function from the Select a Key-Action area. Do this by performing the following actions:
1. In the Select a Key-Action area, click on the dropdown box labeled Function. Scroll down to the entry in that box labeled Enter and click on that entry to highlight it. This entry must be highlighted to assign it to a key definition.
2. In the Change Current Actions for Selected Key section of the screen, look at the line labeled Base. On the right of that line is the current key definition for the Base mapping
of that key. If you click on the -> button on that line, the current key definition on the right- hand side of the line will change to the default Enter function.
3. In order to enable the change in this file, you must then click on the Change Key button at the bottom of the Change
Current Actions for Selected Key screen. This will mark the change as permanent in your keyboard file. This new key assignment will not be recorded if you forget to click on this button.
This sequence can also be used to assign existing macros or single-character text codes to a base key or any one of its mappings. To change the key assignment on any of the six key mappings, click on the -> button for that mapping. To assign a macro instead of an AS/400 key sequence, click on the Macro dropdown box and select the macro to be assigned. To assign a single character to a key, click on that character in the character scroll bar of the Select a Key-Action area. Always remember to click on the Change Key button for that key or the change will not be recorded when you save the file.
If you make a mistake and want to change your key mapping back to its default PC/400 setting, click on the Default button on the Change Current Actions for Selected Key section of the screen.
The Copy/Move/Swap Key Function
In addition to explicitly assigning a function, macro, or text character to a key, you can also transfer all six key definitions from one key to another key by using the Copy/Move/Swap Key function. For this example, instead of explicitly assigning the Enter function to the base function of the Enter key, you could copy the keyboard definition from the right Ctrl key to the Enter key so that it would function in the exact same manner. Let’s review the steps needed to do this, as well as a few other features.
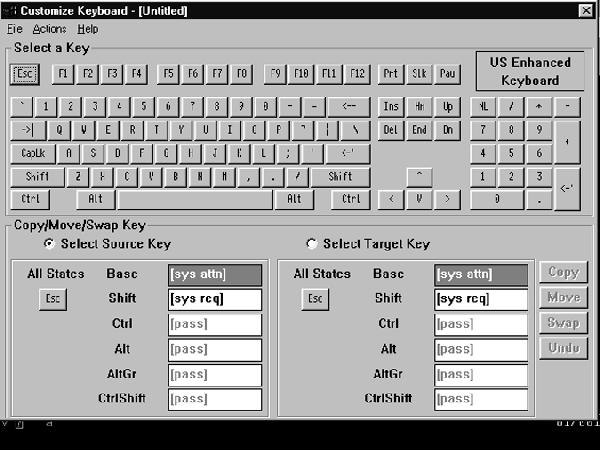
First, you need to change the Customize Keyboard screen to Copy/ Move/Swap key mode. Do this by selecting Actions from the menu bar and then selecting the Copy/Move/Swap key option from the dropdown menu. This will give you the screen shown in Figure 3. (To return to the default key-mapping mode described above, click on Actions from the menu bar again and then click on the Select a Key-Action option from the dropdown menu.)
The Copy/Move/Swap screen is divided into two sections: one for the key you want to copy your key definitions from (the source key) and another for the key that will receive the new definitions from the source key (the target key). To designate a source key, click on the Select Source Key radio button and then click on the key from the keyboard layout that you want to use as your source. To designate a target key, click on the Select Target Key radio button and then select the key from the keyboard layout that you want to use as your target. In this example, the right Ctrl button is the source key and the Enter key is the target key.
Once the source and target keys are designated, there are four different options you can use. To copy all the definitions for the Source to the Target, click on the Copy button on the Target side of the screen. In this example, the Enter key will have the same definitions as the right Ctrl key. By default, when you select a source and target, all six possible mapping states are highlighted for copying. You can do selective copying by turning off highlighting for those states that you do not want to copy.
The second option you can use is to move your mapping definitions from one key to another. By clicking on the Move button, all eligible key mappings are transferred from the source key to the target key. After the transfer, the key mappings are set to [dead] on the source key side.
A third option is to swap key definitions between the source and target keys. When you click on the Swap button, all eligible key mappings are traded between the source and target keys. It is important to note that there are limitations on using the Move and Swap functions. Move and Swap are only available for defined, eligible key mappings. If you have any key mappings of [pass] or [dead] on either the source or target keys, Move and Swap will not be activated for those key matches. To use Move or Swap when your keys have these definitions, unselect those states that have [pass] or [dead]. The Move and Swap functions will then become active and you can use them.
The fourth and final option is to undo any mapping changes you have made. Do this by clicking on the Undo button. This returns the target key definitions to what they were before the last Copy/Move/Swap function was activated.
Saving a Keyboard File and Using It in PC/400
To save your customized keyboard in a file, click on File in the Customize Keyboard menu bar, and then select Save As in the dropdown menu. If there is no file name assigned, PC/400 will ask you to define a name. The file will then be saved in the following directory:
C:PROGRAM FILESIBMCLIENT ACCESSEMULATORPRIVATE This is the default directory for all customized keyboard files. To specify this file as your default keyboard file in PC/400, go back into the Keyboard Setup window. (That window shown in Figure 1; you get there by choosing Assist from the PC/400 menu bar and then selecting Keyboard Setup from the dropdown menu.) Under Current Keyboard, click on the User-Defined radio button and then specify the location and name of your keyboard file as the Keyboard-File Name. After specifying this file, PC/400 will begin using your keyboard mappings when you access the AS/400.
To move this file to other PC/400 setups, copy the keyboard file you created into the C:PROGRAM FILES IBM CLIENT ACCESSEMULATOR PRIVATE directory on the target machine and specify it as the current keyboard for that installation.
Keyboard Customization—Just a Click Away!
As you can see, PC/400’s mapping function is a quick and powerful tool for making your keyboards match your user and application expectations. And—in that regard—it might be able to remove some of the things that drive your users crazy.

Figure 1: The Keyboard Setup window allows your users to input text, AS/400 functions, or macros at the touch of a key.

Figure 2: The Customize Keyboard window allows you to reassign functions to different keystroke assignments.

Figure 3: The Copy/Move/Swap function allows you to transfer or copy specific key mapping from one key to another.


LATEST COMMENTS
MC Press Online