I'm going to show you how to install Connections on IBM i over the course of a few TechTips.
In a recent article, I explained what IBM Connections is and why IBM i is a fantastic operating system to run it on. Installing Connections on other platforms requires a number of servers. While installation on IBM i is by far more simplistic, there are still a lot of steps.
You need to download the images from Passport Advantage. If you had support entitlement to Lotus Quickr, then it would carry forward as an entitlement to IBM Connections. Inside Passport Advantage, search for product CIHK3ML, which is IBM Connections V4.5 for IBMi Multilingual, and then download it. You'll also need CII8NEN, which is IBM Connections V4.5 Wizard for IBMi English as well.
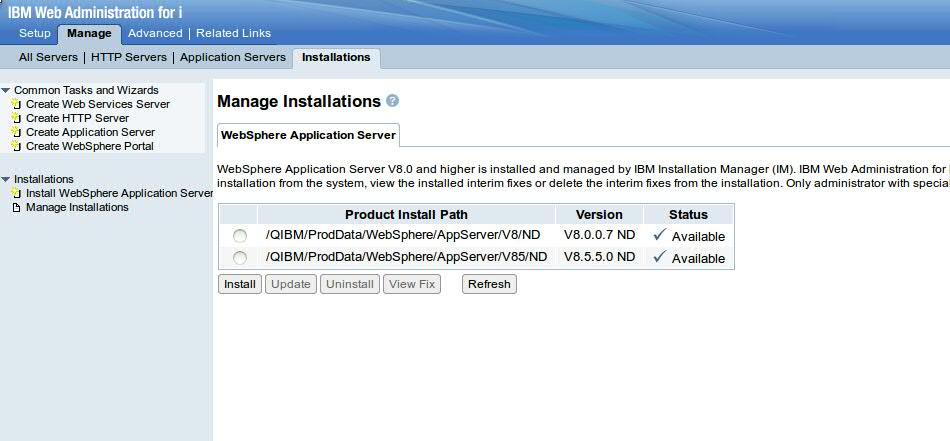
While that's downloading, you need to ensure your PTF Groups are up to date. Make sure you're at the most recent levels for DB2 and Java. If you have IBM WebSphere Application Server (WAS) Network Deployment version 8 installed, you'll need to ensure it's at WAS fix pack level 5 or 6. Any higher or lower will be unsupported. This level is determined not by your PTF level; even though you've downloaded the WAS 8 Group PTF and applied it, the fix pack is not actually installed until you've manually updated WAS. You can determine your WAS fix pack level via the IBM Navigator for i HTTP Administration page. As per the screen shot, click on the Installations tab and ensure your fix pack level is 8.0.0.5 or 8.0.0.6 (never mind that I'm at 8.0.0.7 and stay supported).

Figure 1: Check and update your WebSphere fix pack level.
If you're at a lower version, select the WAS 8 version and hit the Update button. Then browse for the fix pack and install it. I've written detailed instructions about updating WAS fix packs here.
The next part is Installation Manager. If you don't have Installation Manager installed, then you can do that relatively easily. Simply extract the /IBM_Connections_Install_OS400/IM folder from the IBM Connections image you downloaded and put it somewhere in your Integrated File System—for example, /IMInstall.
Then you need to launch Qshell with the qsh command and enter the following commands:
cd /IMInstall/IM/os400/tools
./imcl listAvailablePackages -repositories /QIBM/IMInstall/IM/os400 -features -long
The imcl program is used to list what packages are included with your download and will specify the package ID. You need to substitute the package ID with the com.ibm.cic.agent parameter below.
./imcl install com.ibm.cic.agent -repositories /QIBM/IMInstall/IM/os400/repository.config -installationDirectory /QIBM/ProdData/InstallationManager -accessRights admin -acceptLicense
Once the command finishes, Installation Manager will be installed on your server.
Now we're cooking. At this point, let's create the WebSphere Application Server deployment manager and application server node profiles for the server. Before getting started, you'll want to create a new IP interfaces for the Connections WebSphere instance and the IBM HTTP Server instance. Also, add those IP addresses to your DNS server so that you get going with proper DNS resolution from the start.
To create the deployment manager, in Qshell run the following commands:
cd /QIBM/ProdData/Websphere/AppServer/V8/ND/bin
manageprofiles -create -profileName dmgr -templatePath dmgr -hostName connections.yourdomain.com -enableAdminSecurity true -adminUserName
wasadmin -adminPassword password
Remember to substitute connections.yourdomain.com with your own server's fully qualified domain name address and set a password for the password variable.
To create the application server node, run the following commands:
cd /QIBM/ProdData/Websphere/AppServer/V8/ND/bin
manageprofiles -create -profileName AppSvrNode1 -templatePath default
-hostName connections.yourdomain.com
This will give you a base WebSphere deployment manager you can log into later.
Next, let's prepare to install the Connections DB2 databases. First, you'll need to create an IBM i user profile (in IBM Navigator for I, of course). Call it LCUSER. No special authorities should be needed.
Take the IBM Connections Wizards zip file you downloaded and place it in another installation folder. For example, put it inside /ConnectionsInstaller.
Then run the following lines of code inside Qshell:
cd /ConnectionsInstaller
ajar -x IBM_Connections_4.5_wizards_OS400.zip.
cd /ConnectionsInstaller/Wizards.
dbWizard_OS400.sh
This will build all the IBM Connections libraries and DB2 databases for you and apply security for LCUSER. The libraries are called ACTIVITIES, BLOGS, COMMUNITIES, DOGEAR, FILES, FORUM, HOMEPAGE,MOBILE, PROFILES, and WIKIS. Add these libraries to your backup routine.
Next time, I'll walk you through configuring Tivoli Directory Integrator and getting your Profiles database prepared and populated. Once that's done, we'll configure WAS and load Connections!


LATEST COMMENTS
MC Press Online