Quickly and easily customize iSeries Access fonts and screen size for a better viewing experience.
Are you getting the most out of your green-screen emulation, or are you still using the installation defaults?
For 5250 emulation, aka "green-screen" access, many shops use the product formerly known as Client Access, known as iSeries Access in the version I'm using now, and currently marketed as System i Access in the latest round of name changes. Strictly speaking, green-screen emulation is only a part of the iSeries Access product; what most of us use is called "Personal Communications iSeries Access for Windows."
In this article, I'm going to use the iSeries Access name. It's the middle road, it's the name most people use, and it's less of a mouthful. (It also gets better hits in Google: "client" is way too common a word, and what's a self-respecting search engine going to make of a search for "i"? But back to the subject at hand.)
Many of my coworkers use the product as it runs from a default installation: full screen, emulating a 24-line, 80-column terminal, green text on a black screen, with a menu bar and tool bar at the top. The default installation is not necessarily bad, and it is easy on the eyes, but it could be better. What I really dislike about the default installation is viewing a spool file and having to constantly scroll right and left to see the full width of the report. I also hate it when a coworker pastes a screen print into an email, and I have to scroll the email right and left to see the pasted screen image.
So take five minutes to read the rest of this article, and then invest two minutes in experimenting.
The Default Installation
If you have run the Start or Configure Session wizard, or your network gurus ran it on your behalf, you are likely seeing a full-screen display that looks like Figure 1 below. The default font is IBM3270, which comes from the font used in the IBM 3270 terminals that attach to the mainframe System/370, aka System z. The font is quite readable.
Figure 1: This is the typical screen from taking the defaults in the Start or Configure Session wizard. (Click images to enlarge.)
In this typical use, a developer looking at a job log needs to scroll across to see the end of each line.
But you can see more than 80 characters at a time, and you can use a font that works better than the default font with a wider screen.
Setting Up for 132 Columns Wide
If you are seeing only 80 columns, the first thing to do is change your emulation session to 132 columns wide. (I'm assuming you already have an iSeries Access session defined.) Click the Communication menu entry, and then click Configure. See Figure 2. Note that I'm working from iSeries Access V5R3. In earlier versions of the product, the Configure item may have been somewhere else, perhaps under Edit>Preferences, and I suppose in V5R4 and later versions, IBM may have moved it again, though I think that's unlikely.
Figure 2: Configure the communications setup.
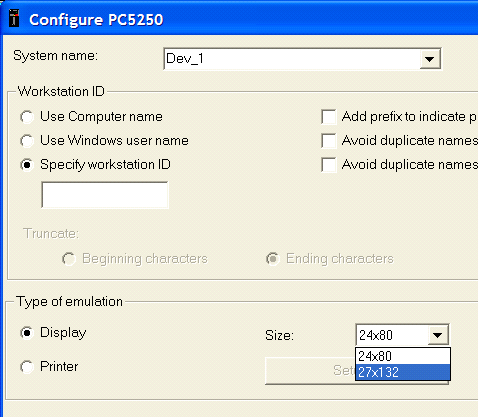
On the resulting screen (Figure 3), go to the Size dropdown and change it to 27x132. Then click OK.
Figure 3: Change the screen size.
Because you have changed the communication configuration, you will have to sign on again, but it's a small price to pay.
Now if you display a job log, you'll have a display something like Figure 4. You are now seeing 130 columns of the job log. The font is smaller and some of the screen is not used, but it cuts way down on scrolling right and left.
Figure 4: Now you have 130 columns, but a smaller version of the IBM3270 font and unused space at the bottom of the screen.
Change the Font
We can make the font better. It's easy. Click Edit>Preferences>Appearance>Font. Drat! Font is grayed out. See Figure 5.
Figure 5: The Font menu entry is grayed out when full screen.
Some people stop here and assume the font cannot be changed. Fear not; there is a simple trick.
To change the font, you first need to restore down to a window by clicking the standard Windows icon at the top right of the screen or by double-clicking the blue bar at the top of the screen.
Now click Edit>Preferences>Appearance>Font, and you should see a screen like Figure 6, where the current default font (IBM3270) is highlighted.
Figure 6: Pick your new font here.
This is where you can change the font. There are typically not a lot of fonts shown, because the emulator needs a fixed-width font, so you are not going to see common proportional fonts like Arial or Times Roman. You can experiment with the various fonts that are available and see what suits you best, but personally I prefer either Lucida Console or Lucida San Typewriter. For now, highlight Lucida Console and click OK.
Maximize the screen and display a job log again. You should see that the characters are now larger and the display is scaled to fit the whole screen, something like Figure 7.
Figure 7: The Lucida Console font expands to fill the whole screen
This is definitely much more readable. You might also find that now that you've changed the font, you want to run the emulation permanently in a window for your 80-column work, as in Figure 8.
Figure 8: Here's your 80-column display in a window using Lucida Console.
If you display a job log, the screen will automatically resize to provide a scaled, 130-column readable display.
Easy, wasn't it? Try it for a couple of days. If you don't like it, I can't give you your money back, but you can simply change the font back to IBM3270 and the width to 80.


LATEST COMMENTS
MC Press Online