Make your life easier by enabling the cut, copy, and paste shortcut keys in iSeries Access.
Say what you like about Windows; it has added a significant level of consistency across applications that many rely on. I love the efficiency of the Windows shortcut keys for cut, copy, and paste (Ctrl+X, Ctrl+C, and Ctrl+V, respectively), and I use them in many applications instead of clicking on icons in the tool bar or clicking on the Edit menu. Since these keys work consistently across virtually all Windows applications, you get into the habit of using them everywhere.
Unfortunately, Ctrl+X, Ctrl+C, and Ctrl+V are not available in the default installation of iSeries Access.
Due to a deficiency in my touch-typing gene, I do a fair amount of copying and pasting in and across iSeries Access sessions. So do others (possibly for the same reason), but many are frustrated by having to reach for the mouse to copy or paste. However, enabling Ctrl+X, Ctrl+C, and Ctrl+V is relatively easy.
Keyboard Mapping Primer
In iSeries Access, a key press is mapped to an action by a keyboard map. To change the action of a key press, all you have to do is change the keyboard mapping file, and IBM has made that very easy to do.
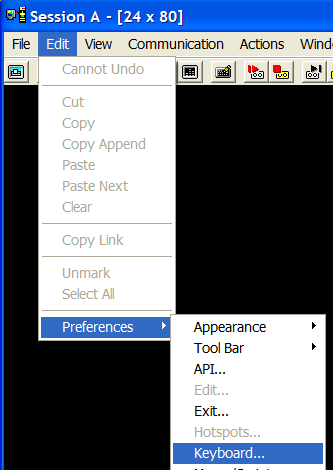
In a session, click Edit > Preferences > Keyboard, as in Figure 1 below:
Figure 1: Access keyboard mapping. (Click images to enlarge.)
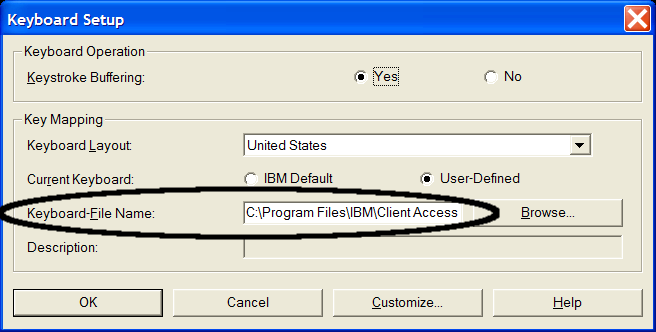
You should get a window like Figure 2. The significant field is the one named Keyboard-File Name.
Figure 2: The Keyboard Setup menu shows the location of your key mapping file.
If the iSeries Access session is from a default installation, the keyboard mapping file will probably be named C:Program FilesIBMClient AccessEmulatorprivateAS400.KMP.
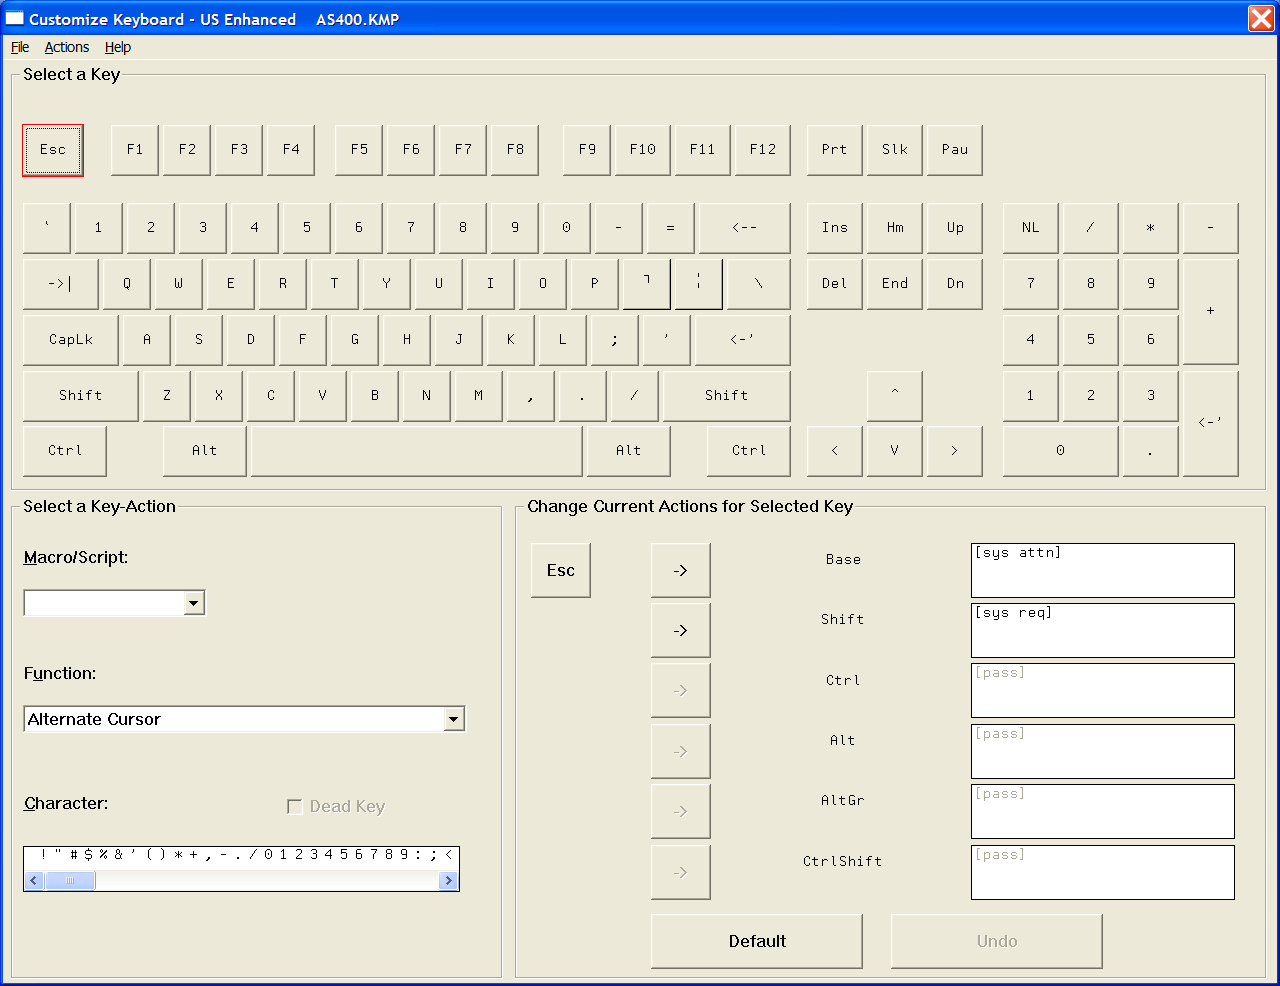
Now click the Customize button, and you should get a full-screen display like Figure 3.
Figure 3: This is the initial Customize Keyboard mapping screen.
The screen is divided into three sections:
-
Top Half: This is a picture of the physical keyboard. Click on any key to indicate you are working on the mapping for that key. The key will get a red border, like the Escape key in Figure 3.
-
Bottom Left: This is where you choose the macro, function, or character to which a keystroke maps.
-
Bottom Right: This shows again the key you are working on, plus up to six actions that pressing the key can take. In Figure 3, the Escape key can have two actions. If you press Esc, it maps to Sys Attn, and if you press Esc+Shift, it maps to Sys req. The [pass] function means that iSeries Access passes the keystroke through to Windows, and [dead] means the key combination has no action. Pressing one of the arrow buttons (->)will assign the highlighted key-action at the bottom left to the key. Be cautious about remapping any keystroke that is assigned to [pass]; otherwise, Windows may not respond as you expect. For example, if you use Alt+Tab to switch between Windows applications, you probably don't want to remap it here.
Mapping Ctrl+C
Click on the "C" key in the keyboard at the top. Notice that in the bottom right, it has three mappings: "c," "C," and [center text]. Center text is only of use with the Office Vision assist feature, and if you are using it, you probably want to stop right here. Otherwise, you want to remap the Ctrl+C so that it copies the current selection from the clipboard.
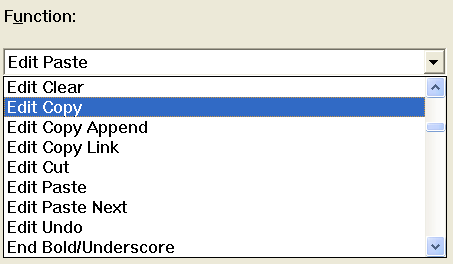
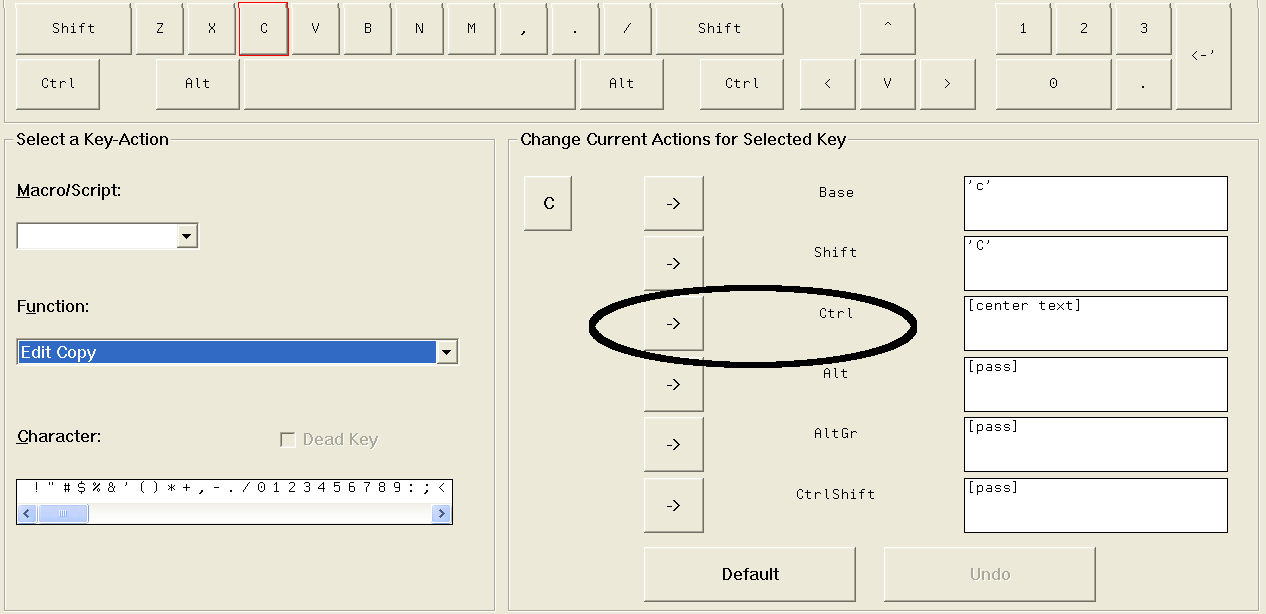
Go to the bottom left, click the Function dropdown list, scroll to find Edit Copy, and highlight it, as in Figure 4.
Figure 4: Find and highlight the Edit Copy function.
Now click on it. The dropdown closes, and Edit Copy is the active function ready to be assigned. Your screen should now look like Figure 5, and you are ready to assign "copy" to the Ctrl+C key combination.
Figure 5: Edit Copy is ready to be assigned.
On the bottom right of the screen, click on the arrow button (->) that points to Ctrl (circled in Figure 5) and [edit-cut] appears in the box to the right, replacing [center text]. You have re-mapped Ctrl+C. Easy, wasn't it?
Mapping Ctrl+V and Ctrl+X
Now you need to assign "paste" to Ctrl+V. Click on the V in the top half of the screen. Since you have changed the actions for the C key, you will get the message in Figure 6.
Figure 6: Remember to save changes made to a key.
Go ahead and click Yes to save the changes made to C. Until you do, you have no permanent changes to the keyboard map.
Repeat the steps above to assign Edit Paste to Ctrl+V and Edit Cut to Ctrl+X.
Saving the Mappings
Now that you have the keys remapped, you need to make the changes permanent by saving the mappings. I suggest that you do not save back to the original mapping file, AS400.KMP
Click File > SaveAs. In the standard Windows dialog that results, change the keyboard file name (I creatively named mine AS400SAM.KMP) and click the Save button. You return to the Figure 3 Customize Keyboard screen. Click File > Exit and you should be back at the Figure 2 Keyboard Setup screen.
Verify that the Keyboard-File Name field contains your new keyboard file name.
Click OK, and back in your session you should be able to use Ctrl+X, Ctrl+C, and Ctrl+V for cut, copy, and paste, respectively, just like in other Windows applications.
When you close this session, you will see a message like Figure 7.
Figure 7: Save the revised session definitions.
Click Yes to permanently save the revised definition for this session to the Workstation Profile file (the .WS file).
Share the Mappings
Many sessions can use the same keyboard mapping file. In another session, just click Edit > Preference > Keyboard to get to the Keyboard Setup screen (Figure 2), and then use the Browse button to select your new keyboard mapping file.




LATEST COMMENTS
MC Press Online