I'm from Rochester, Minnesota, and the nearest real beach is miles and miles from my home. But regardless of where you go for your vacation, sometimes you need to take work with you. If something comes up, and you're the only one who can handle it, it doesn't matter if you're at the local stadium or miles away on the shore. You're it: the one on call. Being able to access your work wirelessly from a cell phone or PDA can make the difference between a minor interruption and a wasted vacation. V5R3 of the IBM Advanced Job Scheduler (AJS 5722JS1) gives you the ability to work with your scheduled jobs wirelessly.
Since V3R6, the AJS has been the premier job scheduler for iSeries. With this licensed program, you can schedule jobs to run whenever you need--taking into account holidays, fiscal calendars, and job dependencies. With the latest release, almost 100% of the product has been made accessible from the iSeries Navigator GUI. You can send email notifications to iSeries users and attach printer output in PDF format to those email notifications. You can even create your own scheduling environments to allow testing or backup of critical scheduling information. With V5R3, you also get the new wireless capabilities.
To access your scheduled jobs wirelessly, you must have either an Internet-ready cell phone (a Wireless Markup Language [WML] device) or a wireless PDA (an HTML device). After you've started the HTTP application server on your iSeries system for AJS, you need only point your wireless device's Internet browser to the correct URL address, and you're ready to sign in and begin managing your scheduled jobs. For most systems, the default URL address will be http://hostname.domainname.extension:8210/servlet/AJSPervasive. In some cases, the URL might consist of the IP address of the system--for example, http://000.000.000.000:8210/servlet/AJSPervasive.
When you sign on to AJS for Wireless, you see a list of options that identify the functions you can perform. You can work with your AJS scheduled jobs that are waiting to run and your scheduled jobs that have already run. You can stop or start the AJS monitor engine that is running on the iSeries system to ensure the scheduled jobs run only when they're supposed to. You can respond to inquiry messages for those jobs that have an error. You can even send a message to other iSeries user profiles that have email addresses defined to AJS. Finally, you have the ability to customize what you see on your wireless device, making adjustments to your preferences to suit your particular needs. Figure 1 shows the layout of the main AJS for Wireless panel.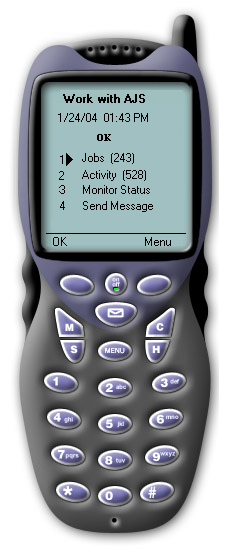
Figure 1: The main AJS for Wireless panel shows the main functions you can perform wirelessly. (Click images to enlarge.)
But enough about what you'll see when you sign on to AJS for Wireless. Picture yourself at the beach. It's a balmy 85°, there's a breeze blowing in off the waves, and in your hand is a glass with enough cold, amber-colored liquid to ensure someone else should be driving you home. (Author's note: In no way am I advocating the excessive consumption of alcoholic beverages.)
Suddenly, your cell phone rings. On the other end of the line is Corey, the 19-year-old intern you left to keep an eye on things. He sounds upset. One of the systems is running suspiciously slowly, and Corey's found a job that seems to run again and again. You wonder aloud if perhaps someone's been abusing the power that's available with AJS. You ask for the name of the job and then assure Corey that you'll take care of it. Your next move is to make your connection to AJS for Wireless!
As you sign on, the first thing you realize is that you need to prevent this rogue job from being started and restarted as you try to figure out what's going on. From the AJS for Wireless initial panel, you choose the Monitor Status option. You see, of course, that the AJS monitor is active (Figure 2). Any scheduled jobs that reach their start time with all of their requirements met are going to run. 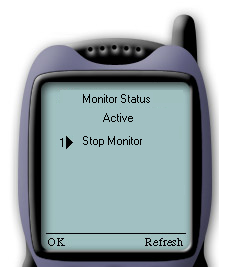
Figure 2: From the Monitor Status panel, choose option 1, Stop Monitor, to prevent all AJS-scheduled jobs from running at their scheduled start time.
To keep the rogue job from being started again, you select the Stop Monitor option. The monitor status changes to inactive. AJS-scheduled jobs that are currently running will continue to run, but no additional scheduled jobs will start. Your end users can still schedule their jobs, but those jobs will not run. You'll need to restart the AJS monitor before any new AJS-scheduled jobs will run. With no additional scheduled jobs being started, the performance of the system shouldn't get any worse. Take a healthy draught from your glass; you've taken the first step toward resolving the problem.
Your next step is to end the currently running job. From the main Work with AJS panel on your wireless device, choose the Jobs option. Notice that you are given the choice to look at AJS active jobs (scheduled jobs that are running), held jobs (jobs that someone has prevented from running), and pending jobs (jobs that are scheduled to run in the future). Following each link is a number that indicates the number of jobs in that state (Figure 3). 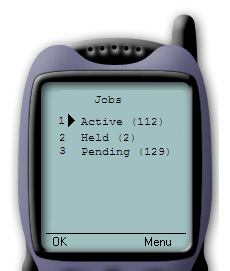
Figure 3: The number following each option indicates the number of jobs that are active, held, and pending.
Right now, you're not concerned with the held or pending jobs. They can't run until you start the AJS monitor. The number next to the active jobs link indicates there are jobs actively running, so you bravely choose that link. From the list of active jobs displayed (see Figure 4), you find the job that Corey has identified and select it.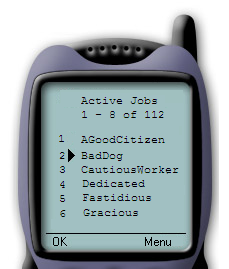
Figure 4: From the Active Jobs list, select the job you need to examine.
When you select this active job, you see several options displayed that look interesting to you--but first things first. You need to prevent the rogue job from slowing down the system. You choose the option to hold the active job (Figure 5). What is interesting about holding an active job is that it is still considered an active job; if you were working with active jobs on the green-screen, this job would be on the list of active jobs with a status of held. While it is still active, it is effectively not using any of the CPU. With that taken care of, you can feel confident the system should return to its normal zippy self. 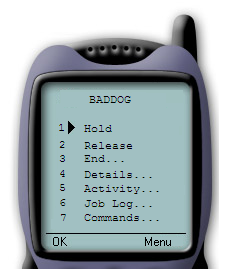
Figure 5: Use the hold option to prevent the rogue job from monopolizing system resources.
Now though, you want to know what that rogue job was doing on your system. You see an option to view the commands associated with the job. You step though each command in the job and discover a series of obscure program calls--nothing terribly helpful to you. It would be nice if the commands were a little more obvious about what was going on, but they aren't. A lesser administrator might give up at this point and deal with the problem when he returns to the office. But not you. You decide to dig a little deeper.
The other option that immediately catches your eye for the job you're working on looks promising. You choose the option to view the job log. Stepping through the messages one at a time can be tedious, but as you make your way through the list, you realize that there have definitely been some problems. The fact that it's a scheduled job makes you wonder if the job has ever run successfully. It would be nice to find that out before you get too much further into this. Fortunately, AJS for Wireless can deliver. You back out of the job you're on to the main Work with AJS panel that you saw when you signed in to AJS for Wireless by selecting Home from the menu. You've now seen that the Jobs link gives you access to jobs that are scheduled to run (pending), held, and running (active). The Activity link gives you access to those AJS jobs that have already run. When you choose this link (Figure 6), you find options to look at all AJS activity, AJS activity that has ended normally, AJS activity that has ended abnormally, and AJS activity that is still active. You choose the option to view normally ended AJS jobs. 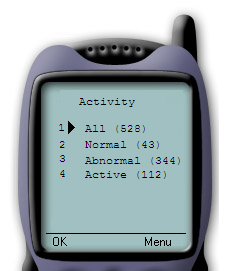
Figure 6: From the Activity panel, choose Normal to view jobs that have ended normally. From the Normal Activity panel, use the menu option to access the Normal Activity filter.
You see that there are a lot of normally ended job with various names. You could scroll through the list searching for the job, but instead you decide to use the Normal Activity filter. From the list of normally ended jobs, you use the menu link to show navigation options. You choose Filter. You are taken to the Normal Activity Filter panel (Figure 7), where you choose Job to filter on job names. You're prompted to enter the name of the job you wish to filter on. When you navigate back to the Normal Activity, you notice that all of the extraneous jobs have been filtered out of the list. You only see each run of the job you're interested in that has ended normally. The activity is listed in descending date order by default, so you select the top entry. There are two options you can select: Details and Commands. As you've already examined the commands associated with the job, you click on Details. The information displayed shows that the job last ended normally yesterday at noon.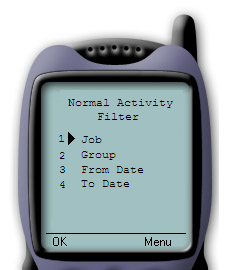
Figure 7: Use filtering to aid in finding the jobs you're interested in.
The final bit of information you're curious about is how many times the rogue job has failed between noon yesterday and now. You back out to the Activity panel and notice the large number of abnormally ended jobs. You click on the Abnormal activity link and then use the Abnormal Activity Filter to see only the jobs you're interested in. You notice that the panel indicates it is showing jobs 1 to 8 of 270 (Figure 8). The job has abnormally ended 270 times. You scroll to the bottom of the list and check the details of the earliest abnormally ended job. It failed shortly after noon yesterday. You then select the top two jobs and check their details. It looks like the job runs about every five minutes. It's probably a good thing you're taking care of this problem now. 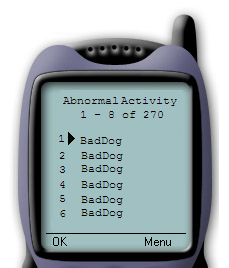
Figure 8: Examine some of the abnormally ended jobs.
At this point, you make a command decision. You order another malt beverage. You then decide to begin the cleanup process. The active rogue job that you held moments before can be ended. From all the previous runs, you can safely assume it will not complete successfully this time, either. Ending it now is an act of mercy. You navigate to the active job and choose the End option. Because the job was running about every five minutes, if the AJS Monitor were active, you'd have about five minutes to put a stop to the next run of the rogue job. But when you stopped the monitor, you stopped all status updates to AJS. For example, the job you ended still appears in the list of active AJS jobs because the AJS Monitor was not listening to notice the job ended. At this point, you go ahead and restart the AJS Monitor. You immediately navigate to the list of pending jobs and place a hold on the rogue job. This will ensure that the scheduled jobs that should be running can resume with their next scheduled run, but the rogue is kept safely corralled until its problems can be diagnosed.
One final activity remains for you before you return to your sandy activities. You need to alert the owner of the rogue job that you ended his scheduled job and that he needs to fix it before releasing it to run again. You can also turn to AJS for Wireless for this task. From the Work with AJS panel, you choose the Send Message option. You are prompted to identify the user and write a short message (about 100 characters). You compose a friendly note that conveys your deepest respects but makes it clear that the offender needs to make sure the problem does not happen again. After you send the message, you lean back and take it easy...it's your day off, after all!
Jeff Waldbillig is a staff software engineer at IBM Rochester. He has held positions as a technical writer and host programmer, and he is currently writing GUI software for iSeries Navigator. He can be reached by email at This email address is being protected from spambots. You need JavaScript enabled to view it..


LATEST COMMENTS
MC Press Online