In order to make a "trigger happy" database, let's explore a few more complex scenarios.
By Rafael Victória-Pereira
Creating simple triggers was covered in Introducing Database Triggers, and the introduction to complex trigger scenarios was presented in Exploring More Complex Trigger Scenarios. Let's cover a few more scenarios and review what you've learned.
Editor's Note: This article is excerpted from chapter 9 of SQL for IBM i: A Database Modernization Guide, by Rafael Victória-Pereira.
Using Triggers to Compose and Fill Columns
This time the request for help didn’t come from the Dean’s office, for a change. The manager of one of the university’s Web applications (who happens to be the Dean’s niece) asked for our help in preventing “that awful content” from being displayed by the application she manages. After a quick chat, we figured out that those “N/A” default values that we assigned to certain text columns were the cause of her discomfort. We could simply alter the default values and be done with it, but let’s take this opportunity to do something else with triggers: we’re going to compose and fill a column if, and only if, certain conditions are met. This is not a case of “change a column whenever the record is updated.” It’s a bit more refined than that, but still simple enough to follow and reproduce in similar (and potentially more complex) scenarios you will find in your own applications.
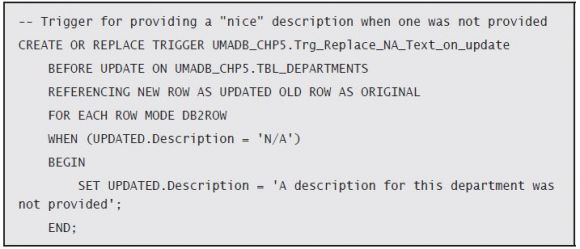
Let’s start with something simple: the Departments table contains one of those “N/A” filled columns: the department description. Earlier in this chapter, you saw how to condition the activation of a trigger, so the code for this trigger should be fairly easy to understand:
While the declaration of the trigger and the rest of the “header” should be familiar by now, the body (the line between the BEGIN and END statements) might confuse you, because you’re looking at a change of a column’s value. Don’t worry: there’s no INSERT or UPDATE action following it. That’s because the INSERT/UPDATE is not necessary. Note that the trigger is activated before the update takes place. This means that any changes made to the table’s columns values will be made final when the trigger ends and the actual UPDATE operation is performed. That’s why there’s a SET statement in the body of the trigger, but no UPDATE statement following it.
However, if this was all you could do, it wouldn’t be very useful! In a real-life scenario, you might want to use more complex values—computed or composed using other columns’ values, for instance.
Let’s see how that works with a trigger that replaces the “N/A” of the Courses table’s Description column with some nicely composed text: “A <department name> department course, managed by <Teacher Rank> <Teacher Name>.” This trigger is a bit longer and complex, but it follows the same basic principles as the previous one. The difference is that there are some parts of the description that come from other tables. I’ll show you how that translates to code in a moment, but first, let’s look at the trigger’s header part:
It’s very similar to the previous one. Actually, the only change is the table name, which went from TBL_Departments to TBL_Courses. The next part is the body of the trigger, where all the real action takes place. It starts with the declaration of the variables, which will temporarily hold the names of the department, rank, and teacher:
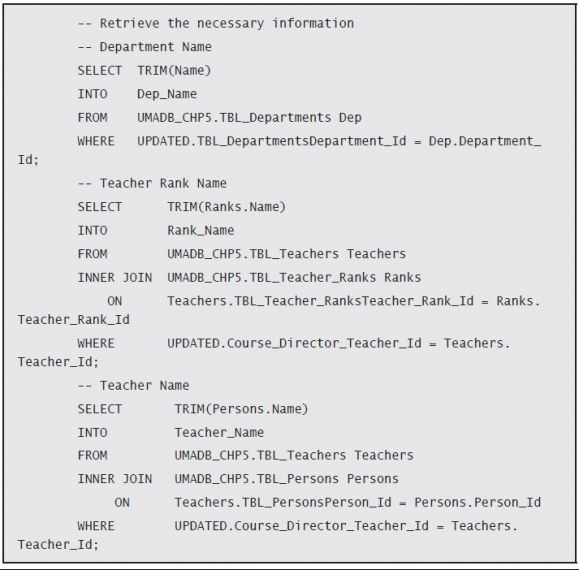
Then comes the code to fill each of these variables with the necessary information, based on the Course Director and Course Department ID columns:
Here, I’m using SELECT ... INTO statements to fill the variables with the appropriate information. I could store the teacher rank and name in the same variable, but I chose not to overcomplicate the SELECT statements.
The next step is to fill in the new description, just like I did in the previous example. The difference is this time around I’m going to compose the new value using the variables above:
This code is available in the chapter’s downloadable source code, along with working examples of both this and the previous triggers in action. Even though I didn’t show it, you can also perform the same type of changes on numeric columns. You can use all of SQL’s power, including UDFs, to compute or compose a column’s new value.
Using what I presented in this section, you should be able to create your own column- value–changing triggers. If you need additional practice, find all the columns with the “N/A” default value and build triggers to change them appropriately!
Using INSTEAD OF Triggers to Supercharge Views
Views are a great way to hide the database complexity from the user, because they offer a much simpler structure. With a view, you can gather information from as many tables as you’d like and display them as if they all belonged to the same table. But so far, that’s the only thing you can do with views: display information.
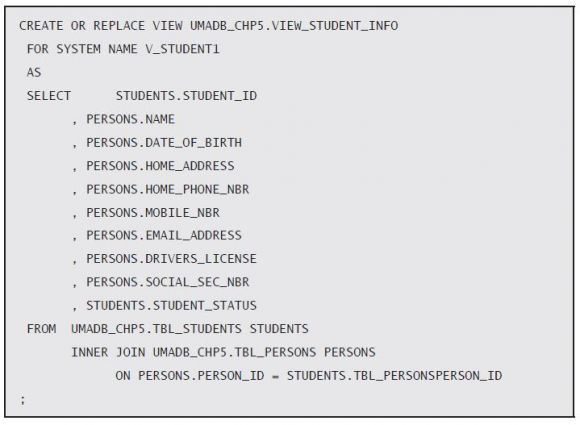
However, you can use INSTEAD OF triggers to supercharge your views, or, in other words, allow the users to use those views to insert, update, or delete records in the underlying tables. Back in Chapter 5, I created a view named Student Information View. In case you don’t remember, here is its source code:
This view takes information from the Students and Persons tables and displays it to the user, as if all belonged to the same table. Let’s start by creating a trigger that allows the user to update most of the information from the view. I say most because the majority of the columns in this view are from the Persons table. The only two that are not are the student’s ID and status. An INSTEAD OF trigger can only be created over a view, and you need to specify the operation that activates the trigger.
Let’s look at the source code of the trigger that will enable the UPDATE operation over this view, piece by piece, as usual, starting with the “header” part:
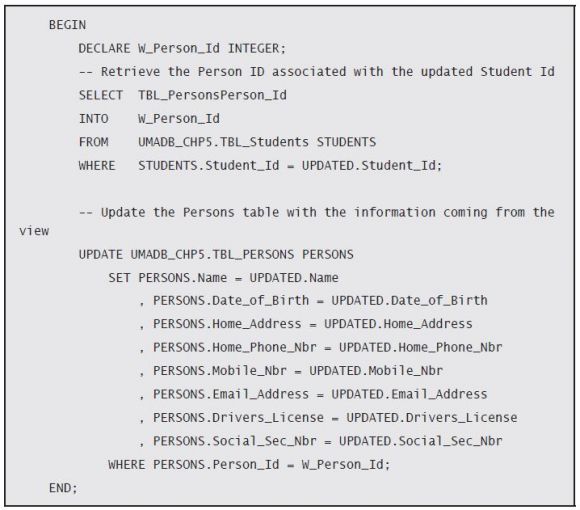
Apart from the INSTEAD OF UPDATE ON UMADB_CHP5.VIEW_STUDENT_INFO part, it looks pretty standard. The important thing to understand here is that this line tells the database engine to execute the code in the body of the trigger instead of (hence the name of the trigger type) failing the statement and returning an error, which would be the case in a view without such a trigger. In this particular case, what I want is that the columns from the Persons table receive the values specified in an UPDATE statement over the View_ Student_Info view. For that to happen, the body of my trigger has to “tell” the database engine what to do. In this case, it must map the view columns to the respective Persons table columns in an UPDATE statement, which here is rather simple, because the columns have the same names, as you can see in the body of the trigger:
However, there is a small intermediate step: finding the right Person ID. This is necessary because the view doesn’t have the Person ID, which means that I have to get it from somewhere. In this case, I’ll use the Person ID from the Students table (Tbl_ PersonsPerson_Id). I’ll store it in a temporary variable named W_Person_Id, which I’ll then use in the UPDATE statement. Also note that the UPDATE statement is simply mapping the view columns (prefixed UPDATED.) to the respective Persons table columns (prefixed PERSONS.).
In summary, what’s happening here is that I’m telling the database engine that when someone tries to update a view (which is not possible under normal circumstances), it should update a table instead. More specifically, I’m telling the database engine that an UPDATE statement issued over the View_Student_Info view actually updates the TBL_ Persons table, using the UPDATE statement in the trigger’s body section.
Let’s try it! Say I want to change the name of the student with the ID equal to 1 from “Dalton, Joe” to “Dalton, Jack”. With this trigger in place, I can use the student information view to do that:
The database engine will note that I’m trying to update a view, so it will check for INSTEAD OF triggers for this operation. It will find our newly created TRG_Update_ View_Student_Info trigger, which will take over and issue an UPDATE over the Persons table instead. For the end user, this is totally transparent. It’s yet another way to hide complexity—and you can use it for INSERT and DELETE statements as well.
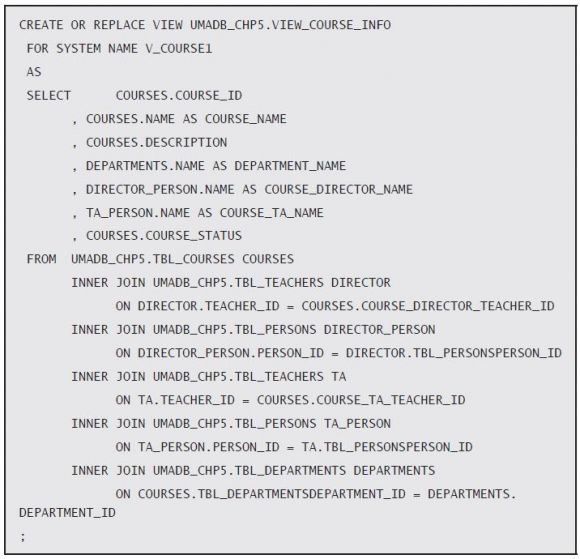
Now let’s see a slightly more complex example. Chapter 5’s code also included another view: Course Information. This is a more complete and complex view, spanning four tables (whereas the Teachers and Persons table are used twice), showing a lot of course-related information that is not actually part of the Courses table. Here’s the view’s source code:
Note that to display both the course director and teaching assistant’s names, the SELECT statement uses the Persons and Teachers tables with different aliases. This is an important detail to consider when building the trigger, which will allow us to update that view. In the end, I want to be able to update the Courses table’s Name and Description columns, or the Department’s Name column, or the Teacher and TA’s Name columns, stored in the Courses, Departments, and Persons tables, respectively.
Given that we’re talking about quite a few tables here, it’s a good idea to devise a mechanism that limits the updates to the bare minimum. In other words, it’s a good idea to issue an UPDATE statement if the value of the respective table was actually changed. For instance, it doesn’t make sense to execute an UPDATE statement over the Departments table if the department name wasn’t changed. It’s also important to mention that even though the Course ID is a column of the view, it doesn’t make much sense to change it, because it’s an ID column, generated automatically by the database engine.
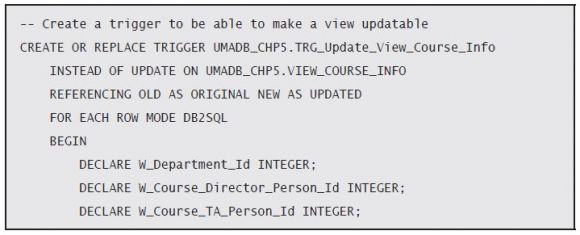
Having said that, let’s start dissecting the code! Because the header part is very similar to the previous trigger’s, I’ll show it with the first part of the trigger’s body:
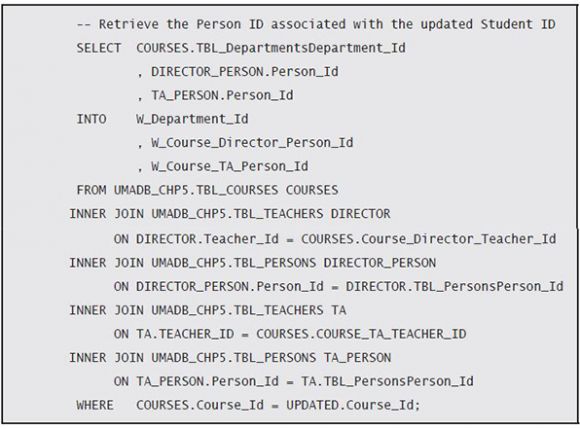
This piece of code is nearly the same as the previous trigger’s (I actually copy-pasted it and did some changes). The main difference is that there are three temporary variables instead of just one. This is because of the tables that the trigger will have to update. Let’s see how each of these variables is set:
It’s a long statement, but it’s not very complicated. Still, let’s review it in detail. The main table is the Courses table, which I’m accessing using the Course_Id column from the view to get the data that will let me connect to the other tables. Once I have the appropriate Courses record, I can use its TBL_DepartmentsDepartment_Id to get the link to the Departments table and store that value in the W_Department_Id temporary variable. That’s the easy part.
The course director and teaching assistant (TA) names are a bit more complicated, because the Courses record only stores the respective teacher IDs. However, the names of the teachers are not stored in the Teachers table, but in the Persons table, so I need to access the respective record from the Persons table. How? Via the TBL_PersonsPerson_Id of the Teachers table. The tricky part is that I need to do this twice: for the course director and the teaching assistant. That’s why I’m using the Teachers and Persons tables twice, with different aliases (DIRECTOR and DIRECTOR_PERSON for the Course Director, and TA and TA_PERSON for the Teaching Assistant). This will allow me to store the respective person IDs in the W_Course_Director_Person_Id and W_Course_TA_Person_Id temporary variables.
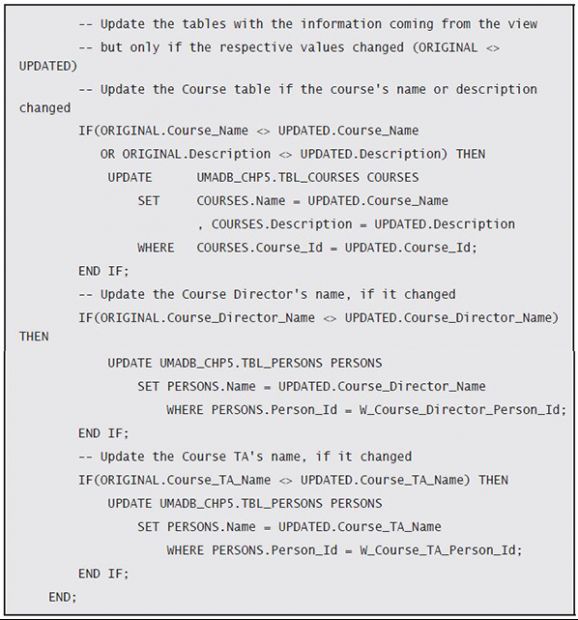
If you look at the previous trigger, you’ll see that the next step is to perform the update. However, this situation is a bit more complex, because I have more than one table, and I want to limit the updates to the bare minimum. To do that, I’ll check if the column’s value was actually changed, by comparing the before and after values for the respective column. If they are different, I’ll issue the respective UPDATE statement. Let’s see how that translates to code, using the Department Name:
As you see in this piece of code, the before and after values are stored in the ORIGINAL and UPDATED records, respectively. Checking whether the department name was changed is a simple thing to do, with this statement:
If this comparison returns true, then I issue my UPDATE statement, just like I did in the previous trigger. The rest of the code is simply a rehash of this idea, with the necessary adjustments to make it work for the rest of the columns:
Here you see how and where those temporary variables are used: they serve the sole purpose of finding the right record to update in the respective tables. Keep in mind that this is not a real-life example, because I’m updating columns from other tables without performing any checks. That sort of validation will be discussed in the next chapter. For now, I just wanted to show you a more complex example of an INSTEAD OF trigger with multiple updates, performed selectively.
Use Triggers with Care
Because this last trigger probably left your head spinning, I won’t hammer you with more code. Instead, I want to share a few notions about triggers that you must always remember when creating or changing existing triggers.
Triggers Are Like Salt
Triggers are like salt or any other condiment: if you use just enough it helps, but adding too much will ruin everything. This is particularly true in two different aspects: performance and control. From a performance perspective, you have to keep in mind that a trigger is another piece of code that will be executed whenever the operation that activated runs. For instance, inserting 1,000 rows in a table with a trigger with a for each row definition will cause the execution of that trigger 1,000 times! Even worse, this trigger’s actions can affect other tables, which in turn may have triggers of their own, causing “trigger storms” or “trigger cascades.”
This brings us to the aspect of control. Triggers are not always obvious, and most people tend to look for problems in applications or “regular” SQL routines (read: SPs and UDFs) when something is not working as it should. Triggers can be stealthy, so it’s important to have them well documented in terms of functionality and scope. My advice is that you keep your triggers’ source code along with the other SQL routines’ sources, preferably in a QSQLSRC file in your sources library, or whichever version of it you use.
The cascading triggers also make debugging a bit more difficult, because they might change column values in unexpected ways or, even worse, prevent modifications without warning. They can also lead to unexpectedly locked objects or, in a nightmarish scenario, unexplainable deadlocks. Keeping strict control over your triggers and, most importantly, defining a (company/shop-wide) proper and strict trigger usage policy is of paramount importance.
However, don’t get me wrong: I’m not suggesting that you shouldn’t use triggers. I’m just saying that you should use just enough of them—like salt.
In these articles, you’ve learned ...
I don’t know how many times I wrote the word “trigger,” but it sure was a lot. I couldn’t have done it any other way, because triggers were the focus of this chapter. Let’s review what was discussed:
- I explained what triggers are and why you should use
- I explained the anatomy of a trigger, detailing each
- I presented a handful of “regular” trigger examples, as well as trigger usage scenarios (data validation, auditing, and automated composition/filling of information).
- Then I explained the INSTEAD OF trigger philosophy and how to use these special triggers to make views updatable.
- Finally, I presented a few reasons you should be careful with the use of triggers.
As a final note, let me add that there’s a lot more to know about triggers. I barely scratched the surface. The idea was to introduce this tool without overwhelming you with all the technical details. You can consider this the minimum working knowledge you need to use triggers. However, if you really want to use them on a large scale, consider reading more about this topic. IBM has a great Redbook covering this and other SQL- related topics: Stored Procedures, Triggers, and Functions in DB2. Look it up: it’s very informative!








LATEST COMMENTS
MC Press Online