The next piece of the LAMP stack is the Apache Web Server.
In the first article of this series, I implied I didn't know much about Apache. To be precise, I said I can barely speak Apache. That may have been a bit of a misstatement; I've done a fair amount of work with Apache over the years. But it's been a long time since I did any serious Apache configuration, so a lot of it is as new to me as it may be to you. But once again, we're rescued by the glorious YouTube videos from Catherine Gaughan-Smith.
In this case, we'll follow along with video number two in the Ubuntu series. As I did with the first video, I'll follow much of what Catherine did, but because of my unique requirements, I'll diverge a little from her path. When I do, I'll make sure to let you know what I did and why.
Timeline of Part 2
Part 2 of 4 is a little more involved, with about a dozen different steps. The first 30 seconds are a recap of part 1. The next 90 seconds are used to create a user group. While Catherine uses the built-in SSH terminal in her Mac, we’re instead going to use the Eclipse PDT we installed in the second article in this series. The next 30 seconds use the SSH terminal to show the new group, followed by a minute of changing the permissions for the primary HTML folder. Step 4 installs some additional guest software. We may not need all of it, but since I’m not sure what I need and what I don’t, I just install it all. Time to reboot!
The next section starts with nearly two minutes (ending about 7:15 of the video) devoted to setting up the vboxshare folder, which Catherine uses to share things between her virtual machine and her desktop. Since we’re using PDT, we have direct access to the files on our virtual machine and don’t need to use this shared folder, so you can ignore that entirely. Catherine then creates a simple index.html page in the shared folder, which she will eventually copy into the HTML folder. As it turns out, Ubuntu already has a very nice default index.html page, and we’re going to use that as a test before we edit it for ourselves. Because of that, we can ignore all the way up to 8:30 in the video.
The next three minutes focus on cloning the default configuration file and modifying the clone. I diverge from the video in a couple of key areas, and I’ll detail those differences later. Some of the most important changes have to do with the fact that I’m using a static IP address and not using port forwarding (this actually simplifies a number of things). The last 30 seconds of this section shows how to disable the default site and enable the new site. At this point, I’ll show you how to bring up the default Ubuntu welcome page in your browser, which presumes that you’ve configured Apache correctly.
In the last section, Catherine copies her index.html into the HTML folder, but we’re instead going to save the existing index.html and then modify it. Her video shows you the custom index page and also uses the server status directive that we configured earlier in the process (around step 7) to show the status of our newly created server. The section ends by installing a few additional packages, and we’re done!
Configuring Ubuntu Using Eclipse PDT
As I’ve said before, you can just follow the videos exactly as Catherine has posted them and you’ll have a working virtual machine. It will be a port-forwarded machine (which means you’ll have to map ports for all of your applications), but it will work perfectly adequately. On the other hand, if you want to follow my lead with statically configured machines, you’ll need to do a few things slightly differently, and this next part of the article will show you where those differences lie.
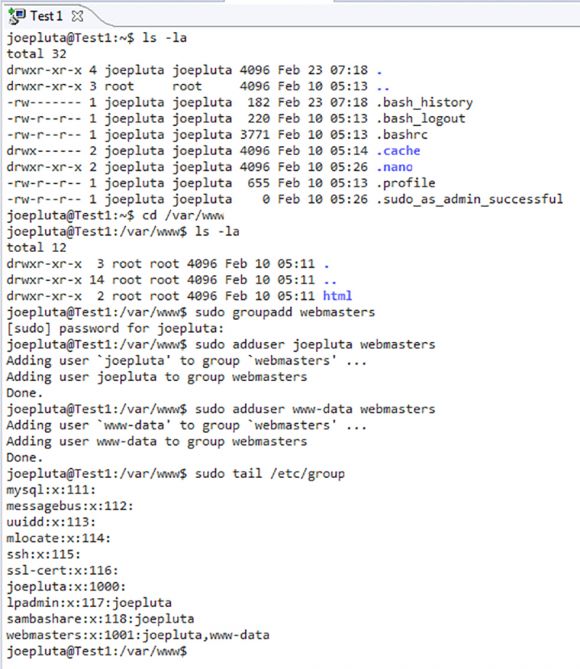
And the differences start immediately, because the first thing we need to do is create a user group. User groups in Linux are similar to user groups on the IBM i, allowing us to assign permissions and authorities to groups of users simultaneously. Catherine uses the command line from her SSH terminal to do this, but if you recall from the previous article, we're going to use the Eclipse PDT to access our Ubuntu VM. So, at right about the 30 second mark of the video, Catherine mentions that she's accessing via her SSH terminal. You should instead have started your Eclipse PDT and opened a terminal the way we did in the previous article. Other than this different access method, though, you can then continue to follow along. Let me show you a screenshot of what my terminal looks like after executing the first command from the video.
Figure 1: The terminal from PDT provides easy-to-use access to your Ubuntu VM.
Now that you're successfully entering commands, you can follow along with the tutorial until about the 05:30 mark. At this point, Catherine spends a lot of time working on the shared folder. With this technique, you create a folder on your host and share it so that the virtual machine also thinks it's a local folder. This is a relatively simple way to allow a developer to use host tools to update files for the virtual machine. Catherine creates a new index.html file in the shared folder so she can use her desktop tools to edit the file. She does this because she can't directly use her tools on the virtual machine files. Since we use Eclipse PDT, we can access any files on the host (with a very few exceptions), so you can ignore all of this all the way to about the 08:30 mark.
Create the Virtual Machine
Starting at 08:30, the tutorial walks you through the steps to create a new web server. Follow along, except that anywhere you see the word "techbox," instead substitute in your selected server name. Since I called my server Test1, I'll use that instead. You'll copy the default configuration and edit it. The big difference here is that since you need elevated privileges to edit the file, you can't just edit it using the standard PDT editor. Instead, you have to do it from a command line inside the virtual machine. You can use the VirtualBox screen (which we haven't used since the very first article), or you can use the terminal from PDT. The problem is that PDT doesn't work well with Catherine's editor of choice (nano), so instead you'll need to use vi. The vi editor is not at all intuitive for people who don't come from a UNIX background. You can find various tutorials on the Internet; click here or here for text tutorials, and here for a Youtube tutorial. Remember, you'll only need to do this when you're modifying the various Ubuntu configuration files, something you don't need to do that often. When you're editing normal content, you'll use PDT and you'll love it.
While you're following along with Catherine, you can skip the part where she adds the port 8080 listener (at 09:45), but other than that, follow along right up until the 11:00 mark. At this point, Catherine uses a syntax that I don't think works anymore; it's sort of a hybrid between an older syntax and a newer one. I had to change the definitions slightly in order to get the server to work correctly. Here are the changes:
<Location /server-status>
SetHandler server-status
Order allow,deny
Allow from all
Require all granted
</Location>
Listing 1: These are the directives from the tutorial.
<Location /server-status>
SetHandler server-status
Require all granted
</Location>
Listing 2: Deleting the Order and Allow directives makes the server work properly.
After saving the configuration, Catherine edits a file to allow the server to listen on port 8080. Because we're using a static configuration, you can ignore that part entirely, all the way up to 11:35.
Next, the tutorial shows you how to disable the current site and enable the new site. Do that exactly as shown (except, of course, using your selected configuration file name). Then, at 12:05, Catherine copies the file she created in the shared folder into the web server's working folder. You don't have a shared folder (on purpose!), so skip ahead to 12:30 where she restarts the server. Trust me, there's a method to my madness.
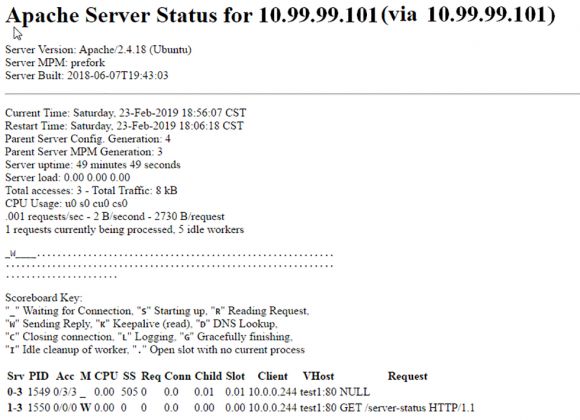
Follow along to the 13:20 mark, where Catherine opens a browser and types in the link to the automatically generated server status page. Since I never configured a name in my hosts file, I just use the IP address and I also don't specify port 8080, since I'm not mapping the port. If you're doing the same thing, you'll enter an address similar to this:
http://10.99.99.101/server-status
If everything we've done works as planned, you'll see something like this:
Figure 2: The server status page from Apache2 looks like this.
That's the server status page. At time mark 13:50, she brings up the index page by simply typing in the server name. Again, I use the IP address directly and I don't use port 8080, I use the default port, so my address is simpler:
http://10.99.99.101
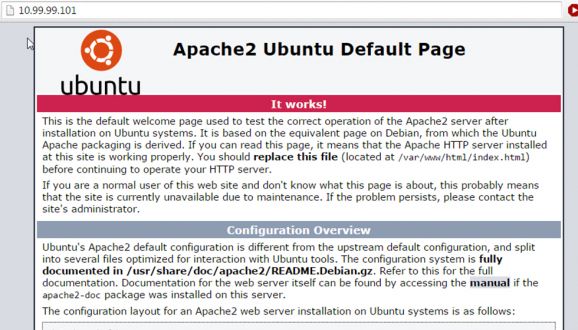
And technically I don't even need the http:// part; the browser is usually smart enough to assume that. Remember, though, that I didn't overwrite my index.html file the way the tutorial did. So instead of the simple page from the tutorial, I see the default Ubuntu index page:
Figure 3: This is the default Ubuntu welcome page for Apache2.
I think this is pretty spiffy.
Now let's do the last piece of the puzzle, which is to edit that file for ourselves. We can actually make a web page that looks exactly like what the tutorial has, but we can use Eclipse's editor to do it.
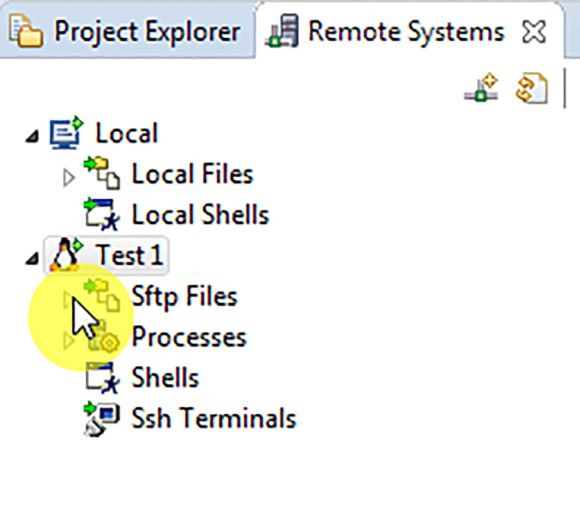
Figure 4: Open up the Sftp Files by clicking on the arrow.
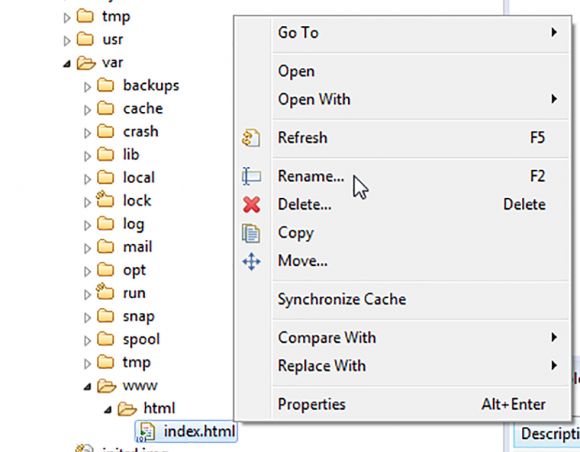
First, we use the Remote Systems view to drill into the virtual machine. You will be directly accessing the files on the host, so use secure FTP (or SFTP). As long as the file doesn't require elevated permissions, you'll be able to do this. Open the folder, expand the Root subfolder, and then continue to drill into /, then var, then www, then finally html. Here you'll see the current index.html, which you'll rename.
Figure 5: Rename the index.html file.
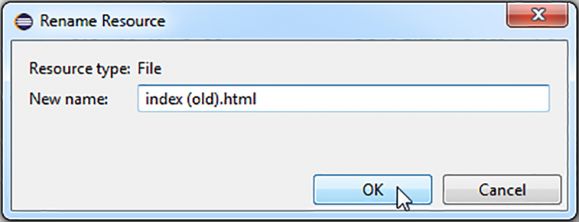
Figure 6: Call it index (old).html.
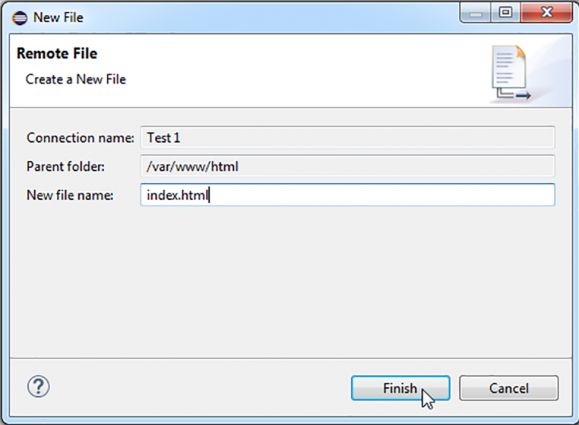
Now you can right-click on the html folder and select option New > File. Fill in the name index.html.
Figure 7: Create a new, empty index.html file.
Double-click on that file to bring it up in the HTML editor, and now you can create your new page. Type in the source Catherine used for her index.html page:
<!DOCTYPE html>
<html>
<head lang="en">
<meta charset="UTF-8">
<title>Test 1</title>
</head>
<body>
<h1>Welcome to my LAMP server</h1>
</body>
</html>
Listing 3: This is the very basic index.html page, with just the server name changed.
Refresh your browser, and you'll see this:
Figure 8: The new, simple index.html page!
Isn't that great? At this point, in a relatively short time, you've managed to create a virtual machine, install Ubuntu, install Eclipse PDT to communicate with the new VM, configure the Apache2 web server, and create web content. That's pretty impressive!
Coming Up
Now that you've done all this, the fun is just starting. Next, we'll configure SQL and PHP, and finally we'll get our web server talking to the IBM i. But just as importantly, we'll get the IBM i to query data from the Linux machine. This is starting to get very interesting!



LATEST COMMENTS
MC Press Online