Eclipse provides many pre-configured IDEs, and PDT is perfect for managing Linux.
This is the second in an ongoing series of articles meant to help you create a virtual Linux environment right on your desktop or laptop. As I noted in the first article in the series, I built this series on a set of fantastic video tutorials by Catherine Gaughan-Smith (aka CGS), which can all be found here: Part 1, Part 2, Part 3, and Part 4. This article, though, is a complete departure from that curriculum. CGS uses ssh from her Mac desktop to access the virtual machine, but I’m going to show you how to use Eclipse—and more specifically, the Eclipse PHP Development Tools (PDT)—to access your shiny new virtual machine.
Eclipse, the Best Tool You Should Already Know
If you know me, you know I’m a long-time advocate of the Rational Developer tools from IBM. I’ve evangelized for them since their original incarnation as WebSphere Development Studio Client (WDSC), one of the clunkier IBM names (and considering it’s IBM, that’s saying a lot!). And if you’ve been able to take my advice and join the overwhelming majority of the IBM i developer community, you’re currently working with RDi, and because of that, you’re already familiar with the Eclipse environment. With that in mind, I decided that rather than use the command line to modify my new virtual machine, I’d instead use the available Eclipse tooling for PHP.
I need something that will allow me to securely access and modify the files in my virtual machine, while providing advanced PHP and HTML editing support. As it turns out, Eclipse provides almost exactly the package I need. I say “almost” because in order to get the perfect environment, I have to do a little customization, but the Eclipse community has made it very painless. So without further ado, let’s get started, shall we?
Two Steps Are All You Need
Only two steps are required to install a fully functional PDT environment that can manage your virtual Ubuntu machine (or whatever Linux variant you decide to install). First, install the PDT itself to provide complete PHP and HTML tooling, and second, add the Remote System Explorer to access your virtual machine.
Downloading the PDT can’t be any easier. Just go to the Eclipse PDT page and select the version that matches your development environment. Most of us are on a 64-bit version of Windows, but files exist for OS X and Linux as well. If you’re using Windows, you’ll get a zip file. Simply extract that zip file to an appropriate location on your machine. I like to keep all my Eclipse version together, so I’ll extract it into the folder /eclipse/PDT. This is the only part that could be a little tricky; the zip file that comes down has as its base folder a folder named “eclipse.”
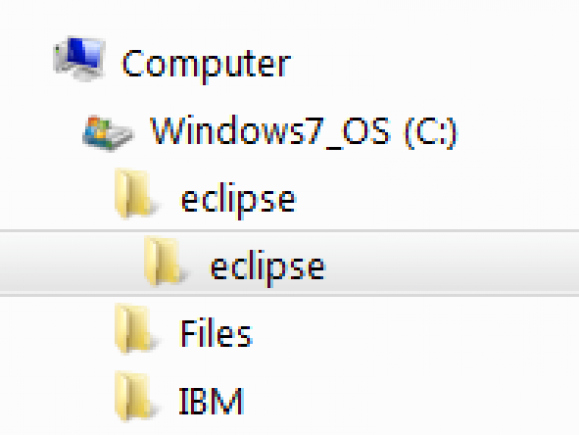
Here’s how I do it. First, I create a folder named eclipse on my hard drive, extract the downloaded zip file into a subfolder also named eclipse. It looks like this:
Figure 1: Extract the contents of the ZIP file into a folder named eclipse.
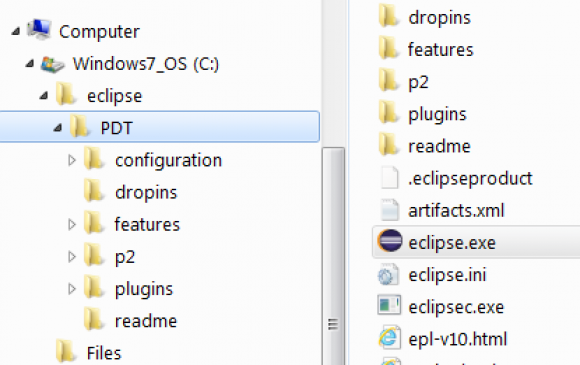
Now I rename that that subfolder to PDT, and then I launch eclipse.exe from there. It may seem a little convoluted, but I think you’ll appreciate it when in a couple of months you decide to download a different Eclipse-based IDE, such as a Groovy editor or some Agile development tools.
Figure 2: Rename the eclipse subfolder to PDT, and then launch eclipse.exe from that subfolder.
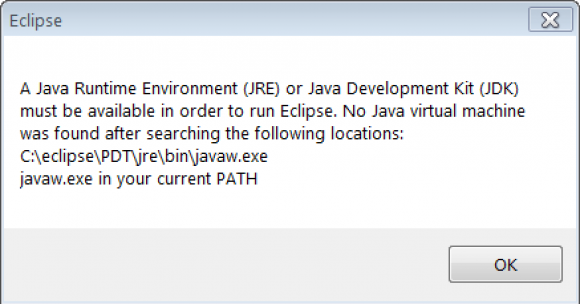
OK, assuming you’ve got your PC set up like mine, it’s time for step two. But you may run into a little problem first. When you start PDT, you may get a message like this:
Figure 3: If you see this message, you don’t have a default JRE installed.
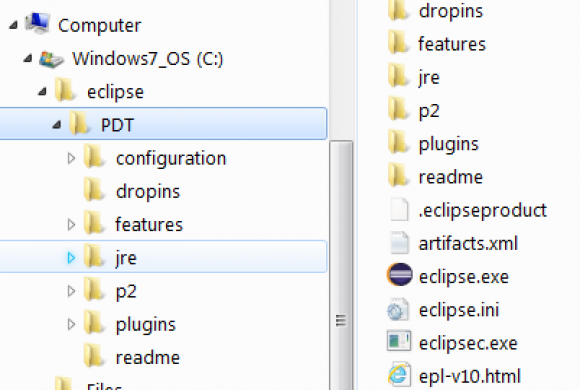
This message appears if you don’t have Java installed and configured. The worst-case scenario here is that you’ll need to go to the Internet and grab a JRE, which is outside the scope of this article, but not to worry; there are lots of tutorials. But you may have a shortcut. All Eclipse-based tools use Java, and that includes RDi. If you’re running RDi, you already have a JRE. You can fix your missing Java issue pretty easily: find the folder where you installed RDi and drill down into the jdk folder. There you’ll find a subfolder named jre. Simply copy that entire folder (and its subfolders) right underneath the folder where you installed the PDT. Now your directory looks like this:
Figure 4: The PDT looks like this with a jre folder added.
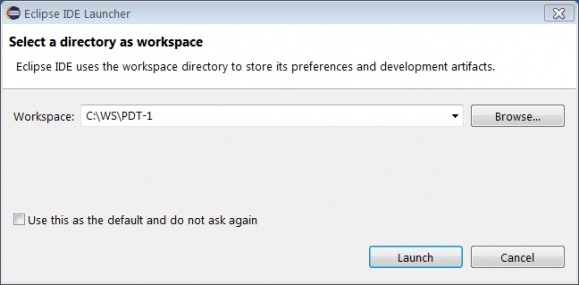
The second step is to add the Remote System Explorer view. This is also a simple process, especially with the Eclipse Marketplace. Start the PDT and point it to a new workspace. I have a folder named WS in my root directory, which I then use to create individual workspaces for my work. If you’d like to do the same, just create folder WS in your root and then enter the following when the initial workspace prompt comes up:
Figure 5: I like to create all my workspaces under a folder named WS, as shown here.
In Figure 5, you’ll see that I’m creating a workspace directory named PDT-1 under the root folder WS. Hit Launch and the normal Eclipse Welcome screen comes up. At this point, I’d say that if you’re completely unfamiliar with Eclipse, this would be a good time to take advantage of the many tutorials available. Even if you are an Eclipse aficionado, you may want to take a look at the many PHP-specific topics. Anyway, now that PDT is up, it’s time to get the Remote System Explorer so we can talk to our virtual machine (or really any other server in the shop!).
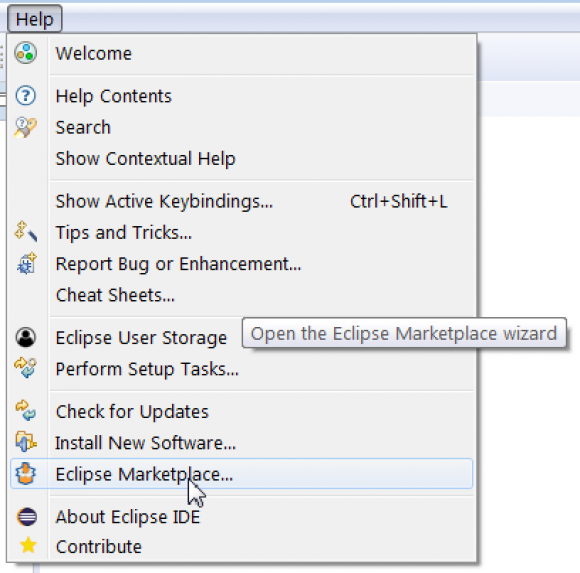
Access the Eclipse Marketplace from the Help menu as shown in Figure 6.
Figure 6: Getting new components starts with the Eclipse Marketplace.
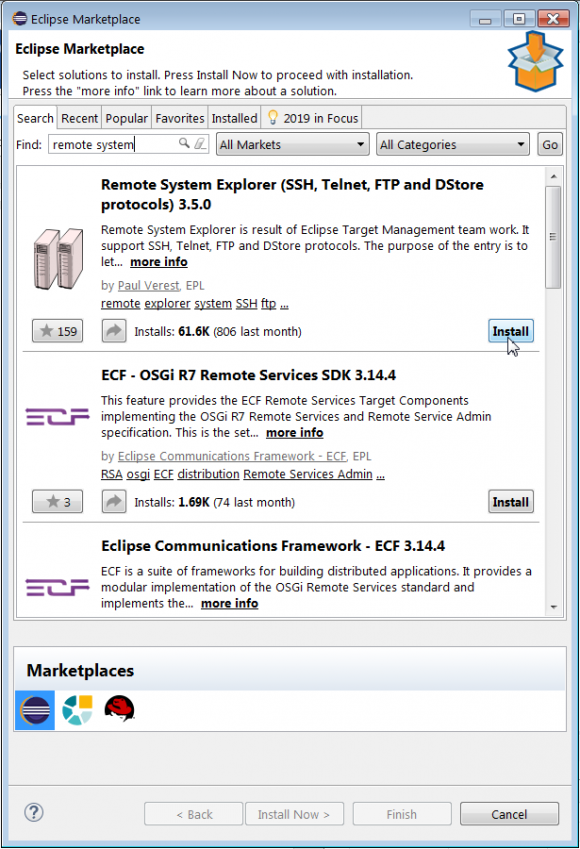
Figure 7: Search for Remote System and then click Install to add it to your workspace.
Enter the phrase “remote system” in the search box at the top of the dialog and click the magnifying glass to search. After a few moments, you’ll see a list and Remote System Explorer should be at the top. Click on the Install button. You’ll see a progress bar, and eventually you’ll be asked to agree to a license. Finally, after the download and install, you’ll be asked to restart Eclipse; after the restart, the Remote System Explorer will be available!
Using Remote Systems View to Attach to Your Virtual Machine
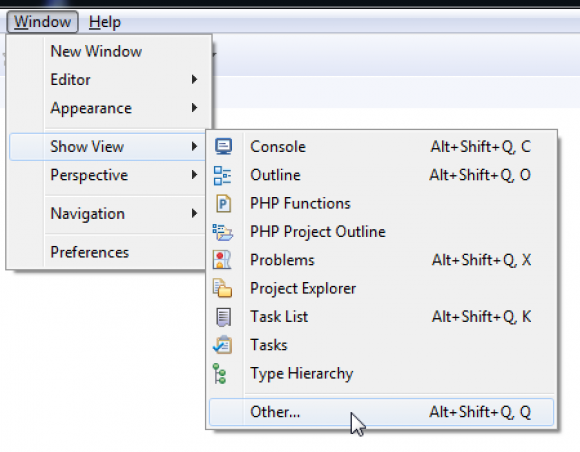
Before you can connect to your virtual machine, you need to add the Remote Systems view to your workbench. This takes just a couple of steps.
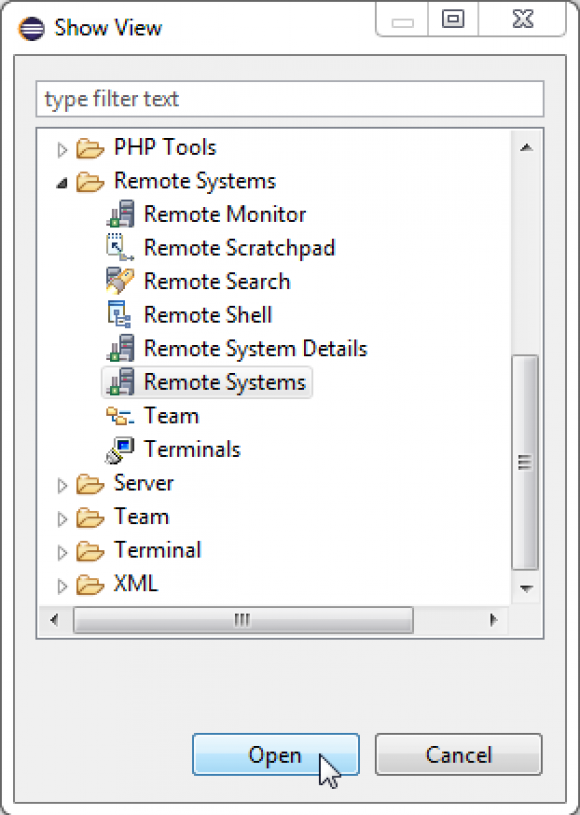
Figure 8: Use the menu Window > Show View > Other… to bring up the Show View dialog.
Figure 9: Then open the Remote Systems view.
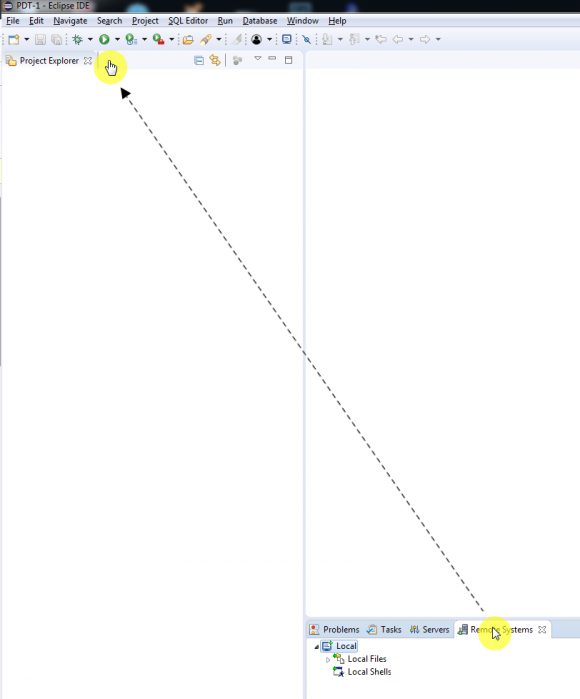
The Remote Systems View appears by default in the lower part of the IDE. If you're familiar with Eclipse, you know that you can drag views around wherever you need them. I recommend dragging the view over on top of the Project Explorer so that you have more vertical room for the view. This becomes especially important if you're working with multiple VMs as I plan to do. Just drag the view as shown in Figure 10.
Figure 10: Drag the Remote Systems view from the lower part of the IDE to the vertical panel on the left.
Now it's time to access your machine. You need to add a connection to your new machine (remember, it's Test 1 at address 10.99.99.101, although you could make it whatever you'd like). Click on the New Connection icon and take two more simple steps.
Figure 11: Click on the New Connection icon.
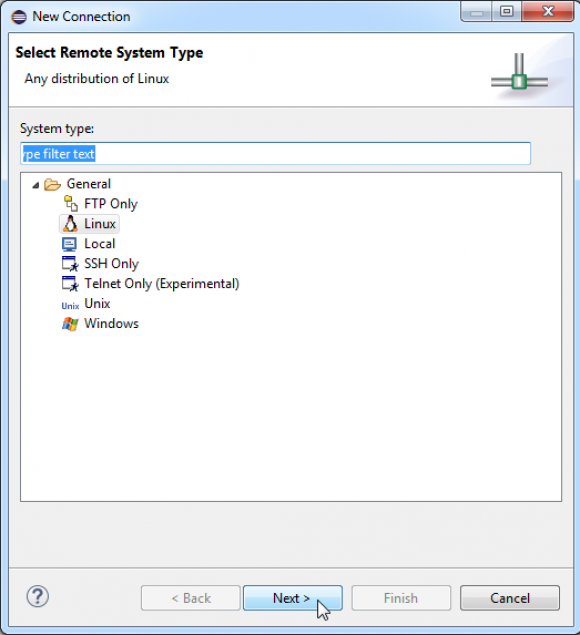
Figure 12: Select Linux and hit Next.
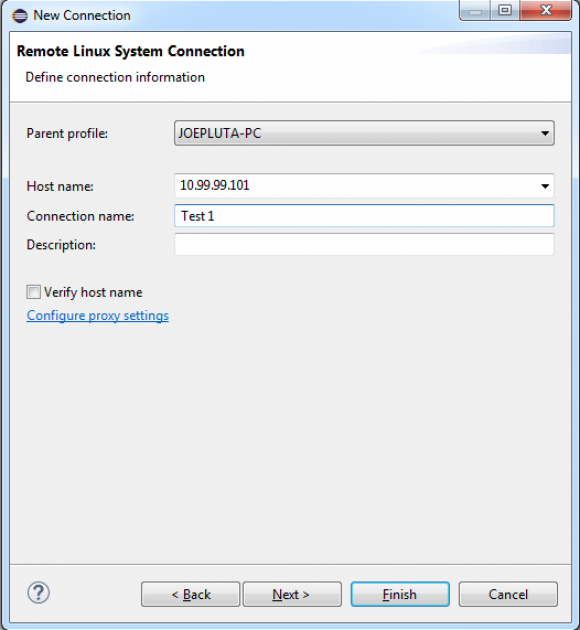
Figure 13: Enter the IP address and host name of the virtual machine and hit Finish.
Figure 13 shows where you enter the IP address and host name of your virtual machine. If you want, you can add an entry to your hosts table on your host machine to give your machine a DNS name, but I'm just as happy using the IP address. Once you hit Finish, the connection will be defined and you'll be almost there. Please note that because I used a static IP and didn't do any port forwarding, the next step is very straightforward. If you did use port forwarding, you’d have to do a little more custom configuration to get the connection to work. But let's finish up. Your final step is to launch a terminal. If you're able to do that, then you'll be able to do everything else needed in later articles.
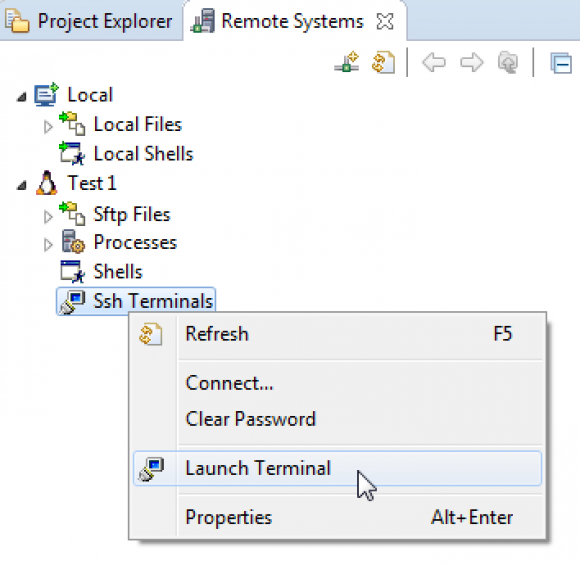
Figure 14: Right-click on the Ssh Terminals option and select Launch Terminal.
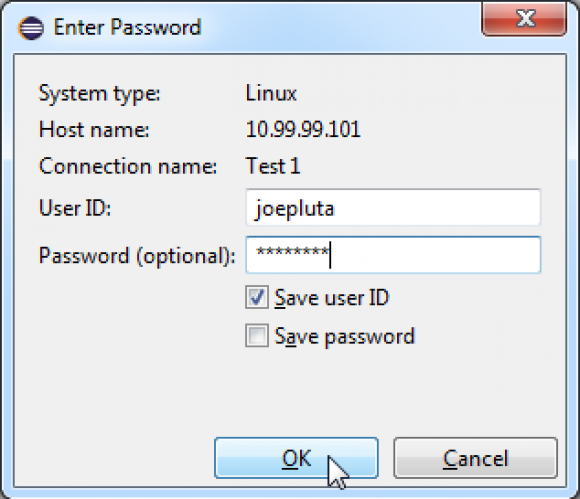
Figure 15: Enter the user name and password you selected when initially configuring your Ubuntu VM.
Figure 16: The first time you connect, you'll be asked to verify the authenticity of the host. Just hit Yes.
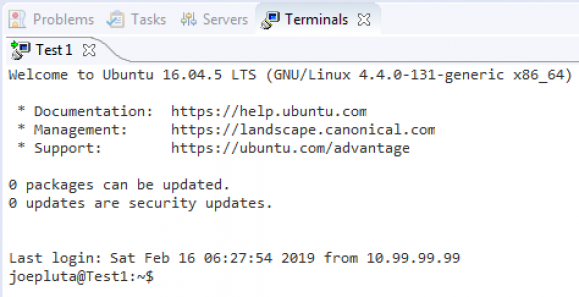
You want to launch a terminal. Use the IDE to do so, and enter the user ID and password that you set up when you first created your Ubuntu virtual machine. Since this will be an SSH connection and this is the first time you've tried to connect to this machine, you'll be challenged to ensure that you're communicating with the machine you think you're communicating with. This challenge happens only once. And if you've done everything correctly, you'll see something like this:
Figure 17: You have successfully logged into your machine, and you are ready to start entering commands!
This is the end point for today. Later, we'll use this terminal and also the Sftp Files option under the connection itself (see Figure 13) to access and work with your Ubuntu virtual machine. But for now, you have full access to your machine, so have fun until next time!




LATEST COMMENTS
MC Press Online